(Optional) Relativity Integration
This document provides step-by-step instructions to integrate Reveal AI 2.x into your Relativity workspace.
a. Prerequisites
Reveal AI 2.x works with Relativity Versions 9.3 and higher.
b. Install and Configure NexLP Relativity Application
Import NexLP Relativity Application to the target Relativity workspace.
The rap files are located in the 05.ADS_Package folder.
Use Nexlp_RelativityIntegration_2.80.0.9.rap.
The Application will add a “NexLP” menu to the workspace.
Go to “NexLP” menu, click Setup.
Click “New NexLPSetup” to create a new NexLPSetup object.
In the NexLPSetup object layout, enter the following parameters. The following table lists fields and their purposes:
Name | Details | Example |
|---|---|---|
StoryEngineURL | The login URL used by NexLP API. If you are using a load balancer use the load balancer URL. NOTE: If you did not use the default naming for the StoryEngineWebAPi application in IIS you will want to use the updated name. | /nexlp/StoryEngineWebAPI In case loading balancer is used: /LoadBalancerURL/StoryEngineWebAPI |
RsapiURL | Optional, for setting RSAPI on a different web server | http://relativity.abc.com/ Relativity.Services, or enter [RELATIVITY] if you want to use the default RsapiURL |
SecurityKey | Security key for the corresponding Story Book | 8a5c6a87-ad69-4f27-ab50-37ab393b3e16 |
RsapiCertFindValue | Optional, the certificate find value used for RSAPI | WEB02 |
DefaultEntityId | Optional, the starting entity id. If not set, Reveal AI will always open “Top 5 Custodian” search when user logs in | 12345 |
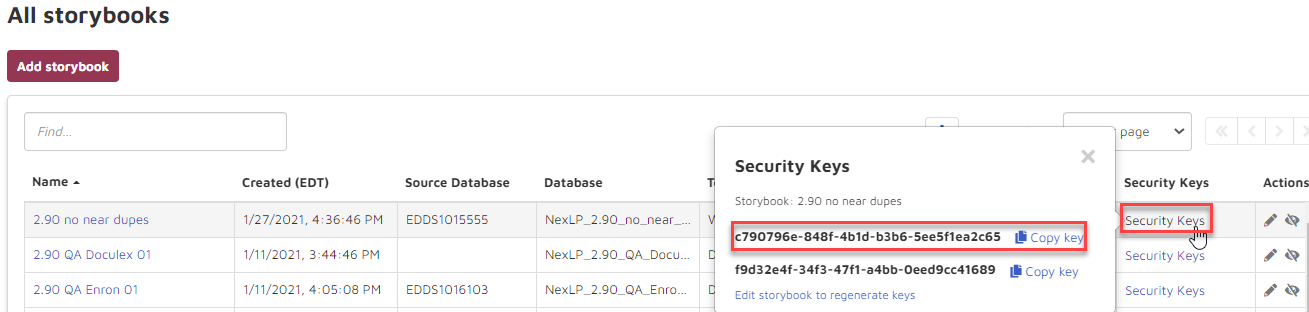
Where is my Security Key:
On the Front-End:
Logon as an Admin to the Reveal AI Standalone.
In the top-right corner of the screen click Admin” >> “System Administration.
On the left-hand navigation make Sure All Storybooks is selected.
For the storybook whose Security Key you would like to see select “Security Key” on the far right column of the storybook table.
You will now need to Create a New NexLP Setup. Notice only StoryEngineURL and SecurityKey are mandatory for setup.
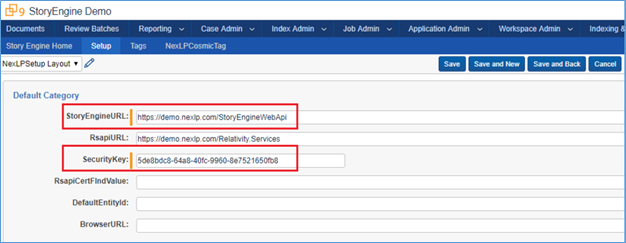
Click Save to save the NexLPSetup Object created above.
c. Relativity Smoke Test
To test the connection between Relativity and Reveal AI, login to the Relativity Workspace and go to “NexLP/Reveal AI Home”. This will automatically log the user into Reveal AI’s workbook.
d. Set Up Group Permissions for NexLP
The permissions of Reveal AI are integrated within Relativity. Following the steps below to give the target group permission to access Reveal AI:
For Relativity 9, open Workspace Security management page, go to “Object Security” and select the Relativity group you want to set up. Scroll down to find “NexLP Setup” and “NexLP Tag” objects:
Allow the group to view the “NexLP Setup” object.
Allow the group to view/add/edit/delete “NexLP Tag” object.

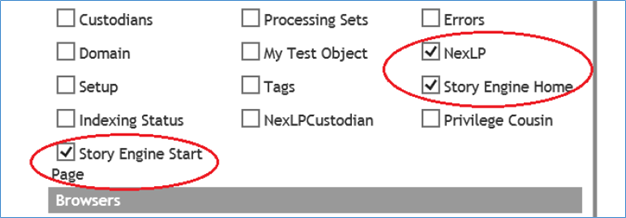
Go to “Tab Visibility”, select the Relativity group you want to give access to, and give the group permission to access “NexLP”, “Story Engine Home” and “Story Engine Start Page[1]”:

Note
[1] The “Story Engine Start Page” is a customized link and can be added manually after installing ADS package.
e. Uninstall NexLP Relativity Application
To uninstall NexLP Relativity Application, delete the “NexLP” application from the Relativity Application management interface.