Prepare SQL Server
Before installing Reveal AI the following script must be run to install SQL Server Full-Text and Semantic Extraction:
SELECT
CASE
WHEN
FULLTEXTSERVICEPROPERTY('IsFullTextInstalled') = 1
THEN 'FULL TEXT INDEX INSTALLED'
ELSE 'FULL TEXT INDEX NOT INSTALLED'
END IsFullTextInstalled
Unzip all files in the “01.NewInstall” folder from the Installation Packages to a local folder (for example, C:\NexLP) on the target SQL server. Open Microsoft SQL Management Studio to begin:
In the 01.NewInstall Folder open the 001.DeployNexlpSystemDatabases.sql file
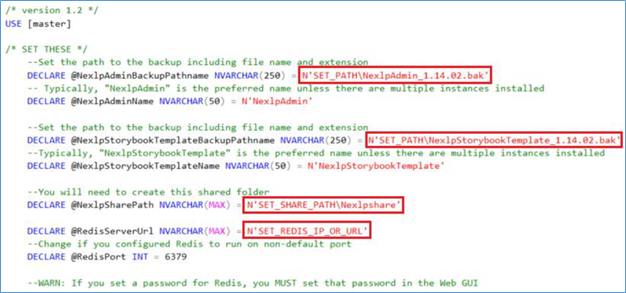
The following script will assist you in installing the Reveal AI Admin and Storybooktemplate databases as well as updating a few other configuration settings needed to get Reveal AI up and running. Before you run this please configure the following components:
Variable
Description
@NexlpAdminBackupPathname
Set the path to the backup including file name and extension
Example: N'C:\NexLP\2.90.xx\01.NewInstall\NexlpAdmin_1.14.02.bak'
@NexlpAdminName
Typically, "NexlpAdmin" is the preferred name unless there are multiple instances installed
@NexlpStorybookTemplateBackupPathname
Set the path to the backup including file name and extension
Example: N'C:\NexLP\2.90.xx\01.NewInstall\NexlpStorybookTemplate_1.14.02.bak'
@NexlpStorybookTemplateName
Typically, "NexlpStorybookTemplate" is the preferred name unless there are multiple instances installed
@NexlpSharePath
NEXLP_SHARE: the folder where you want to put the application files, including Story Books, Vector files, etc.
We require using a network share in a multiple server deployment that must be accessible from all Reveal AI servers (e.g.: SQL, Web, AI, Processing)
The following accounts will need full access to the NexLP share folder:
NexLP Service Account
NexLP Admin Account
SQL Server Service Account
@RedisServerUrl
Find the IP address of the caching server, insert the following script into the Admin database to reflect the actual Url of the caching server (by default it is “127.0.0.1”)
@RedisPort
Change if you configured Redis to run on non-default port
Important
If you set a password for Redis, you MUST set that password in the Web GUI. See Install Reveal AI 2.0 Web Server in this installation guide.
Once you have made the updates to the above variables run this script.
/* version 1.2 */
USE [master]
/* SET THESE */
--Set the path to the backup including filename and extension
DECLARE @NexlpAdminBackupPathname NVARCHAR(250) = N’SET_PATH\NexlpAdmin_1.14.02.bak’
--Typically, “NexlpAdmin” is the preferred name unless there are multiple instances installed
DECLARE @NexlpAdminName NVARCHAR(50) = N’NexlpAdmin’
--Set the path to the backup including filename and extension
DECLARE @NexlpStorybookTemplateBackupPathname NVARCHAR(250) = N’SET_PATH\NexlpStorybookTemplate_1.14.02.bak’
--Typically, “NexlpStorybookTemplate” is the preferred name unless there are multiple instances installed
DECLARE @NexlpStorybookTemplateName NVARCHAR(50) = N’NexlpStorybookTemplate’
--You will need to create this shared folder
DECLARE @NexlpSharePath NVARCHAR(MAX) = N’SET_SHARE_PATH\Nexlpshare’
DECLARE @RedisServerUrl NVARCHAR(MAX) = N’SET_REDIS_IP_OR_URL’
--Change if you configured Redis to run on non-default port
DECLARE @RedisPort INT = 6379
--WARN: If you set a password for Redis, you MUST set that password in the Web GUI.
 |
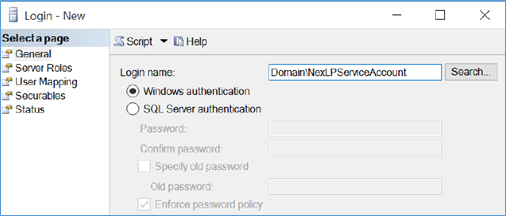
Create a dedicated domain user, such as Domain\NexLPServiceAccount. Add a new Windows authentication login for Domain\NexLPServiceAccount in the SQL Server:
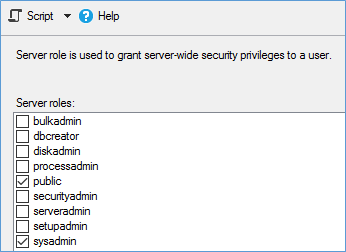
In Server Roles, give the following permission to Domain\NexLPServiceAccount login:
Important
This user MUST be a sysadmin.
 |
In User mapping, add the restored NexLPAdmin databse to Domain\NexLPServiceAccount user, map it to “nexlp” schema, with “db_datareader”, “db_datawriter”, “db_ddladmin” and “public” database roles membership:
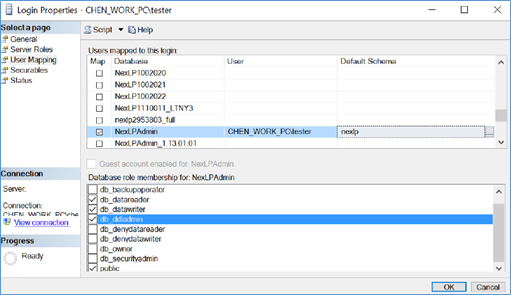
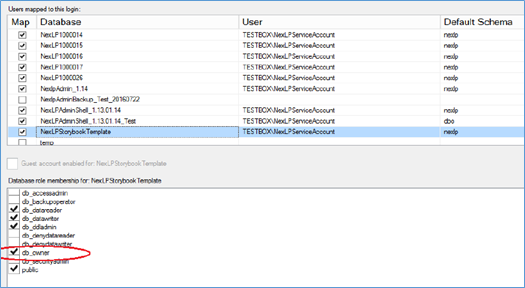
Add the restored NexLPStorybookTemplate databse to Domain\NexLPServiceAccount user, map it to “nexlp” schema, with “db_datareader”, “db_datawriter”, “db_ddladmin”, “db_owner” and “public” database roles membership:
Important
Notice the “db_owner” permission above needs to be checked.
Please see Appendix (Troubleshooting) - SQL Connection Issues for guidance on addressing SQL connectivity errors.