Install Reveal AI Service
The AI (artificial intelligence) service provides COSMIC, Alerts, Language Modeling, Job Scheduling and Vector creation services.
Note
External software is no longer included in release packages to align with Reveal best practices.
Follow the steps below to install Reveal AI AI Service:
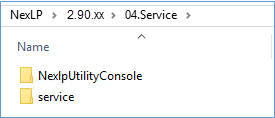
Copy all files from 04.Service folder to a local folder on AI Server, for example, “C:\nexlp”:

Browse to folder “2.90.xx\04.Service\service\ServiceTemplateProduction\NexlpServiceAi_2.90.xx”:

Open config_this_service.bat file, update the highlighted sections below:
REM Location of the Reveal AI root folder for which the service will need read/write access
REM This folder will contain a subfolder for logs among other things
REM Do not end in a slash, no quotes
SET C_NEXLP_ROOT_PATH=c:\nexlp
REM The account the service will run under
REM If local account, you can use .\[username], otherwise use [domain]\[username]
SET C_SERVER_SERVICE_USER=.\NexlpServiceAccount
REM Don't leave your real password here in plain text after installing the service
REM It is preferred to set this through the Windows Services window after installation; the service won't start without a valid password
REM Be sure to read the README file. It is better to set the password through the Windows Services app because of permissions
SET C_SERVER_SERVICE_PASSWORD=PASSWORD_HERE_TEMPORARILY
REM Java max memory value. 10000m=10GB, 40000m=40GB
SET C_JAVA_MAX_MEMORY=12000m
REM based on server size. Typically server memory * 0.8
SET C_NEXLP_ROOT_PATH =
Create the following folder path in the folder specified by “C_NEXLP_ROOT_PATH” parameter above: Logs\Service.
For example, if the “C_NEXLP_ROOT_PATH” is “C:\nexlp”, create the following folder paths: “C:\NexLP\Logs\Service”:

SET C_SERVER_SERVICE_USER = (Optional) You do not have to configure this option here, but this will be the account that will run the AI Service
SET C_JAVA_MAX_MEMORY = This will be the Maximum amount of memory given to the AI Service. We recommend that you do not use 100% of the available memory on the server to set this value.
Open configService.xml file, update the highlighted sections below (this should be the same root path as the SET C_NEXLP_ROOT_PATH setting above):
…
<nexlpAdminServerName>localhost</nexlpAdminServerName> <nexlpAdminDatabaseName>NexlpAdmin</nexlpAdminDatabaseName> <serviceLogRootFolder>C:\nexlp</serviceLogRootFolder>
Go to NexlpUtilityConsole folder (under C:\NexLP\2.90.xx\04.Service)
Open “NexLPUtilityConsole.exe.config”.
Update the <connectionStrings> section:
<connectionStrings>
<add name="NexLPAdmin" connectionString="Server=localhost;Database=NexLPAdmin;Integrated Security=SSPI;Connection Timeout=120" providerName="System.Data.SqlClient" />
</connectionStrings>
Open a command line window in Admin mode, browse to “C:\NexLP\2.90.xx\04.Service\service\ServiceTemplateProduction\NexlpServiceAi_2.90.00.xxxx” folder, run the following commands:

C:\NexLP\2.90.xx\04.service\Service\ServiceTemplateProduction\NexlpServiceAi_2.12\install_this_service.bat
Open Windows Services, find NexlpServiceAi_2.90.xx service:

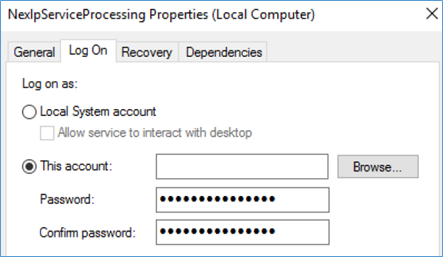
Right click the service and open Properties page.
Click “Log On” tab.
Make sure to enter the correct password for the service account.
Click OK to save any changes.
Start the service.

Tip
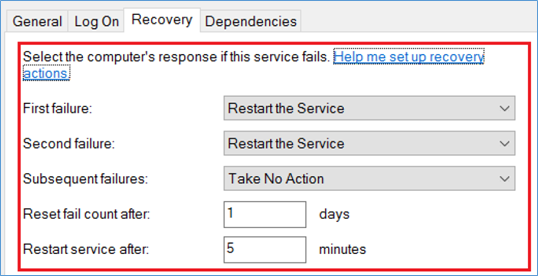
On the Recovery tab of the service you can set the First, Second and Subsequent Failures to ‘Restart the Service’. With this setting should the machine be reset or the service get turned off the service will look to start itself back up automatically.

Start the service and confirm that the AI Service is Running.
