Mapping Import Fields
Once your project has been created, you must map the fields in your load file to those in the project in order to import documents.
This may be done by allowing Reveal to match imported to internal fields, or by manually specifying or adjusting links in the Import Mapping screen of Project Setup. Once specified, mapping are saved for future use.
Connecting to Your Load File and Mapping Fields
Once the Project's Fields are configured, from the Project Setup pen select Import Mapping to see the list of fields in the project database referenced by the choice in Select Case.
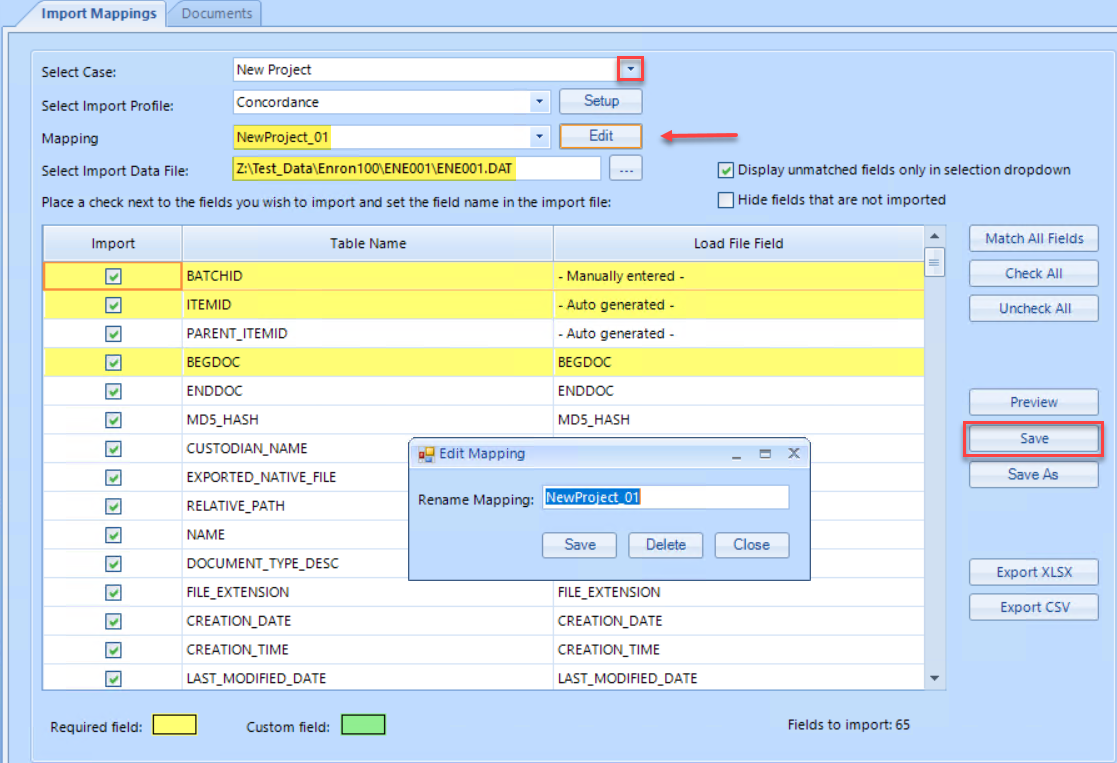
Select Import Profile is selected to specify the delimiter set used in the load file; Concordance is the default.
Mapping selects a named mapping profile if already defined; if not yet defined, go on with the specification and Save the Mapping Name.
Select Import Data File is where you browse out to select the load file to be imported.
There are two checkbox options as you prepare to map the table:
Display unmatched fields only in selection dropdown is checked by default, to limit the choices when manually mapping or editing to fields not yet selected in the table.
Hide fields that are not imported optionally unclutters the table.
Required fields are in yellow. Required fields are: BatchID, ItemID and BEGDOC.
Unmapped fields are indicated with the word --Select-- in the Load File Field name.
To have Reveal Review Manager try to match load file fields automatically, select the Match All Fields button just to the top right of the table. A prompt appears confirming you wish to map the fields automatically.
Load File Field values will appear next to Table Name fields
The matches may or may not be correct - verify everything.
Any unmatched fields from the load file will be available in a dropdown list when you click --Select-- in the Load File Field name for any unmatched Table Name field.

These load file fields can be manually mapped by selecting from the dropdown list for any Table Name field, or may require custom fields to be created for them.
To create a new custom field, you must go back to the Fields Tab.
Uncheck the green checkmarks to deselect any fields that you do not want to import.
Click the Save button to save the field mapping profile and name the profile in a similar manner to match your database. Click the Save As button if you wish to save a different mapping with a new profile name.
Additional options are to Save As Database Template, Export XLSX and Export CSV.
Note
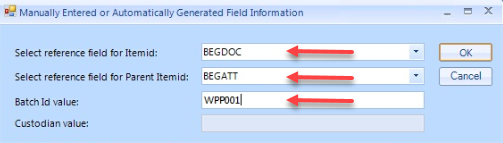
Certain fields may be flagged as <Manually entered> or <Automatically generated> rather than matched or left as --Select--.
Fields such as ItemID and Parent_ItemID will normally be assigned by Reveal using internally sequential record numbers for consistency, referencing BEGDOC and BEGATT (Begin Attach) to signify new item records and item records sharing a parent document. These will be set as <Automatically generated> under Load File Field.
Note
Parent_ItemID is generated by referencing BEGATT and is used to populate document families. BEGATT must be mapped and the BEGATT values must be the family's parent's Begin Number. If BEGATT does not match a Begin Number in the database, the import/overlay will fail.
BatchID is the field that gets populated in Review that’s used as a label to reference the import. The value is typically the volume information received by a producing party (e.g., VOL001). This is <Manually entered> at import rather than mapped from a field in the load file. See also Importing Documents->COMMON ERRORS.
Upon clicking Import Data, a prompt box will pop up:
Note
Data exported to Review from Discovery Manager will populate the BatchID with the name of the export.
You may find that there are fields you need which are not present in the default set of fields, or that an existing field may need to be modified in order to accommodate your needs. See Managing Fields for details.
Once this step is complete, barring the need to configure any custom Text Sets, you are ready to Import Documents.