Install Processing Server
This section will cover the setup and installation of the Reveal AI Processing Server in the form of a Windows Service. To begin copy all files in the 03.Processing folder from the Installation Packages to a local folder (for example, C:\NexLP) on the Analysis Processing Server.
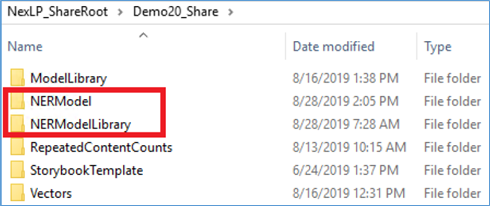
In the installation package Copy the NERModel + NERModelLibrary folders of the 09.Share folder from the installation package and move them to the NexLP_Share location that you created in Prepare SQL Server Item b (please note this is NOT the same share that is created in step c below).

This is what your Nexlp_Share folder should now look like (on a fresh installation you may be missing a few of the other subfolders):
Navigate to NexlpUtilityConsole folder (C:\NexLP\2.90.xx\03.Processing\NexlpUtilityConsole).
Open “NexLPUtilityConsole.exe.config” and update the “<connectionStrings>” section:
<connectionStrings>
<add name="NexLPAdmin" connectionString="Server=localhost;Database=NexLPAdmin;Integrated Security=SSPI;Connection Timeout=120" providerName="System.Data.SqlClient" />
</connectionStrings>
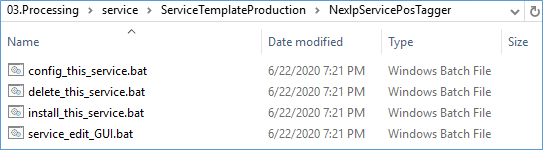
Browse to the NexlpServiceProcessing folder at the following path: 03.Processing\service\ServiceTemplateProduction\NexlpServiceProcessing_2.90.xx
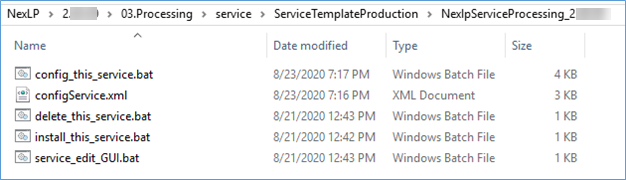
Open config_this_service.bat file, update the highlighted sections below:
REM Location of the Reveal AI root folder for which the service will need read/write access
REM This folder will contain a subfolder for logs among other things
REM Do not end in a slash, no quotes
SET C_NEXLP_ROOT_PATH=\\MachineName\Nexlp
REM The account the service will run under
REM If local account, you can use .\[username], otherwise use [domain]\[username]
SET C_SERVER_SERVICE_USER=.\NexlpServiceAccount
REM Don't leave your real password here in plain text after installing the service
REM It is preferred to set this through the Windows Services window after installation; the service won't start without a valid password
REM Be sure to read the README file. It is better to set the password through the Windows Services app because of permissions
SET C_SERVER_SERVICE_PASSWORD=PASSWORD_HERE_TEMPORARILY
REM Sets the Startup type for the windows service
REM valid values: auto, manual, disabled
SET C_SERVICE_STARTUP_TYPE=auto
REM *** This is typically different for each server
REM Java max memory value in megabytes (MB). 10000=10GB, 40000=40GB
REM Leave blank to use the Java defaults
REM What are the Java defaults? Run this from the command line: java -XX:+PrintFlagsFinal -version | findstr HeapSize
REM Based on server size. Typical amounts:
REM AI = 20000 REM Extraction = 2000 per worker REM Processing = server memory * 0.8
SET C_JAVA_MAX_MEMORY=48000
SET C_NEXLP_ROOT_PATH =
Create the following Local folder path in the folder specified by “C_NEXLP_ROOT_PATH” parameter above: “Logs\Service”. For example, if the “C_NEXLP_ROOT_PATH” is “C:\Nexlp”, create the following folder paths: “C:\NexLP\Logs\Service”.
 |
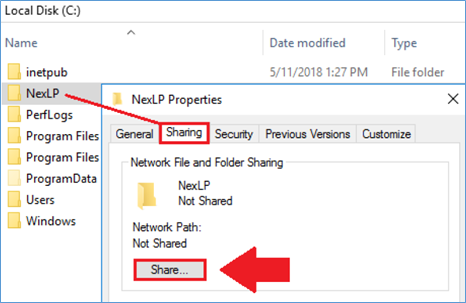
You will now need to make the LOCAL root folder shareable (In the example above the NexLP folder would be the root).
Right-click the C:\Nexlp folder.
Select Properties.
Navigate to the “Sharing” Tab.
Click Share.
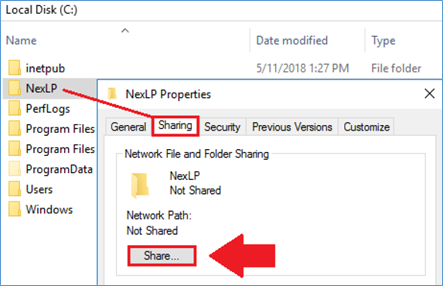
While setting up the sharing permissions make sure that the NexLP Service Account has access to this folder.
Additional users that will need access are
the accounts running the Processing Service (NexLP Service Account Recommended) and
the user account that is running the Reveal AI application pool on IIS (NexLP Service Account recommended, see step f.7.1 below).
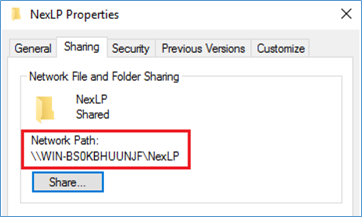
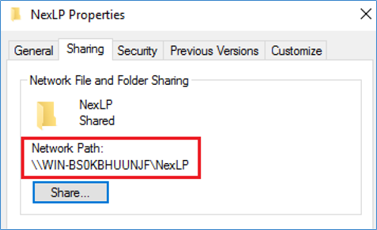
Click “Share”.
Important
If you are setting up multiple processing servers it is strongly recommended to create and share the local root folder on each individual server. Should we need to view any logs related to the processing service they will now all be kept in the same folder. You will not see a performance hit while writing to this shared folder across the network. Use the same permission settings for this folder as set up in the ServiceLogRootFolder(Step f.3) variable.
SET C_SERVER_SERVICE_USER = (Optional)
You do not have to configure this option here, but this will be the account that will run the processing service.
SET_C_JAVA_MAX_MEMORY =
This is where we will set the amount of memory that will be used by the processing service. We recommend that you do not use 100% of the available memory on the processing server to set this value. See chart below Step f.7.2 for example configurations. Once the service has been started and we need to change the amount of memory given to the service we can do it in two places:
If we change the value in the config_this_service.bat file, then we will need to save our changes and run the delete_this_service.bat file and then run the install_this_service.bat file as an Administrator to re-install the service.
Important
The changes will ONLY take effect by re installing the service.
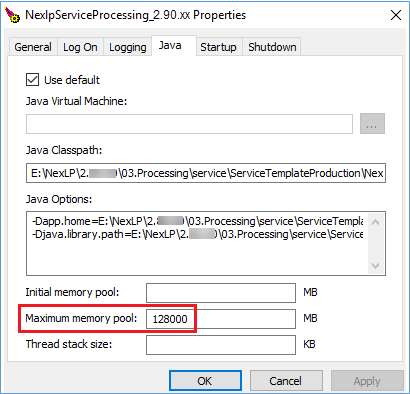
If you open the service_edit_GUI.bat file and navigate to the Java tab you can change the Maximum memory pool. After changing this value, you will need to restart the service for your changes to take effect.
Open configService.xml file, update the highlighted sections below:
<service version="0.8">
<nexlpAdminServerName>localhost</nexlpAdminServerName>
<nexlpAdminDatabaseName>NexlpAdmin</nexlpAdminDatabaseName>
<serviceLogRootFolder>\\MachineName\Nexlp</serviceLogRootFolder>
<userDir>..\..\backend</userDir>
<utilityExeFilePath>..\..\NexLPUtilityConsole\NexLPUtilityConsole.exe</utilityExeFilePath>
</service>
<settings> <numOfThreads>2</numOfThreads>
<clearCacheForWarmup>true</clearCacheForWarmup>
<annotatorResourceRootPathDci>..\..\resources\</annotatorResourceRootPathDci>
<annotatorResourceRootPathOther>..\..\backend\</annotatorResourceRootPathOther>
For this section there are 7 Settings that you need to be aware of:
NexlpAdminServerName = Name of the Reveal AI SQL Server.
NexlpAdminDatabaseName = Name of the NexLP Admin database. (This usually does not change.)
ServiceLogRootFolder = This folder path will be the shared Local root folder of your processing output logs. For this you will need to create a Local folder on your processing server called ‘Storybooks’. Example: C:\NexLP\Storybooks.

You will now need to make the root folder shareable; in the example above the NexLP folder would be the root.
Right-click the C:\Nexlp folder.
Select Properties.
Navigate to the “Sharing” Tab.
Click Share.
While setting up the sharing permissions make sure that the NexLP Service Account has access to this folder.
Additional users that will need access are:
the accounts running the Processing Service (NexLP Service Account Recommended)
the user account that is running the NexLP application pool on IIS (NexLP Service Account recommended, see step f.7.1 below).
Click “Share”.
The file path of the Network Path is what you will need to enter into the .xml file.
The reason that this folder will now need to be shared is with this version you will be able to download processing logs from the front-end, but for the front-end to find those log files this folder will need to be able to access to the web server.
Important
If you are setting up multiple processing servers it is strongly recommended to create and share the local root folder on each individual server. If you use the same share on both servers, you will experience a noticeable performance hit while processing in the event you are writing the processing logs over the network share. Use the same permission settings for this folder as set up in the ServiceLogRootFolder(Step 5.d.3) variable.
Example: if you have the root C:\NexLP on processing server 1 and server 2 make sure the <serviceLogRootFolder> value on each server points to the shared root folder on the local drive.
NumofThreads = This count controls the amount of CPU threads that will be used during the processing. See recommended memory below for advice on configuring this value.
Tip
If you need to edit this value once it has been configured you will need to RESTART your NexLP Processing Service for your changes to take effect.
AnnotatorResourceRootPathDci = There is a ‘resources’ folder in the 03.Processing folder than you will need to enter the path to.
Example path: C:\NexLP\2.90.xx\03.Processing\resources\
AnnotatorResourceRootPathOther = Inside the 03.Processing folder there is a folder called ‘Backend’. Enter the pathway to that folder,
Example Path: C:\NexLP\2.90.xx\03.Processing\backend\
RestrictedStorybookIds = This setting will restrict this service to ONLY be used for the StorybookID’s that get entered in this list. When adding ID’s to this list you will need to add one ID per line (you do not need add any line separator). In my example below with this configuration this service will only run for Storybook ID’s 1000017 & 1000018. Any other case will not use this processing service.
<restrictedStorybookIds>
<storybookId>1000017</storybookId>
<storybookId>1000018</storybookId>
</restrictedStorybookIds>
Tip
When setting up multiple processing servers it is recommended that you have two separate processing servers. It is still possible to do this on this same processing machine but you will need to make sure that you have enough resources to support both services potentially running at the same time.
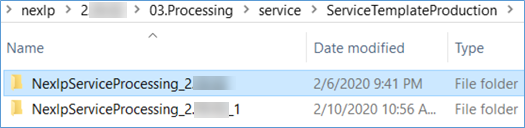
If you are doing this on the same Processing server. In the 03.Processing folder of the installation package make a copy of the NexlpServiceProcessing_2.90.xx folder. In this example NexlpServiceProcessing_2.90.02 will be the first processing service. Name the copy of this folder NexlpServiceProcessing_2.90.02_1 this will act as the second processing service.
For the second processing service (NexlpServiceProcessing_2.90.02_1), once you have your memory settings allocated skip to step d and begin the installation of the second processing service.
Tip
You can also utilize the restrictedStorybookIds setting above for Step 7 in the case where you have one very large processing server (let’s say 256GB) and one smaller one (let’s say 64GB) in the scenario where you have a large data set that needs to be processed and it could take multiple days to complete. That large service could be restricted to the StorybookID for the large case and when that is set the smaller service will still be able to process smaller jobs for other storybooks. It’s important to note that even with multiple processing services you will still ONLY be able to conduct 1 processing job per storybook at a time.
The recommended default memory and thread settings depend on your hardware.
Low Memory Mode | Total Document Count | Machine Free Memory | Java Heap Memory Allocation | Process Thread Count |
|---|---|---|---|---|
Enabled | Less than 5 Million | 32 GB | 28 GB (28000) | 1/2 Thread per core |
Disabled | Less than 5 Million | 64 GB | 58 GB (58000) | 1/2 Thread per core |
Disabled | Greater Than 5 Million | 128 GB | 115 GB (115000) | 1/2 Thread per core |
Java Heap Memory Allocation – We recommend that you use a max of 80% of the available memory on the server to set this value.
Process Thread Count – This number should reflect half of the number of CPU cores that you have available on the CPU of your processing machine. Example: a 16-core machine will have this value set to 8.
Click “Save” to save your settings.
Open a command line window in Admin mode and run the following command:
C:\NexLP\2.90.02\03.Processing\service\ServiceTemplateProduction\NexlpServiceProcessing_2.90>install_this_service.bat

Open Windows Services, find the “NexlpServiceProcessing_2.90.xx” service.

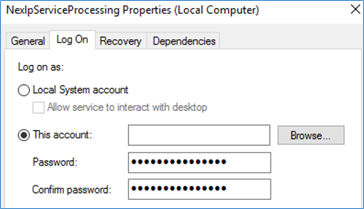
Right click the service, open Properties page. Click “Log On” tab, make sure you enter the correct password for the service account, click OK to save any changes, and then start the service. Log on Using the credentials with your NexLP Service account.
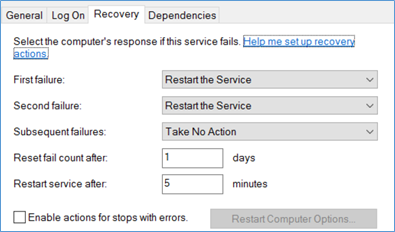
Tip
On the Recovery tab of the service you can set the First, Second and Subsequent Failures to ‘Restart the Service’. With this setting should the machine be reset or the service get turned off the service will look to start itself back up automatically.
 |
Start the Service and Confirm that the Processing Service is Running.

Browse to the NexlpServicePosTagger folder at the following path: 03.Processing\service\ServiceTemplateProduction\NexlpServiceProcessing_2.90.xx.
Open config_this_service.bat file, update the highlighted sections below:
REM Location of the Reveal AI root folder for which the service will need read/write access
REM This folder will contain a subfolder for logs among other things
REM Do not end in a slash, no quotes
SET C_NEXLP_ROOT_PATH=\\MachineName\Nexlp
REM The account the service will run under
REM If local account, you can use .\[username], otherwise use [domain]\[username]
SET C_SERVER_SERVICE_USER=.\NexlpServiceAccount
REM Don't leave your real password here in plain text after installing the service
REM It is preferred to set this through the Windows Services window after installation; the service won't start without a valid password
REM Be sure to read the README file. It is better to set the password through the Windows Services app because of permissions
SET C_SERVER_SERVICE_PASSWORD=PASSWORD_HERE_TEMPORARILY
REM Sets the Startup type for the windows service
REM valid values: auto, manual, disabled
SET C_SERVICE_STARTUP_TYPE=auto
REM Sets the port the api server will run on
SET C_API_PORT=11011
REM *** This is typically different for each server
REM Java max memory value in megabytes (MB). 10000=10GB, 40000=40GB
REM Leave blank to use the Java defaults
REM What are the Java defaults? Run this from the command line: java -XX:+PrintFlagsFinal -version | findstr HeapSize
REM Based on server size. Typical amounts:
REM AI = 20000
REM Extraction = 2000 per worker
REM Processing = server memory * 0.8
SET C_JAVA_MAX_MEMORY=2000
SET C_NEXLP_ROOT_PATH = Use the same shared path that you configured in Step 5.e above.
SET C_SERVER_SERVICE_USER = (Optional) you do not have to configure this option here, but this will be the account that will run the processing service.
SET C_API_PORT = Sets the API port the API server will run on.
SET C_JAVA_MAX_MEMORY = As this is a light running service you should not need to adjust the memory output from its default of 2GB of RAM
Click Save to save your settings.
Open a command line window in Admin mode and run the following command:
C:\NexLP\2.90.02\03.Processing\service\ServiceTemplateProduction\NexlpServicePosTagger>install_this_service.bat
Open Windows Services, find the “NexlpServicePosTagger” service.

Right click the service, open Properties page. Click “Log On” tab, make sure you enter the correct password for the service account, click OK to save any changes, and then start the service. Log on Using the credentials with your NexLP Service account.
Tip
On the Recovery tab of the service you can set the First, Second and Subsequent Failures to ‘Restart the Service’. With this setting should the machine be reset or the service get turned off the service will look to start itself back up automatically.
Start the Service and Confirm that the PosTagger Service is Running.
