Single Sign-On Installation & Integration Guide
Reveal Applications Engineering September 24, 2021 – Updated July 27, 2022
1 Overall Description
Due to the security built into Reveal applications, all users need to be authenticated and all their actions need to be authorized. The main component for user authentication is Keycloak (KC) and all the users' actions are authorized based on their assigned user rights stored in a database server.
KC will store user project association using groups. Other identifiers such as a user’s role in a project remain stored within the relevant App connecting to KC. Essentially, KC is used to allow a user to log in and figure out what projects they are on.
Additionally, all user alteration mechanisms are routed into KC, for example, changing a user's email address or name. Because of this, user alteration mechanisms will have to use a back-end mechanism within the client accessing KC. In other words, an application user will not be able to use their own credentials to call KC’s admin API. Instead, they would issue requests to an application which would then use configured credentials to call KC.
There is a continuous flow of security-related information between the user workstation (browser session), Reveal IIS webserver, Keycloak or Okta, for example, the database server that holds the security information, back to the IIS, to Review, to Processing and back and forth in the opposite direction. If we add to the mix larger deployments, we may have multiple components of the same functionality, making authentication more complex. If during this flow of information anything gets out of sync, user access might be denied.
The general idea is that any application we use that links into KC should be able to perform everything it needs itself. Regular application users should never have to communicate with or log directly into KC.
2 Frequently Asked Questions
Why are you using Keycloak?
We wanted a centralized way to integrate our applications from a project-membership perspective. For example, we wanted users to easily be able to log into Reveal AI projects directly from Review without any additional logging in. Keycloak provides a centralized authentication mechanism, and additionally stores project membership across applications. This allows us to easily have users in Review log directly into their relevant Reveal AI projects.
Will users need to interact with Keycloak?
Normal users do not need to interact with Keycloak directly for administration. All simple user-management functions are handled by our applications, simple meaning things like resetting passwords, resetting MFA, creating users, etc.
Can we integrate our existing SSO?
Yes. Keycloak can add an arbitrary number of identity providers to their authentication scheme.
If we do connect to our existing SSO, how are existing users in Keycloak handled?
Users in Keycloak are uniquely identified by their email address. If you have a user with an email address log in to Keycloak via your SSO and Keycloak has an existing user with that email, the user will be presented with a screen prompting them to link their existing account. If they accept, they will be sent an email with a clickable link to join their existing account to their SSO account.
Do you handle Just-in-Time provisioning?
Yes. New users logging in from your existing SSO for the first time will be prompted with a screen saying they need to contact their administrator to add them to projects. Essentially, they get created in the system with no permissions initially.
What happens to existing users if we link in our SSO?
They still log in as normal directly into Keycloak, or they can log in via your SSO.
How can we troubleshoot login problems with SSO?
For non-IT troubleshooting, what has worked well in the past is to have the user clear their browser cache. Users tend to open multiple windows at the same time and jump from one to another. As a result, sometimes the browser gets confused. As a rule of thumb, if one user has a problem, it is user related; if many users have the same problem, it is server related. All servers record events in log files, so when we investigate we usually look there first in order to get an idea of what the problem is. For more technical analysis, see Section 9.3 Debugging below.
Can we make it such that users are forced to use our SSO?
This should be do-able within Keycloak but has yet to be implemented at Reveal.
Can we make it such that users with specific email address domains are forced to use SSO?
This should be do-able within Keycloak but has yet to be implemented at Reveal.
3 Network Security Documentation
By Source (outbound):
Source | Destination | Port | Reason |
|---|---|---|---|
Review | KC | 443 | Admin functions and authentication. |
Review Manager | KC | 443 | Admin functions |
Review Services | KC | 443 | KC group configuration and user information access |
By Destination (inbound):
Destination | Source | Port | Reason |
|---|---|---|---|
KC | Review Web | 443 | Admin functions and authentication. |
KC | Review Manager | 443 | Admin functions |
KC | Review Services | 443 | KC group configuration and user information access |
Depending on the client’s setup, we may also run KC on port 8443 on the client’s web server(s). In that event the above is the same but with that port altered from 443 to 8443.
Review Services that need communication specifically are:
Assignment Service
Assignment Status Service
Bulk Tag
Document Loader
Export Service
Index Batch Service
Index Server Service
Production Server Service
Search Service
Note that in most deployments, all of the above services will be located on the same server, normally called the “Lightweight Services” or “App” server.
Additionally, if running Keycloak in Domain mode (more than one KC server) there are additional considerations described here: https://www.keycloak.org/docs/latest/server_installation/#_clustering.
Specifically, Keycloak needs IP Multicast enabled on a private network to cluster properly.
4 Review Upgrade Notes
4.1 Can be run ahead of an upgrade
Update the RevealPublish/Web.config file to add an SSO section within the appSettings area:
<!-- OAuthUserAccessCheckInterval is in seconds -->
<add key="OAuthCheckUserAccessInterval" value="180" />
<add key="LoginLandingPageLocation" value="/AuthorizationPages/ProjectSelect.aspx" />
<add key="LoginNotAuthorizedPageLocation" value=" /AuthorizationPages/LoginNotAuthorized.aspx" />
<add key="OAuthClientId" value="RevealWeb" />
<add key="OAuthRealm" value="000000" />
<add key="OAuthAuthorityBase" value="https://auth-us-east-1.revealdata.com/auth/realms" />
<!-- dev values -->
<!--<add key="OAuthClientId" value="RevealWebDev" />
<add key="OAuthRealm" value="Reveal Corp" />
<add key="OAuthAuthorityBase" value="http://10.0.4.124:8080/auth/realms" />-->
Editing the OAuthClientId, OAuthRealm, OAuthAuthorityBase to have the appropriate values based on the region/MSA.
Add the following to the web.config at the end below the DevExpress section:
<runtime>
<assemblyBinding xmlns="urn:schemas-microsoft-com:asm.v1">
<dependentAssembly>
<assemblyIdentity name="Newtonsoft.Json" publicKeyToken="30 ad4fe6b2a6aeed" culture="neutral" />
<bindingRedirect oldVersion="0.0.0.0-12.0.0.0" newVersion ="12.0.0.0" />
</dependentAssembly>
<dependentAssembly>
<assemblyIdentity name="Microsoft.IdentityModel.Logging" publicKeyToken="31bf3856ad364e35" culture="neutral" />
<bindingRedirect oldVersion="0.0.0.0-6.8.0.0" newVersion="6.8.0.0" />
</dependentAssembly>
<dependentAssembly>
<assemblyIdentity name="Microsoft.IdentityModel.Tokens"
publicKeyToken="31bf3856ad364e35" culture="neutral" />
<bindingRedirect oldVersion="0.0.0.0-6.8.0.0" newVersion="6.8.0.0" />
</dependentAssembly>
<dependentAssembly>
<assemblyIdentity name="Microsoft.IdentityModel.
JsonWebTokens" publicKeyToken="31bf3856ad364e35" culture="neutral" />
<bindingRedirect oldVersion="0.0.0.0-6.8.0.0" newVersion="6.8.0.0" />
</dependentAssembly>
<dependentAssembly>
<assemblyIdentity name="Microsoft.IdentityModel.Protocols"
publicKeyToken="31bf3856ad364e35" culture="neutral" />
<bindingRedirect oldVersion="0.0.0.0-6.8.0.0" newVersion="6.8.0.0" />
</dependentAssembly>
<dependentAssembly>
<assemblyIdentity name="Microsoft.IdentityModel.Protocols.
OpenIdConnect" publicKeyToken="31bf3856ad364e35" culture="neutral" />
<bindingRedirect oldVersion="0.0.0.0-6.8.0.0" newVersion="6.8.0.0" />
</dependentAssembly>
<dependentAssembly>
<assemblyIdentity name="System.IdentityModel.Tokens.Jwt"
publicKeyToken="31bf3856ad364e35" culture="neutral" />
<bindingRedirect oldVersion="0.0.0.0-6.8.0.0" newVersion="6.8.0.0" />
</dependentAssembly>
</assemblyBinding>
</runtime>
Add targetFramework="4.8" to the httpRuntime section of both Web.config files. The line should read like:
<httpRuntime maxUrlLength="8192" maxQueryStringLength="20480" maxRequestLength="2097151" requestValidationMode="2.0" executionTimeout="1800" targetFramework="4.8" />
4.2 May be run arbitrarily ahead of an upgrade
Run the SSO_UserUpgrade_Application upgrade tool WITHOUT THE COMMIT FLAG which does the following:
Verifies users have unique usernames and email addresses, and that email address is populated.
If any are not valid it stops and writes out an error.
Validates that the tool can connect to KC using the currently-configured UMDB system settings.
The tool is run as such:
.\SSO_UserUpgrade_Application.exe -s <Server Address> -c <UMDB>
For example:
.\SSO_UserUpgrade_Application.exe -s ’127.0.0.1’ -c ’ User_Management’
Any issues output by this tool must be resolved prior to upgrade time. The upgrade tool will not commit any changes to review or KC unless it verifies current settings without error.
4.3 Must be run at time of upgrade
Run any Reveal-provided MSSQL schema/data upgrade scripts.
Run the SSO_UserUpgrade_Application upgrade tool in commit mode which does the following:
Verifies users have unique usernames and email addresses, and that email address is populated.
If any are not valid it stops and writes out an error.
If they are valid it starts to create KC groups for each case. It stores the group IDs off in the Cases table.
Then it creates each user in KC and also updates the Users table with their IDs.
Emails are sent to activated users notifying them to reset their passwords and set up two-factor authentication. Emails are not sent to deactivated users.
The process goes back through Users_Cases and assigns the KC users to the appropriate KC groups based on this table.
Tool is run as such:
.\SSO_UserUpgrade_Application.exe -s <Server Address> -c < UMDB> --commit
For example:
.\SSO_UserUpgrade_Application.exe -s ’127.0.0.1’ -c ’ User_Management’ --commit
Run any updates generated by Redgate.
Run the SSO_UserDataPurge_Run_After_User_Upgrade.sql script after the upgrade tool finishes and you’re comfortable with the results.
Assuming that tool ran without error, Review is now upgraded.
5 SaaS Documentation
5.1 SaaS Notes
Each MSA will have its own realm named after its MSA number.
Configuration of KC will be limited to Reveal administrators. Clients will not be able to make edits to KC via the console.
Each region will have its own instance of KC.
5.2 New MSA Methodology
Our goal is to maintain a JSON file that can be imported into KC to create a new realm from scratch. The below-described tool should generate this JSON for you to import into KC.
Run the realm_instantiator tool with the following options:
msa number MSA number for the realm. THIS IS NOT CHANGABLE LATER so be sure on this number.
msa name MSA Name to be used for the realm. This shows up in some user-facing places such as the login page. This can be changed later.
review_url Hostname for the primary Review site users will log into. Users will be re-directed to this site after logging into KC. Can be changed later, however takes a few steps to alter.
output Output path for the JSON file to be loaded to KC.
auth_url Hostname for the Keycloak instance for the region.
The realm_instantiator tool is run similar to the below:
realm_instantiator.exe --msa_number ’MSA_NUMBER’ --msa_name ’ MSA_NAME’ --review_url ’URL’ --output ’C:\Some\Path\Here’ --auth_url ’KC URL’ --saas
For example:
realm_instantiator.exe --msa_number ’120000’ --msa_name ’Reveal Production Staging’ --review_url ’devstaging.revealdata.com’ -output ’C:\Users\Administrator\Desktop’ --auth_url ’auth-us-east-1.revealdata.com’ –saas
This will write the following into your output directory:
::msa number::-review-update.sql This file will contain a list of SQL updates to run against review’s user management database. It will pre-generate config entries.
::msa number::-realm-importable.json This will be the file you use in KC to create your new realm.
As an administrator log into KC’s console interface.
Under the realms drop-down click Add Realm.
Click on Select File next to Import and select the ::msa_number::-realm-importable.json file above.
5.3 HAProxy/DNS Upgrade Notes
See Keycloak Server Setup (Domain mode/SaaS) section to set up KC servers initially.
Set up DNS record to point to HAProxies in the region with an appropriate naming scheme. For us-east-1 this name will be:
auth.us-east-1.revealdata.com
Create HAProxy Records:
...
acl auth-us-east-1 hdr(host) -i auth-us-east-1.revealdata.com
acl auth-us-east-1-protected path -i /auth
acl auth-us-east-1-protected path -i /auth/
acl auth-us-east-1-protected path -i -m sub /console/
...
use_backend auth-us-east-1 if auth-us-east-1 auth-us-east-1-
protected { src 10.0.0.0/16 }
use_backend auth-us-east-1 if auth-us-east-1 !auth-us-east-1-
protected
...
# auth.us-east-1.revealdata.com
backend auth-us-east-1
balance first
mode http
server node1 10.0.4.254:443 ssl verify none check
server node2 10.0.4.148:443 ssl verify none check
...
6 Keycloak Server Setup (Domain mode/SaaS)
6.1 Common Changes
Create EC2 servers with AWS Linux 2.
Change hostname appropriately and install java:
hostnamectl set-hostname kc-master-0
yum install java-1.8.0-openjdk
Reboot.
Run realmjoin (see realmjoin.sh in scripts section).
Reboot.
Run retrofit.
wget https://revealdata-public.s3.amazonaws.com/linux_retrofit.tar.gz
Reboot.
Download keycloak distro:
cd /opt/
curl -XGET https://revealdata-software-public.s3.amazonaws.com/keycloak-11.0.3.tar.gz | tar -xvzf -
mv keycloak-11.0.3 keycloak
Create external managed database using Aurora w/postgresql compatibility here.
While setting up VPC and similar items, make sure to give Linux Admin access to DB via security group. Then tunnel thru the Linux admin to talk to the DB.
For postgres, run the following against the server:
create database keycloak with encoding ’UTF8’;
Go to this site and grab the newest JDBC driver. Here version 42.2.18:
Run the following:
mkdir -p /opt/keycloak/modules/system/layers/keycloak/org/
postgresql/main
cd /opt/keycloak/modules/system/layers/keycloak/org/postgresql/main
wget https://jdbc.postgresql.org/download/postgresql-42.2.18.jar
Follow directions here:
https://www.keycloak.org/docs/latest/server_installation/#_database
Create module.xml file with the following content:
<?xml version="1.0" ?>
<module xmlns="urn:jboss:module:1.3" name="org.postgresql">
<resources>
<resource-root path="postgresql-42.2.18.jar"/>
</resources>
<dependencies>
<module name="javax.api"/>
<module name="javax.transaction.api"/>
</dependencies>
</module>
Edit this file:
/opt/keycloak/domain/configuration/domain.xml
MAKE SURE THAT ALL EDITS ARE IN THE auth-server-clustered SECTION.
Add the postgresql driver in. Content should look like:
<drivers>
<driver name="postgresql" module="org.postgresql"> <xa-datasource-class>org.postgresql.xa.PGXADataSource </xa-datasource-class>
</driver>
<driver name="h2" module="com.h2database.h2"> <xa-datasource-class>org.h2.jdbcx.JdbcDataSource</xa-datasource-class>
</driver> </drivers>
Now, in the same file edit the KeycloakDS datasource:
<datasource jndi-name="java:jboss/datasources/KeycloakDS"
pool-name="KeycloakDS" enabled="true" use-java-context="true">
<connection-url>jdbc:postgresql://revealdata-keycloak-1a-001.cidxb3vnerlr.us-east-1.rds.amazonaws.com/keycloak
</connection-url>
<driver>postgresql</driver>
<pool>
<max-pool-size>20</max-pool-size>
</pool>
<security>
<user-name>USERHERE</user-name>
<password>PASSHERE</password>
</security>
</datasource>
Search for socket-binding-groups and alter the http and https to standard ports, making sure to replace all instances of these (there are three including the load balancer):
<socket-binding name="http" port="${jboss.http.port :80}"/>
<socket-binding name="https" port="${jboss.https.port :443}"/>
6.2 Master Only
In the same directory edit the host-master.xml.
Comment out the load-balancer server line.
Change the socket-bindings port-offset to 0. We want these servers running on standard ports.
Replace all instances of 127.0.0.1 with 0.0.0.0.
Run the following:
mkdir -p /opt/keycloak/domain/servers/server-one/configuration
cd /opt/keycloak
bin/add-user-keycloak.sh --sc domain/servers/server-one/configuration -r master -u revealadmin
/opt/keycloak/bin/domain.sh --host-config=host-master.xml -Djboss.node.name=node1 -Djboss.boot.server.log.level=DEBUG -Dkeycloak.profile.feature.upload_scripts=enabled -Dkeycloak.profile.feature.account_api=enabled &
Assuming things are configured correctly, the server should be running. Make sure to check the startup log information and look for errors. They will be printed in red so it should be obvious.
6.3 Worker Only
In the same directory edit the host-slave.xml.
Change the socket-bindings port-offset to 0. We want these servers running on standard ports.
Replace all instances of 127.0.0.1 with 0.0.0.0.
Search for jboss.domain.master.address and replace that address with the IP address of the master server.
For every worker, run the following on the master server:
/opt/keycloak/bin/add-user.sh
Follow the instructions here to add a user and configure properly in the worker: https://www.keycloak.org/docs/latest/server_installation/#_clustered-domain-example -- specifically the Setup Slave Connection to Domain Controller section.
When done, to start up:
cd /opt/keycloak
bin/domain.sh --host-config=host-slave.xml -Dkeycloak.profile. feature.upload_scripts=enabled
Assuming things are configured correctly, the server should be running. Make sure to check the startup log information and look for errors. They will be printed in red so it should be obvious. I’ve also seen yellow warnings be important, so keep an eye out for those as well.
7 Keycloak Server Setup (On-Prem)
7.1 Pre-setup Questions/Discussion Items
Determine the following items with the client:
Will we be setting up a single KC instance (standalone mode) or will we be running within a KC domain? This tells us if we need to worry about inter-node connectivity.
Default is just installing in standalone.
If in domain mode, where do we want to set up the database? It can be anything that has a JDBC driver. In SaaS we use postgres, but the easiest thing to do is use the client’s pre-existing MSSQL database that Review uses.
Default is using review’s MSSQL database.
Where will we be setting up KC?
Default Client’s web server(s). Only on one web server if in standalone mode.
Will the nodes be behind a reverse proxy? If not, then we need to worry about SSL for KC. Or alternatively we can set up IIS to proxy traffic into KC.
7.2 Actual Setup
There are several points of divergence here based on the answers to the questions above. Generally speaking, everything in a pure “install” is covered in KC’s existing documentation here:
https://www.keycloak.org/docs/latest/server_installation
That said, we describe the general process below:
Download the following ZIP package onto each of the client’s web servers:
s3://revealdata-software-private-build-repository/Review/Keycloak/ Keycloak-OnPrem-Package.zip
Unzip the package and place under wherever the other Reveal services are installed. Normally we would expect this to be something like:
D:\Reveal\InControl\Keycloak
Install the Java 1.8.0 OpenJDK at this location:
C:\Reveal\InControl\Keycloak\installers\java-1.8.0-openjdk-1.8.0.292-2.b10.dev.redhat.windows.x86_64.msi
Create an empty database on the MSSQL server named keycloak. This database name is arbitrary and if desired can be changed in connection string of the below-described configuration files.
Edit the appropriate configuration file based on the Keycloak installation the client desires:
Domain Mode Keycloak\domain\configuration\domain.xml
Standalone Mode Keycloak\standalone\configuration\standalone-ha.xml
The main thing you want to edit are the connection details for where the database sits and what credentials to use while accessing it. By default you can search for this string to see the data to edit:
jdbc:sqlserver://
That should take you to a line containing a connection string. Edit this to point to the DNS Name, IP, etc. for the MSSQL server that KC will be using. If changing from MSSQL to some other database engine, make sure you also alter driver settings as described in KC’s documentation.
Note that if running in Domain mode there are additional edits to make to the Master and Slave configuration files. The necessary edits are described in Keycloak’s documentation here:
https://www.keycloak.org/docs/latest/server_installation/#_domain-mode
Edit the log location for the configuration file you’re using.
Run the following to install Keycloak as a service:
.\service.bat install /config standalone-ha.xml /name " RevealKeycloak" /display "Reveal Keycloak" /desc " Keycloak Server for Reveal"
This should install a service named Reveal Keycloak. Alter this service to log in as a service user that has administrative access to the keycloak database.
Start the service. At this point assuming no other alterations, the Key-cloak console should be accessible at this URL:
From here set up a temporary admin user.
On one of the instances, run the realm instantiator as below:
& ’Keycloak\bin\Keycloak Realm Instantiation (On Prem)\Keycloak Realm Instantiation (On Prem)\realm_instantiator_onprem.exe’ --realm_id 000000 --realm_name ’Reveal Albany’ --review_url ’ https://albanyweb.revealdata.com’ --output Keycloak/realm_json/--auth_url ’https://albanyweb-auth.revealdata.com’
Replace the options as is pertinent to your setup. The tool will write output in the location pointed at by the --output option.
That will generate two sets of output at here:
Keycloak/realm_json/000000-realm-importable.json
Keycloak/realm_json/000000-review-update.sql
These will be used for creating a Keycloak realm and for setting system settings in review respectively.
By default, the server will likely be listening on only 127.0.0.1. This can be altered in the configuration file for the mode you’ve set up.
From here follow the normal realm creation steps. In summary, after this the steps are to run SQL in the Review UMDB to link Review into KC properly. Then take the realm-importable.json file and use that to create a realm within Keycloak.
From there you should have a new realm set up in Keycloak that can be tested against.
7.3 Proper Networking Setup
After the above you will have a server that is configured to listen on a specific set of non-standard ports. Specifically, our package sets them to 8443 and 8080. However, our platform will require verified SSL for communication with Keycloak. As a practical matter what this means is that there are a few options in on-prem setups for setting up Keycloak with SSL:
External Reverse Proxy Ideally the customer would have a layer 7 proxy available to terminate SSL and proxy traffic to Keycloak. This is how we have things set up in our SaaS environment and it saves a lot of headache down the line if they want to increase availability.
See our SaaS setup sections for information on how we proxy this traffic.
IIS Reverse Proxy It is possible to set up IIS as a reverse proxy to terminate SSL and forward traffic to Keycloak. In on-prem setups this is likely the easiest way to go. This is described later in this section. Although easiest, this does remove functionality from Keycloak and is thus very much less desirable than an external proxy.
SSL within Keycloak As a last resort we can set up SSL within Keycloak itself. However, considering that IIS is usually already installed to handle Review, it is often easiest just to set up IIS. If necessary, the steps to set up Keycloak itself to use SSL are described here:
https://www.keycloak.org/docs/latest/server_installation/#_setting_up_ssl
7.3.1 IIS Reverse Proxy
In smaller on-prem setups where the client does not have a forward-facing reverse proxy, setting Keycloak up on a single web server with a reverse proxy within IIS on the server is likely the easiest setup to perform. Generic instructions for setting up IIS to be a reverse proxy are here:
This blog post has several additional steps that fully describe the process, but we summarize below:
Ensure that you’ve already set up a Keycloak administrator. The following reconfiguration will make KC unavailable from 127.0.0.1.
If it’s already running, turn off Keycloak.
Edit the config file Keycloak1 and alter the listening ports for HTTP and HTTPS to be non-standard. In other words, search for the following section in this section at the bottom of the config and alter it so the ports are set to 8081 and 8444:
<socket-binding-group name="standard-sockets" default-interface=" public" port-offset="${jboss.socket.binding.port-offset:0}"> <socket-binding name="ajp" port="${jboss.ajp.port:8009}"/> <socket-binding name="http" port="${jboss.http.port:8081}"/> <socket-binding name="https" port="${jboss.https.port:8444}"/> <socket-binding name="jgroups-mping" interface="private" multicast-address="${jboss.default.multicast.address:230.0.0.4}" multicast-port="45700"/>
Also edit the following chunk:
<properties>
<property name="frontendUrl" value="${keycloak.frontendUrl:}"/> <property name="forceBackendUrlToFrontendUrl" value="false"/
</properties>
To the following:
<properties>
<property name="frontendUrl" value="https://CLIENT.HOSTNAME.COM:8443/auth"/>
<property name="forceBackendUrlToFrontendUrl" value="true"/
</properties>
Replacing CLIENT.HOSTNAME.COM as before: What this does is force Keycloak to use a specific front-end hostname. This will mean that KC is no longer accessible via any other URL than the front-end configured there. This is mainly because IIS is re-writing the URL to its internal address, so what gets to IIS is CLIENT.HOSTNAME.COM but what hits KC is actually 127.0.0.1. Keycloak uses that hostname within internal scripts, so for it to work properly with external users it must be hardcoded in the config as above.
It is possible that we may be able to configure IIS to properly re-route traffic to make the above unnecessary, however we have not performed that research as of yet.
Start the Keycloak service so it picks up these new ports and settings.
Install the IIS Application Request Routing module: https://www.iis.net/downloads/microsoft/application-request-routing
The general setup for a reverse proxy is shown in this walkthrough:
We describe the required steps below.
On the IIS server level click into the Application Request Routing Cache page:
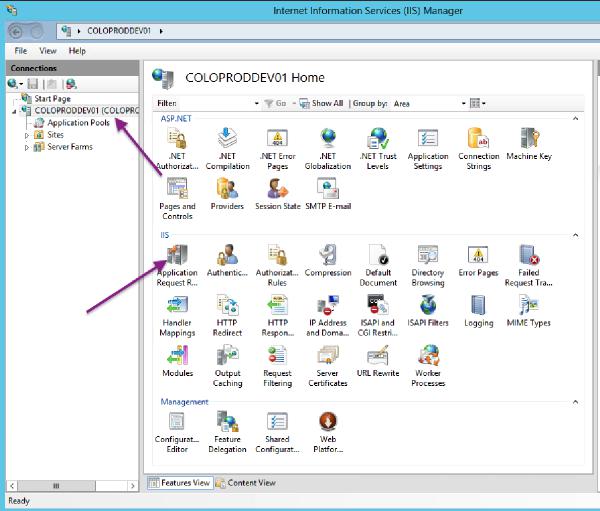
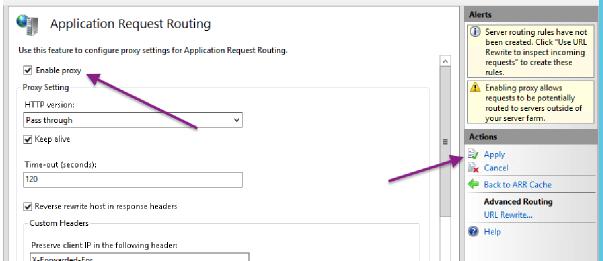
Click on Server Proxy Settings:

Check the Enable Proxy box and Apply the change:
Set up a website specific for Keycloak within IIS and give it the web.config shown on page 33.
Edit the web.config to properly represent the hostnames Keycloak expects to listen on. You can do this by replacing CLIENT.HOSTNAME.COM with the external hostname users will use when connecting to KC.
Back in IIS go into the website you created for Keycloak and give it an HTTPS binding on port 8443 with the SSL cert you’re using for Review.
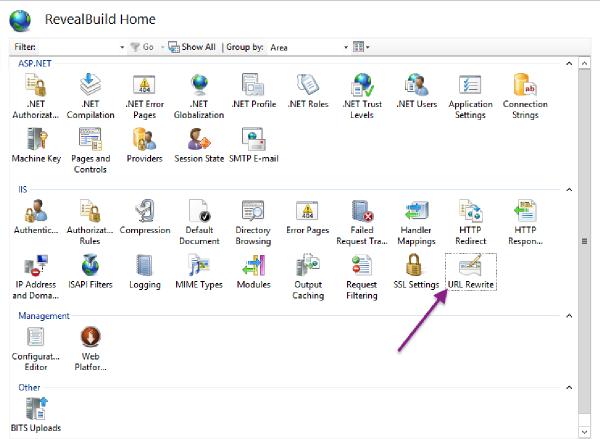
On the website you set up for Keycloak click into the URL Rewrite module:
Click on View Server Variables:
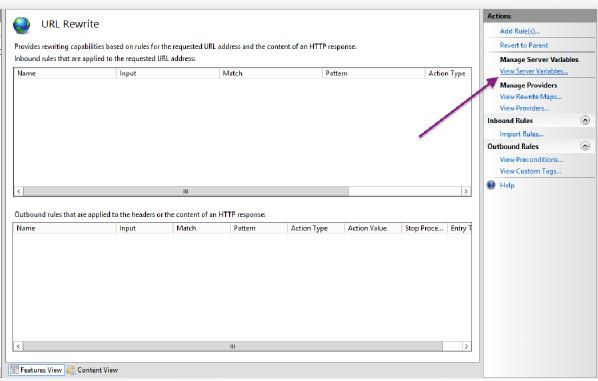
Add two server variables for HTTP_ACCEPT_ENCODING and HTTP_X_ORIGINAL_ACCEPT_ENCODING:


Keycloak should now be accessible via that front-facing CLIENT.HOSTNAME.COM URL.
In summary your network traffic now looks like this:
User Browser -, 8443 HTTPS -, IIS -, Terminate SSL 8081 HTTP -, Keycloak
Part of the alterations we performed on Keycloak’s configuration file now make it inaccessible from 127.0.0.1. In other words, you now must access it via https://CLIENT.HOSTNAME.COM:8443/auth.
8 Creating new KC Realm Templates
Figure out a realm that you want to export.
Use KC’s realm export feature to export it into a JSON file.
Open that JSON file and replace the following things:
Remove all groups
Remove all groups associated with any users.
Replace all instances of the realm ID with ::realm_id::
Replace the displayName for the realm with ::realm_name::
Replace all instances of the previous review URL with ::review_url::
So if we were doing prodstaging we’d replace:
…such that the URLs in the config file should look like:
"redirectUris": [
"https://::review_url:::443/reveal/*"
],
Double-check the users in the export. Ideally you shouldn’t see any non-service account users.
Assuming this realm export JSON was generated from the us-east-1 region’s KC instance, replace all instances of corp from corp.revealdata.com with ::domain::
The current known locations to replace this for are in the customUserSearch-Filter and bindDn within the user federation settings.
Again assuming that this is from us-east-1 replace all instances of the domain controller’s IP address with the following: ::domain_controller::
Manually review the config file and ensure that nothing else looks particularly specific to the realm that it came from. As we add new things as realm defaults we’ll likely see previously unknown updates to this exported JSON that we should at least eyeball to make sure are good.
Prefix any template AI Keycloak client names with:
TEMPLATE-DO-NOT-USE-
8.1 On Prem KC Realm Templates
Take the above KC Realm Template and remove the following components:
All identity providers.
All user federation providers.
9 Setting Up SSO Identity Providers
Generally speaking, all the information you need to set up an identity provider can be found in KC’s documentation here:
https://www.keycloak.org/docs/latest/server_admin/#_identity_broker
If it doesn’t automatically scroll you there, you want the Identity Brokering section.
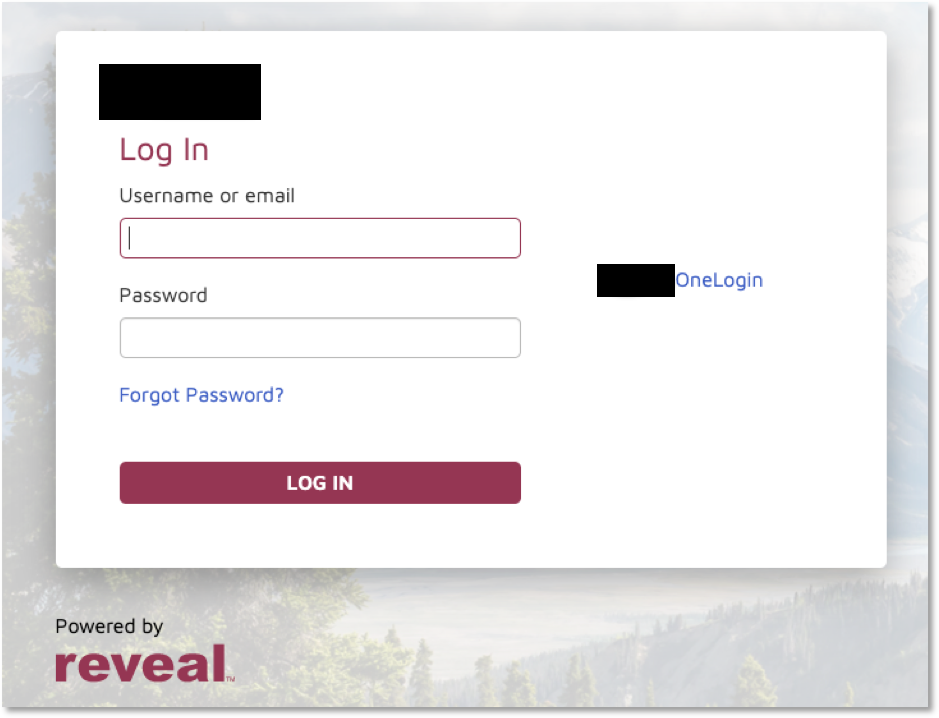
The general idea is that you set up a link with a client’s SSO mechanism to allow their users to come into our site. What ends up happening is that a user goes to one of our Review sites, clicks a button on our login page that sends them to their SSO. After they log in they get sent back to us and KC will create an internal user with a link pointing to that SSO provider.
Here’s what a Review login page will look like with a OneLogin connection (for example):
 |
Review needs the following information from the client’s SSO provider in order to work:
First Name
Last Name
Email Address
Username (optional)
There are ways to just make the username the user’s email address, so that is only necessary if the client wants their username to show differently from their email address.
The above information items are almost always provided by default from SSO providers. OneLogin, for example, requires no additional configuration after initial setup to link that information in properly. More complex or customized identity providers may require some troubleshooting on the Reveal side to get things to work.
The KC documentation covers the majority of the setup, so what we cover here is the extra stuff that is not documented as well. We also provide some plain language quick summaries of the process for OIDC and SAML2 connections).
9.1 OIDC Setup Summary
OIDC identity providers should always have some sort of well-known endpoint available. This endpoint provides KC the majority of what’s necessary for configuration automatically. For example, OneLogin’s well known endpoint has the following form:
https://<subdomain>.onelogin.com/oidc/2/.well-known/openid-configuration
From this documentation:
https://developers.onelogin.com/openid-connect/api/provider-config
Azure AD has the following form:
https://login.microsoftonline.com/{tenant}/v2.0/.well-known/openid-configuration
From this documentation:
https://docs.microsoft.com/en-us/azure/active-directory/develop/v2-protocols-oidc
You should be able to figure out this endpoint for your identity provider and place it into KC’s IDP setup in this location:
 |
That should get you 90% of the way there.
From there, the IDP will need to know the client-id that you’re setting up on the KC side. This is at the very top of the configuration page here:
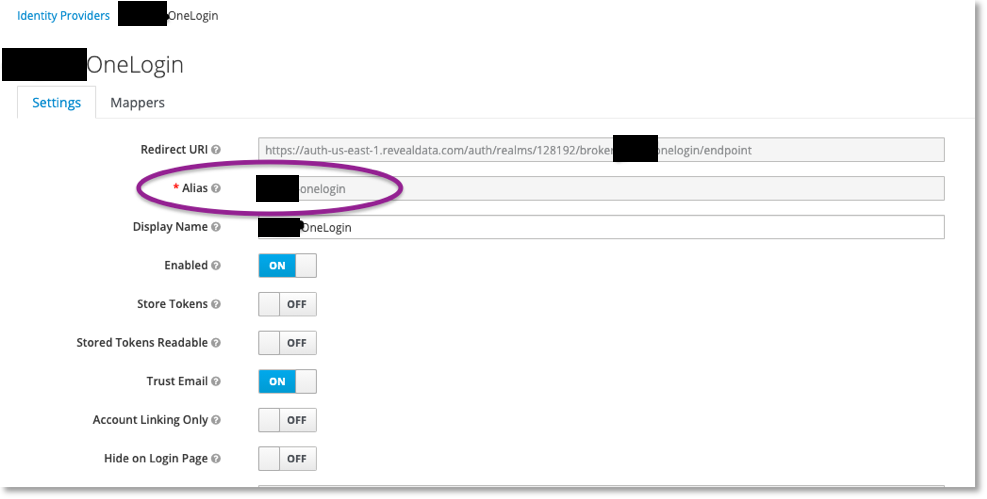 |
For OIDC you’ll need to hand that value off to the client for them to configure in their IDP.
Finally, the client usually also wants to add in some username/password/secret protection. That is configured in this section:
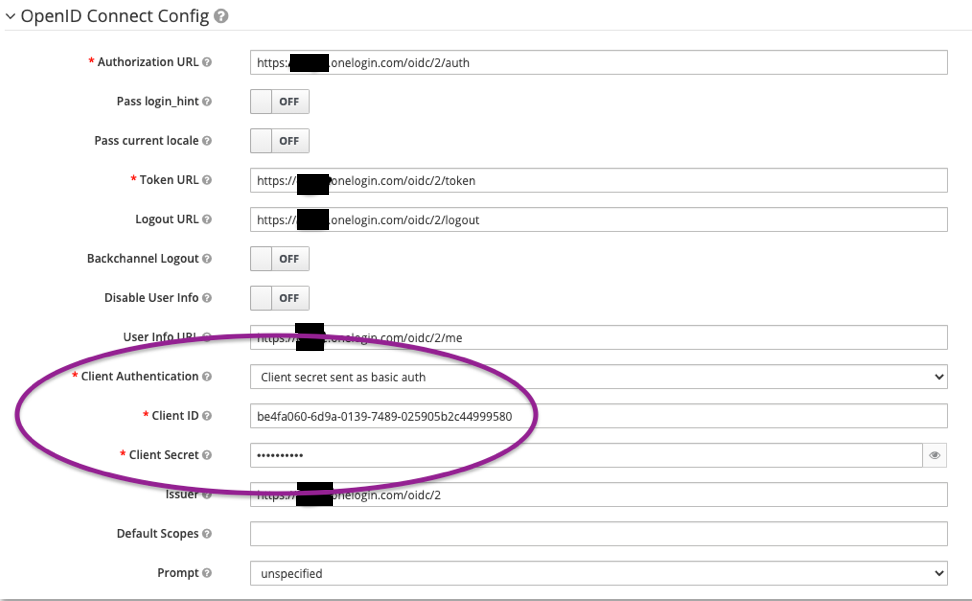 |
Some IDPs accept sending the secret as basic auth, but others may require it as a post. The IDP should be able to provide this information for you.
After setting up and getting a test user in, make sure their username, email, and first/last name look correct. We’ve seen Azure AD send over the username as a UUID4 GUID instead of the user’s actual username.
9.2 SAML Setup Summary
SAML requires metadata from the client's IDP. It is an xml file that contains the Single Sign-on URL they are using. Once the client provides this metadata, Reveal Security is imports the xml file and sets up the identity provider on the client’s realm in Keycloak.
Here is the process used by Reveal Security:
Go to the client's Realm in Keycloak to broker identity providers based on the SAML v2.0 protocol.
To begin configuring an SAML v2.0 provider, go to the Identity Providers left menu item and select SAML v2.0 from the Add Provider drop down list to open the Add Identity Provider page.
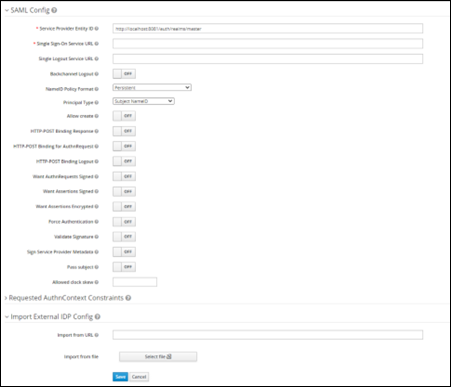
Import this configuration data using the xml file that points to the SAML IDP entity descriptor of the external IDP, as provided by the client. This will upload all the required configurations needed and provided by the external IDP.
Click Save.
If you click on an identity provider listed in the Identity Providers page for your realm, you will be brought to the IDPs Settings tab. On this page there is also a Mappers tab. Click on that tab to start mapping your incoming IDP metadata.
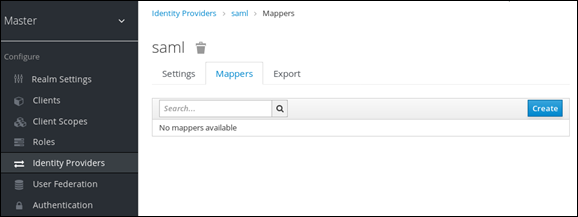
There is a Create button on this page that allows you to create a broker mapper. Broker mappers can import SAML attributes or OIDC ID/Access token claims into user attributes and user role mappings.
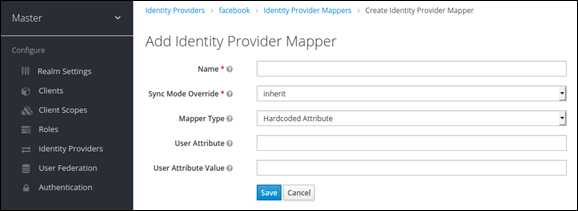
Select a mapper from the Mapper Type list. Hover over the tooltip to see a description of what the mapper does. The tooltips also describe what configuration information you need to enter.
Default Mappers (Attributes):
Email
First_name
Last_name
Click Save and your new mapper will be added.
9.3 Debugging
Debugging this can be difficult due to the nature of the system. Ultimately, as long as you’re getting your configuration from the well-known endpoint that will handle most things.
Networking: Make sure that both KC and the user in their browser can talk to the client’s identity provider (IDP). KC will do some key exchanging with the IDP, so it needs to be able to talk with it; then the user needs connectivity to the IDP so they can log in on that side.
User Information: This requires careful preparation and logging, particularly for large numbers of clients. The main problem is that it can be deceptively difficult to figure out where KC is going to pull user information from. Here’s a process for debugging this:
KC by default will use the User Info URL if provided to pull user information (username, email, etc.). Make sure that this endpoint is providing what you expect it to be providing.
KC by default will not store user access tokens when a user logs in. This can be altered by changing a setting in KC’s IDP configuration:
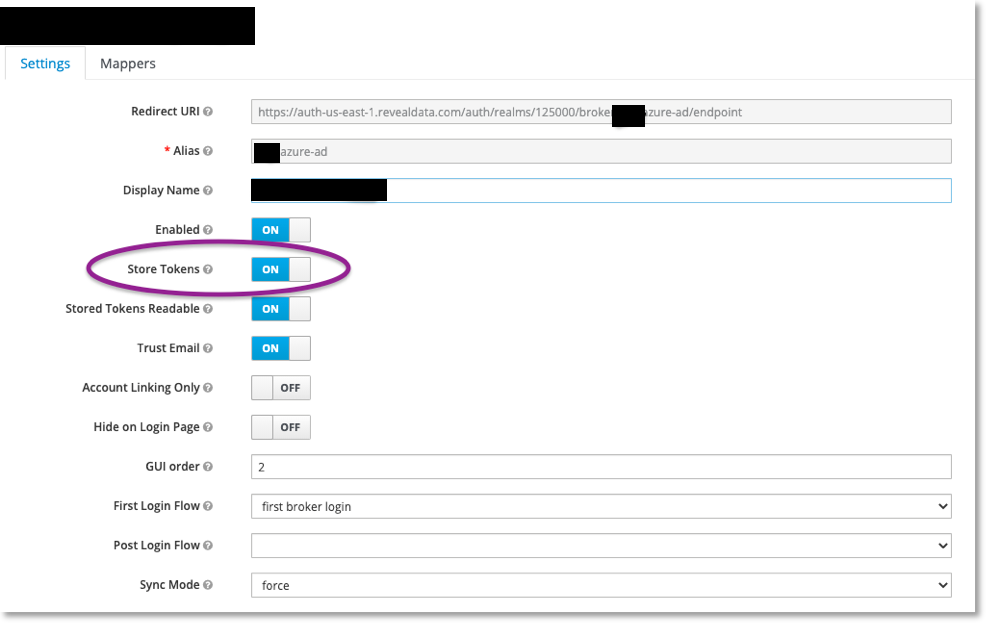
If you do this, you can have a user log in as a test, then grab their access token out of KC’s database. Below I show the table from which you can get this information:
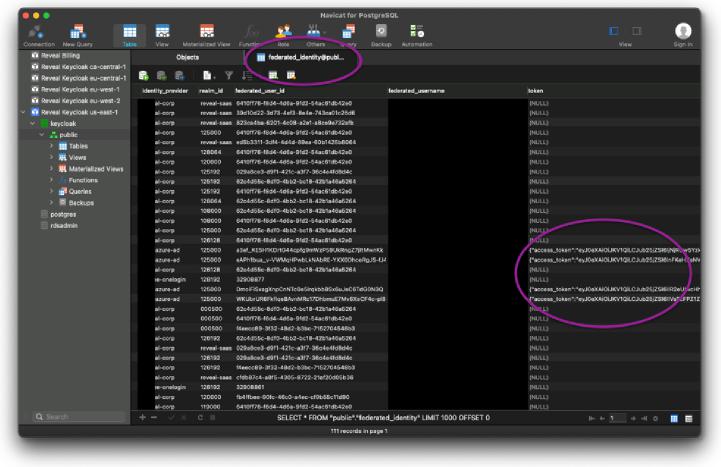
This is important, because after you store and retrieve this token, you can use it to query the IDP’s User Information endpoint to figure out what’s actually getting sent over.
Additionally, KC has debug options in its configuration XML that will dump userinfo information into logs when a user logs in:
https://lists.jboss.org/pipermail/keycloak-user/2015-July/002608.html
Specifically this section:
>>> <subsystem xmlns="urn:jboss:domain:logging:3.0">
>>> <console-handler name="CONSOLE">
>>> <level name="DEBUG"/>
>>> <formatter>
>>> <named-formatter name="COLOR-PATTERN"/>
>>> </formatter>
>>> </console-handler>
>>>
>>> <logger category="org.keycloak.social.user_profile_dump">
>>> <level name="DEBUG"/>
>>> </logger> >>> ...
That way if you’re REALLY unsure what’s going on, you can look at KC’s logs to get further information on what’s getting sent. This requires a full server restart to pick back up.
The above was all about how to figure out what information KC is using. Now the problem is how to use that information to link to the right fields in KC. That mapping is found here:
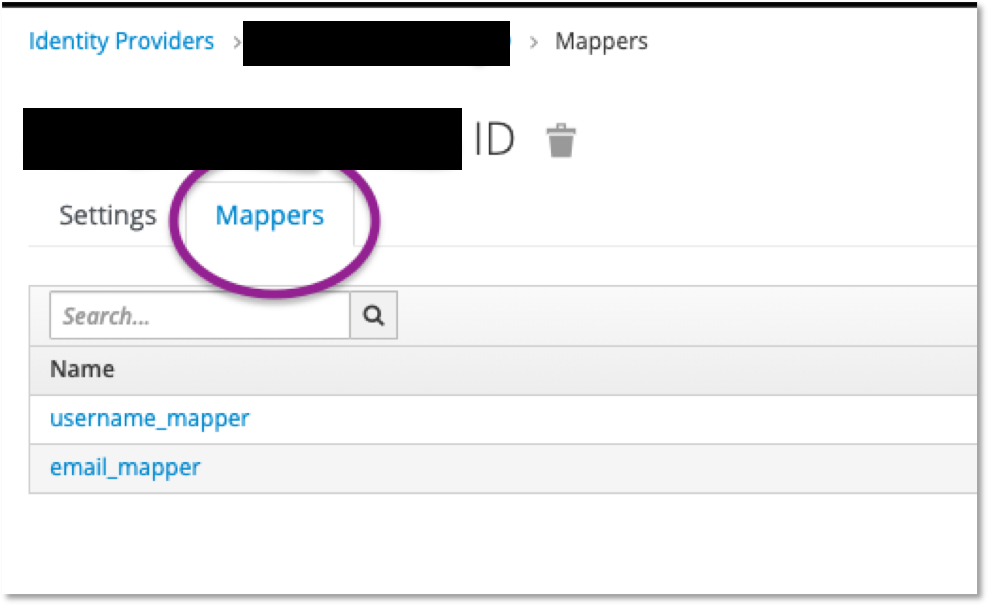
What you want to do is figure out what field should be linking to username and email and create the appropriate mappers to handle it. For example, this is how I had to set up the email for this identity provider:
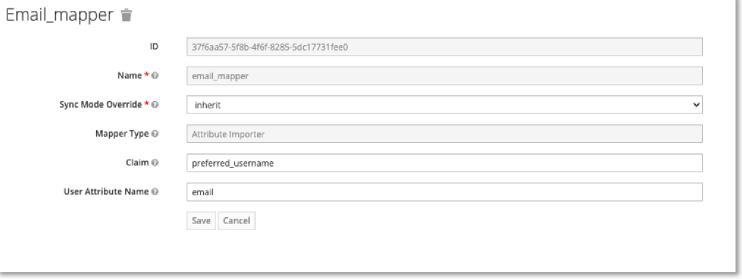
That’s really the long and short of it. Basically you need to do a bit of trial and error to figure out how KC is attempting to internally map an IDP’s attributes to KC’s attributes, then force it if necessary. KC has documentation on this topic here:
https://www.keycloak.org/docs/latest/server_admin/#_mappers
Mapping Claims and Assertions if it doesn’t automatically move you there.
9.4 Setting up bookmark links
While Review does not natively support IDP-initiated login flows, we can emulate the behavior by setting up a bookmark link for Review. We describe the creation of this link below:
Log into Keycloak and identify the client for Review web. This will likely be named RevealWeb:
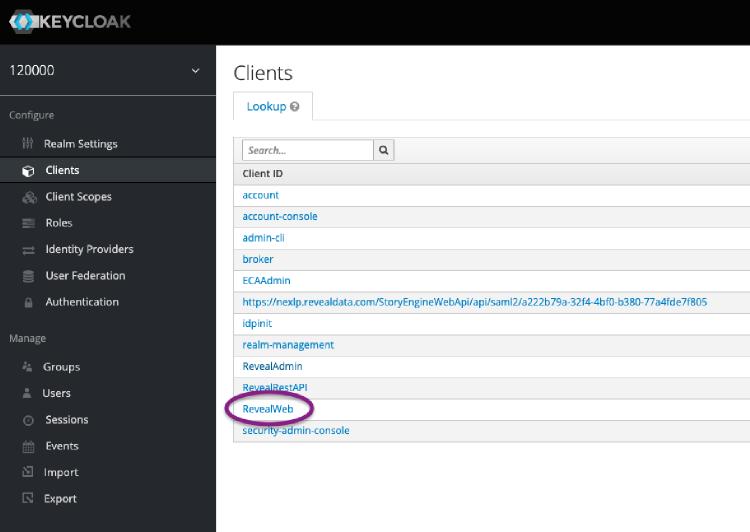
Click into this client and go to the bottom of the page. Under Authentication Flow Overrides double-check the Browser Flow being used. Note this down for the next step. If this combo box is empty, the name in the next step is Browser.
Navigate into the authentication area and find the authentication flow that Review web is using. Within this flow make sure the Identity Provider Redirector step is set to Alternative:

Browse to your login page for Review. This should redirect you into Keycloak with a long URL:
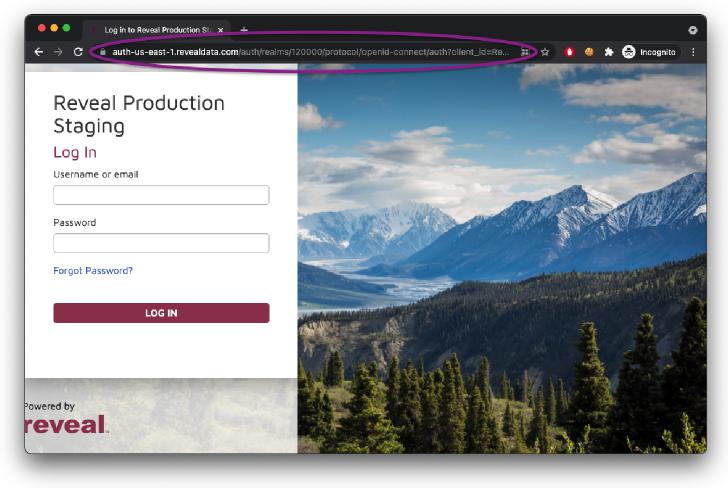
Copy this URL from your browser into a text editor. It should look something like this:
https://auth-us-east-1.revealdata.com/auth/realms/120000/protocol/ openid-connect/auth?client_id=RevealWeb&response_type=code& scope=openidY.20profileY.20emailY.20rolesY.20groups_scope&state= OpenIdConnect.AuthenticationPropertiesY.3D8iu5YK-6onncmR_8q-NulDSlAZCjC4-YPT75HZQgxzZvlQbj16Ty-O0ZQsXqkqwS7R8DddmeJfGbR1UZ-O0oASg_B5QiW4fd6S8lG2aV8xrAWv4OgSkamiDSYKO0nf1jXysdl_hd20un1lHLm0uApCN92cPo6iXxboKlABbsjuTP0-IEix4n5yoD5ZnQ&response_mode=form_post&nonce=637641312063628199.
NGZhNzU2OWYtNDczZC00ZmUyLTk4YzQtNzVhOTkwYWM0OWY0ZDMxMDIyMzktNDA3Yy00YjE0LTlhYzEtOWM4MzlhMDBj&redirect_uri=httpsY.3AY.2FY.2Fprodstaging.revealdata.comY.3A443Y.2 FRevealY.2FAuthorizationPagesY.2FProjectSelect.aspx&x-client-SKU= ID_NET461&x-client-ver=6.8.0.0
In this URL we want to delete the state and nonce URL parameters, so your URL should now look like this:
https://auth-us-east-1.revealdata.com/auth/realms/120000/protocol/ openidconnect/auth?client_id=RevealWeb&response_type=code&scope=openidY.20profileY.20emailY.20rolesY.20groups_scope&response_mode=form_post&redirect_uri=httpsY.3AY.2FY.2Fprodstaging.revealdata.comY.3A443Y.2FRevealY.2FAuthorizationPagesY.2 FProjectSelect.aspx&x-client-SKU=ID_NET461&x-client-ver=6.8.0.0
Finally, navigate in Keycloak to your Identity Provider and grab the alias:
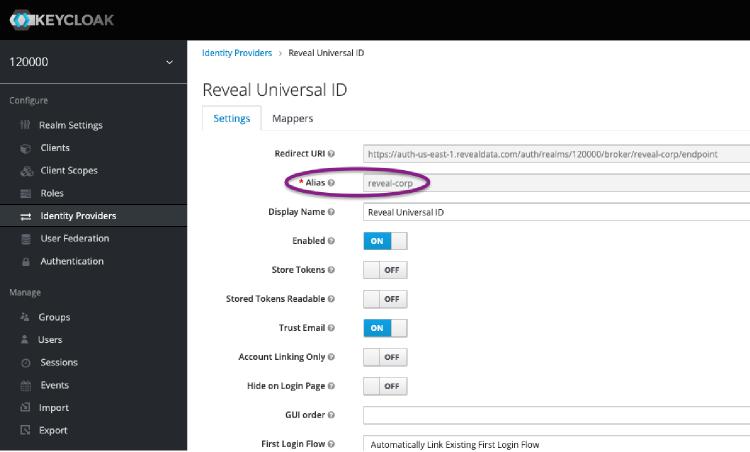
Add this alias into your URL as a new parameter with the key kc_idp_hint:
https://auth-us-east-1.revealdata.com/auth/realms/120000/protocol/openid-connect/auth?client_id=RevealWeb&response_type=code&scope=openidY.20profileY.20emailY.20rolesY.20groups_scope&response_mode=form_post&redirect_uri=httpsY.3AY.2FY.2Fprodstaging. revealdata.comY.3A443Y.2FRevealY.2FAuthorizationPagesY.2 FProjectSelect.aspx&x-client-SKU=ID_NET461&x-client-ver =6.8.0.0&kc_idp_hint=reveal-corp
You can use this URL within your identity provider (e.g. Okta) as a bookmark to Review. In the background what’s actually happening is that the user is being sent to Keycloak with a hint that directs them immediately to your identity provider. The identity provider will automatically log the user in then return them to Keycloak, which in turn logs into Review.
10 Other Notes
10.1 Super Admin Creation
Keycloak manages multi-tenancy with the concept of realms. In on-prem setups, Reveal will likely set up a single realm as most customers do not need multitenancy.
Within realms individual users can have permissions associated with them that allow for realm management. Keycloak also has an over-arching realm named Master. Administrative users in the Master realm are able to administer all Keycloak realms. In this section we describe how to set up an admin user within Keycloak.
When initially installed, Keycloak will not have any users at all. New super administrators can be created by following the following documentation:
https://www.keycloak.org/docs/latest/server_admin/#server-initialization
Specifically, there’s an add-user-keycloak script that you can run locally on the web server to add admin users to Keycloak.
After installation, new super admins can also be created via Keycloak’s web console via the following steps:
Log into Keycloak. Usually the KC console will be listening at a URL like:
https://some.hostname.com:8443/auth/
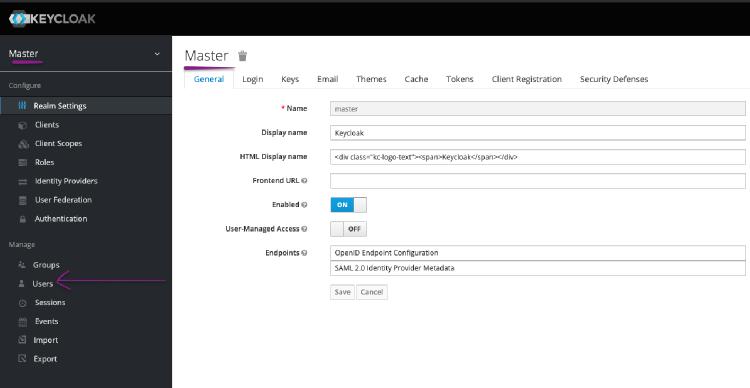
Go to the master realm and click on the Users button.
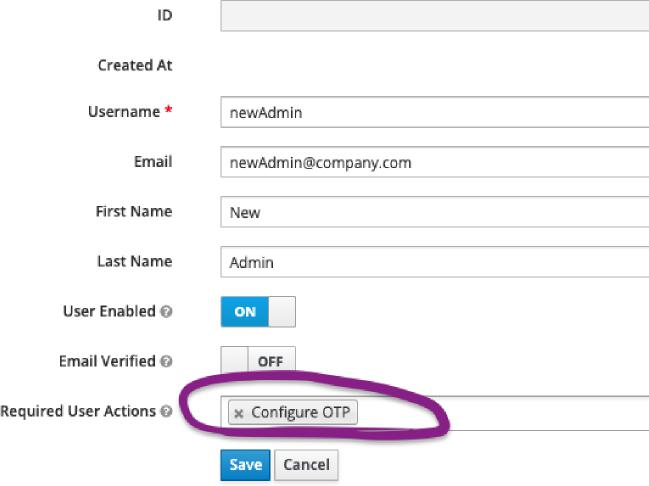
Add a new user. Since these are super-admins, we recommend requiring two-factor authentication on their first login:

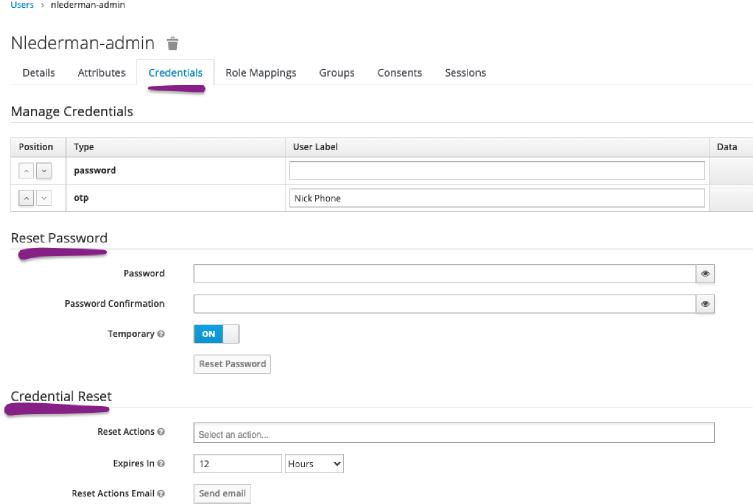
After adding the user, add a password for them or send them a credential reset email:
Finally, to make the user an actual administrator give them the admin role:

That user will now have the ability to log in to the Keycloak master realm and administer all realms. As mentioned before, it is possible in a similar manner to create realm-level administrators, however that is out of the scope of this document.
10.2 Getting to a Testing KC Login Page
Create a testing client that allows all redirect URLs. In this case we’ll name it test.
Navigate to something like the following:
http://[host]:[port]/auth/realms/[realm]/protocol/openid-connect/auth?response_type=code&client_id=[client]&scope=openid&redirect_uri=http://localhost:8081/
Replace the boxed parts with the correct values based on your configuration. For example:
https://auth-us-east-1.revealdata.com/auth/realms/000001/protocol/openid-connect/auth?response_type=code&client_id=test&scope=openid&redirect_uri=http://localhost:8081/
A IIS Reverse Proxy web.config
<?xml version="1.0" encoding="UTF-8"?>
<configuration>
<system.webServer>
<httpRedirect destination="https://CLIENT.HOSTNAME.COM:8443/"/>
<rewrite>
<rules>
<clear />
<rule name="RedirectLogin" stopProcessing="true">
<match url="^Reveal/Login.aspx" />
<action type="Redirect" url="https://CLIENT.HOSTNAME.COM/Reveal/Login.aspx" />
</rule>
<rule name="ReverseProxyInboundRule1" stopProcessing="true">
<match url="(.*)" />
<conditions logicalGrouping="MatchAll" trackAllCaptures="false" />
<serverVariables>
<set name="HTTP_X_ORIGINAL_ACCEPT_ENCODING" value
="{HTTP_ACCEPT_ENCODING}" />
<set name="HTTP_ACCEPT_ENCODING" value="" />
</serverVariables>
<action type="Rewrite" url="http://127.0.0.1:8081/{R:1}" />
</rule>
</rules>
<outboundRules>
<rule name="ReverseProxyOutboundRule1" preCondition="ResponseIsHtml1">
<match filterByTags="None" pattern="href=(.*?)http://127.0.0.1:8081/(.*)\s" />
<action type="Rewrite" value="href={R:1}https://CLIENT.HOSTNAME.COM:8443/{R:2} " />
</rule>
<rule name="RestoreAcceptedEncoding" preCondition="NeedsRestoringAcceptEncoding">
<match serverVariable="HTTP_ACCEPT_ENCODING" pattern="^(.*)" />
<action type="Rewrite" value="{HTTP_X_ORIGINAL_ACCEPT_ENCODING}" />
</rule>
<rule name="ActionRewrite" preCondition="ResponseIsHtml1">
<match pattern="action=(.*?)http://127.0.0.1:8081/(.*?)\\" />
<action type="Rewrite" value="action={R:1}https://CLIENT.HOSTNAME.COM:8443/{R:2}\" />
</rule>
<preConditions>
<preCondition name="ResponseIsHtml1">
<add input="{RESPONSE_CONTENT_TYPE}" pattern="^text/(.+)" />
</preCondition>
<preCondition name="NeedsRestoringAcceptEncoding">
<add input="{HTTP_X_ORIGINAL_ACCEPT_ENCODING}"pattern=".*" />
</preCondition>
</preConditions>
</outboundRules>
</rewrite>
</system.webServer>
<system.web>
<globalization culture="en-US" uiCulture="en-US" />
</system.web>
</configuration>