Relativity®
Configure Connection and Authentication in Relativity®*
Starting from 2.80, Relativity® REST API is used for importing/exporting data from Relativity®. Using REST API requires setting up a valid OAuth2 connection. The section below describes how to create an OAuth2 credential and use it to build a connection in Reveal AI.
Configuration of OAuth2 Client
In Relativity® open Authentication Tab and choose OAuth2 Client.

Then choose New OAuth2 Client...
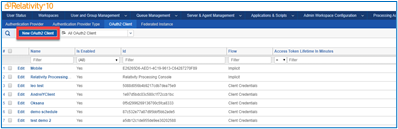
which brings you to the OAuth2 Client Information Page:

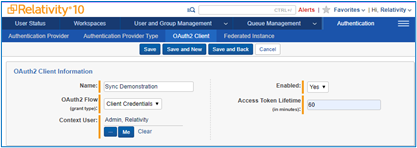
Enter the following information:
Name: According to your convenience.
OAuth2 Flow (grant type): Choose implicit, Code, Client Credentials or Resource Owner.
Context User: The ellipsis will bring you to a list of choices.
Enabled: Yes or No.
Access Token Lifetime: Authentication tokens expire after x minutes.
Then choose a Save option.
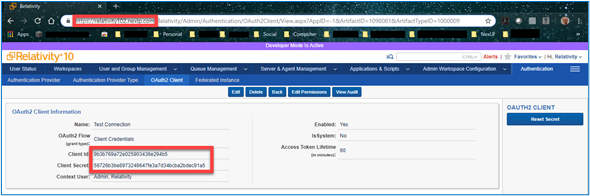
Choose SAVE and you see Client ID and Client Secret numbers automatically added:
Note
You will be capturing the Name, url, Client ID and Client Secret from the above Relativity® page to enter into the appropriate boxes in the NexLP Add Relativity® Server Connection Page.
Add Relativity® Server Connection
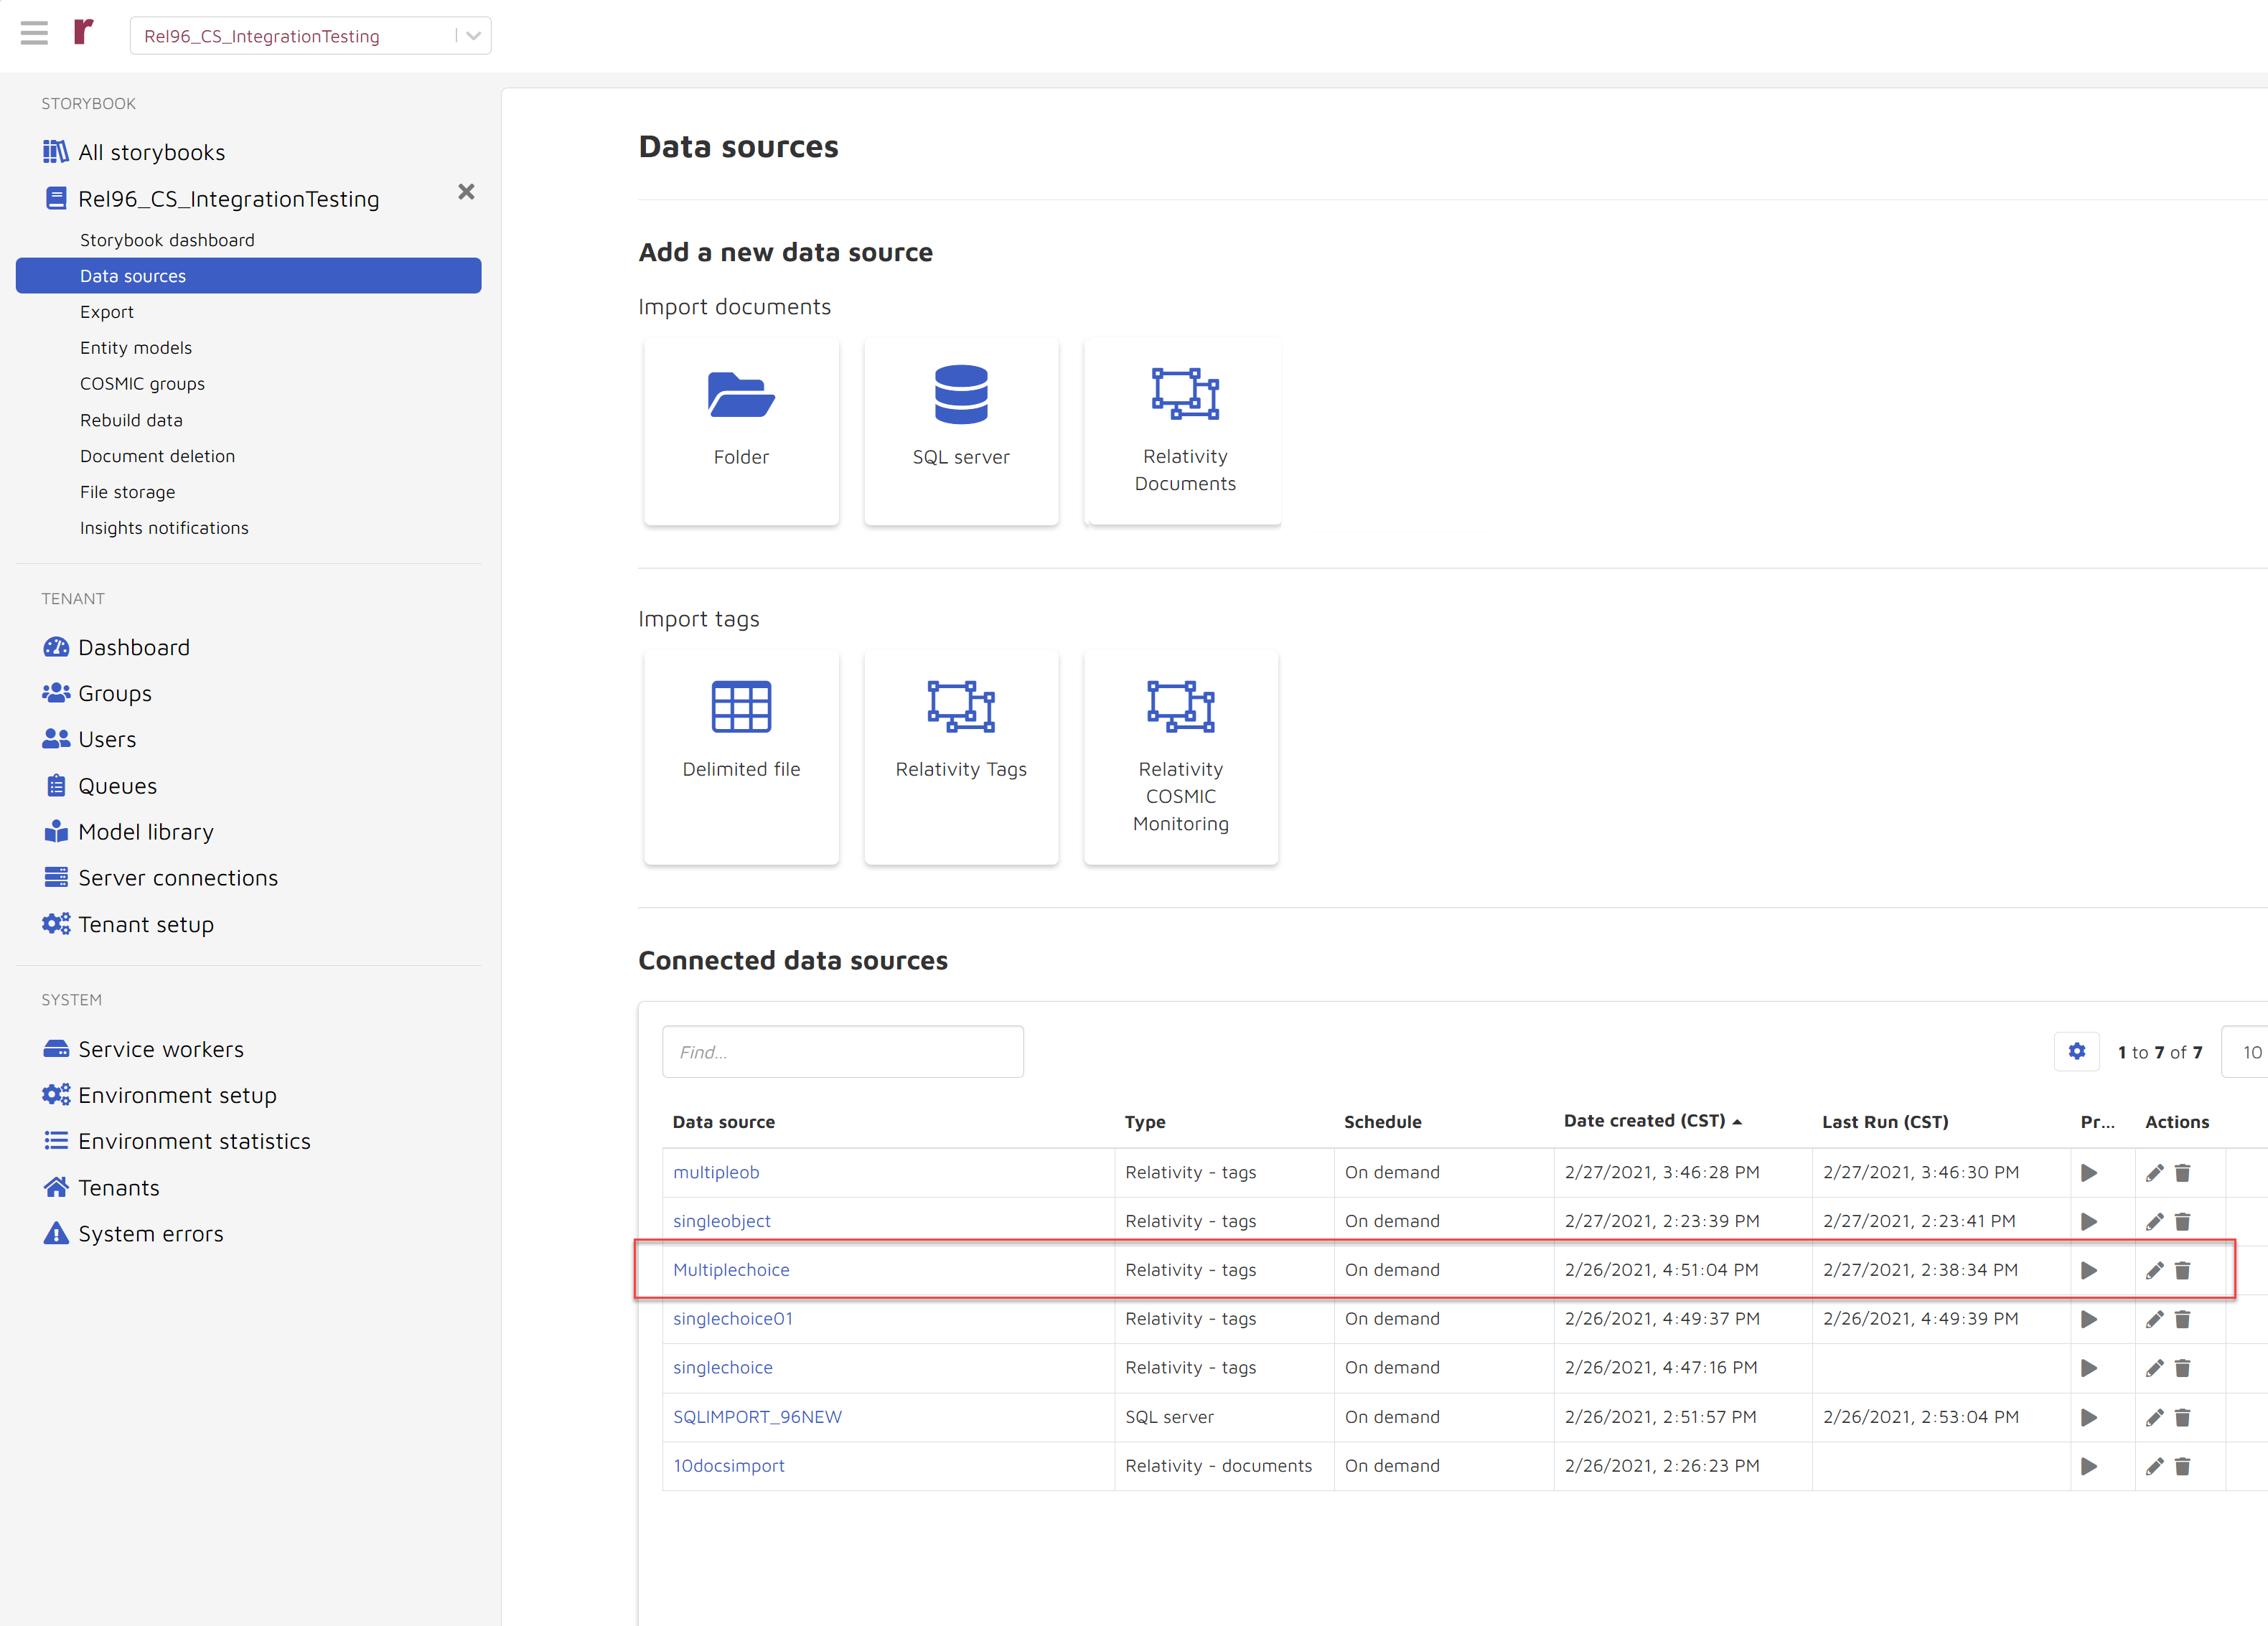
Go to Reveal AI, Admin Page and under Tenant Settings choose Server Connections.
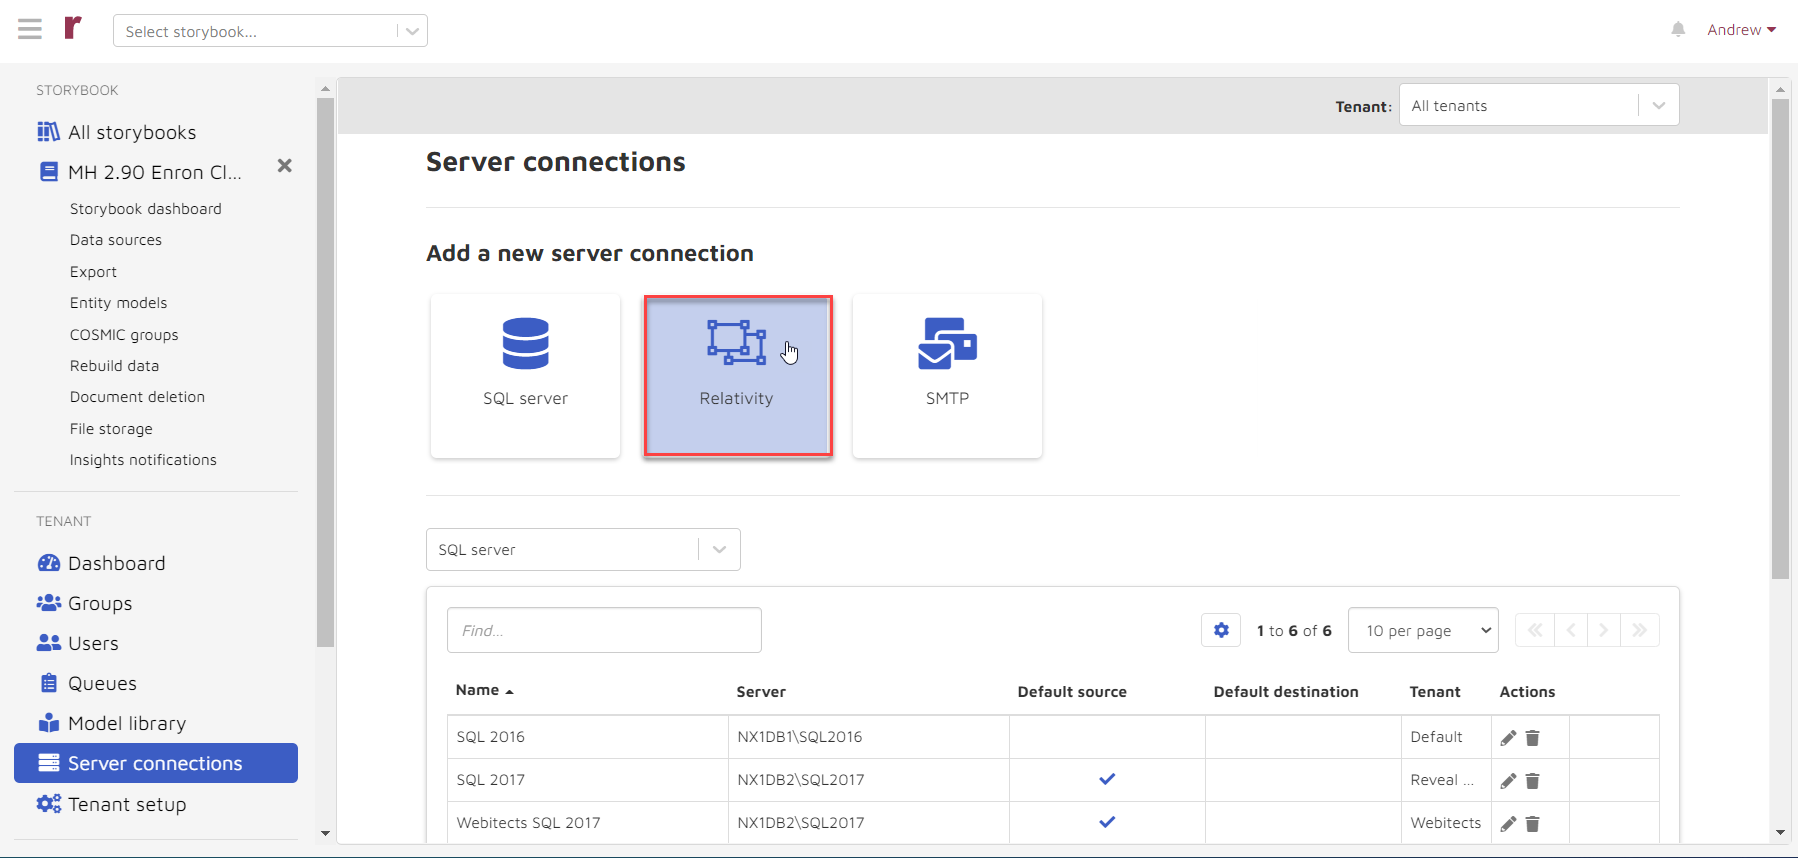
Now choose the Relativity® icon and you see Server Connections >> Add Relativity® Server Connection.
Enter the following items by copying and pasting from the Relativity® 0Auth2 Information page shown on the preceding page: Tenant, Name, Client ID, Client Secret and your Relativity® Url:
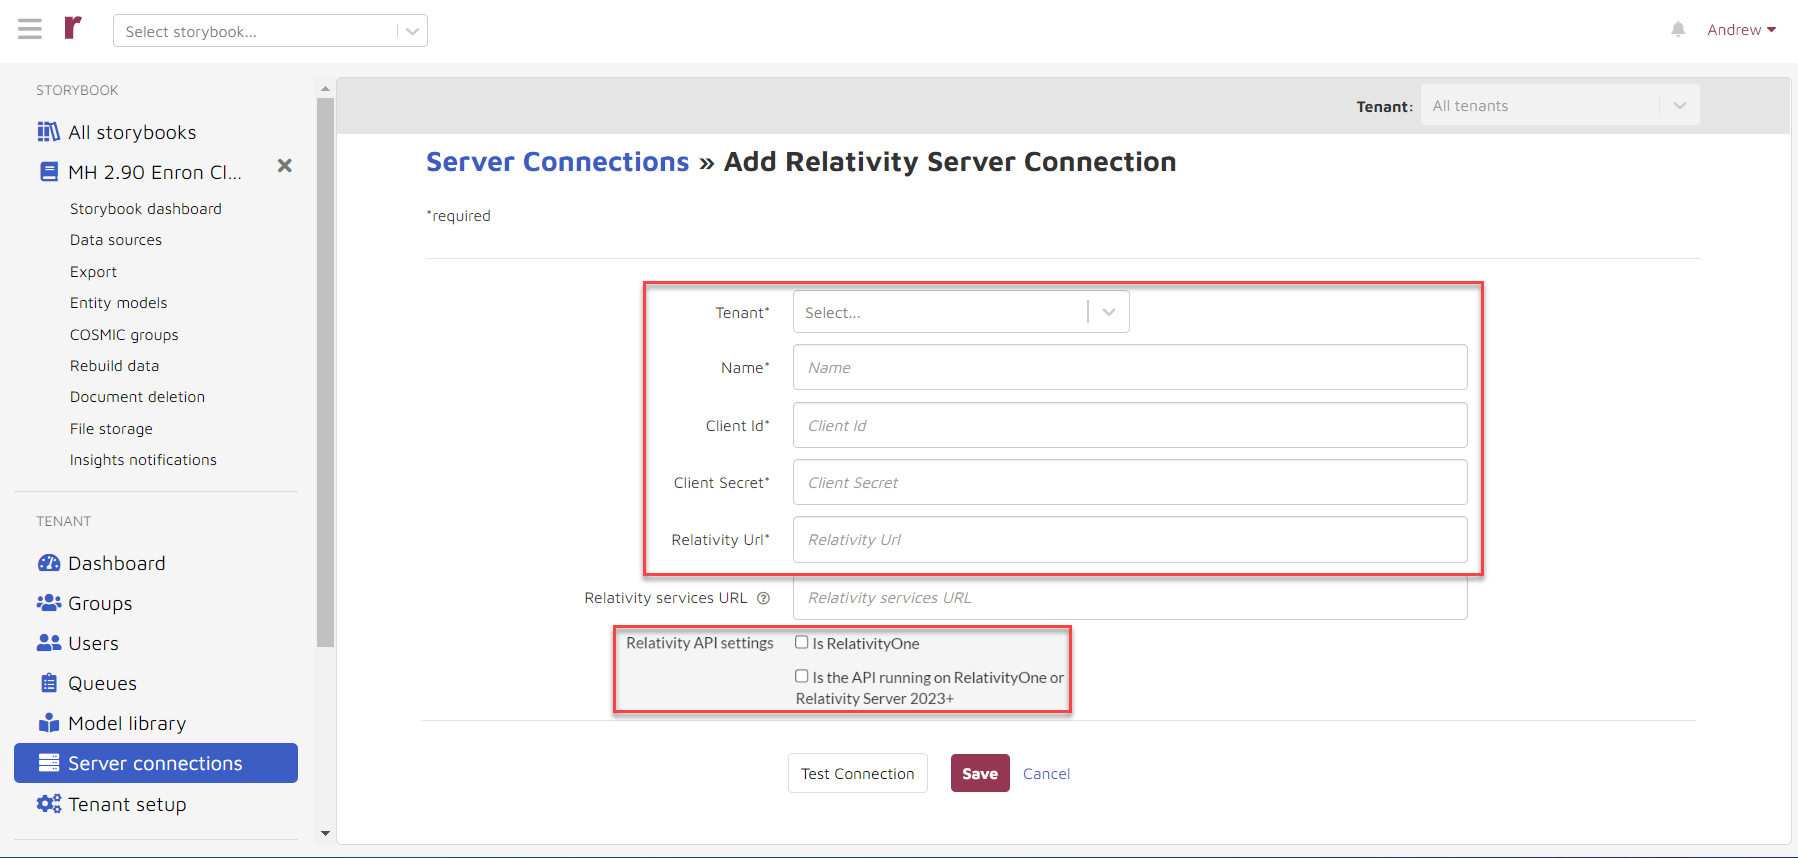
If you are using RelativityOne, the Relativity® Services URL box must also be filled in using the following format: “https://<domain>-services.relativity.one”. If you are uncertain of of your Relativity® services URL, please contact Relativity® customer support.
In addition, there are two checkboxes needed to address changes in the Relativity® API.
Relativity® Version | Relativity® API Checkbox |
|---|---|
RelativityOne | Check both |
On-prem Relativity® Server 2021 | Uncheck both |
On-prem Relativity® Server 10.3 and below | Uncheck both |
On-prem Relativity® Server 2023 (TBD) | Check the 2nd but not the first |
Note
Under the new Relativity® API, Single Sign-On and COSMIC Sync will not be available to users connected to RelativityOne. For these users standard login and “Alternative to Story Engine Home Tab” will be supported, and use of COSMIC monitoring is recommended for tag synchronization.
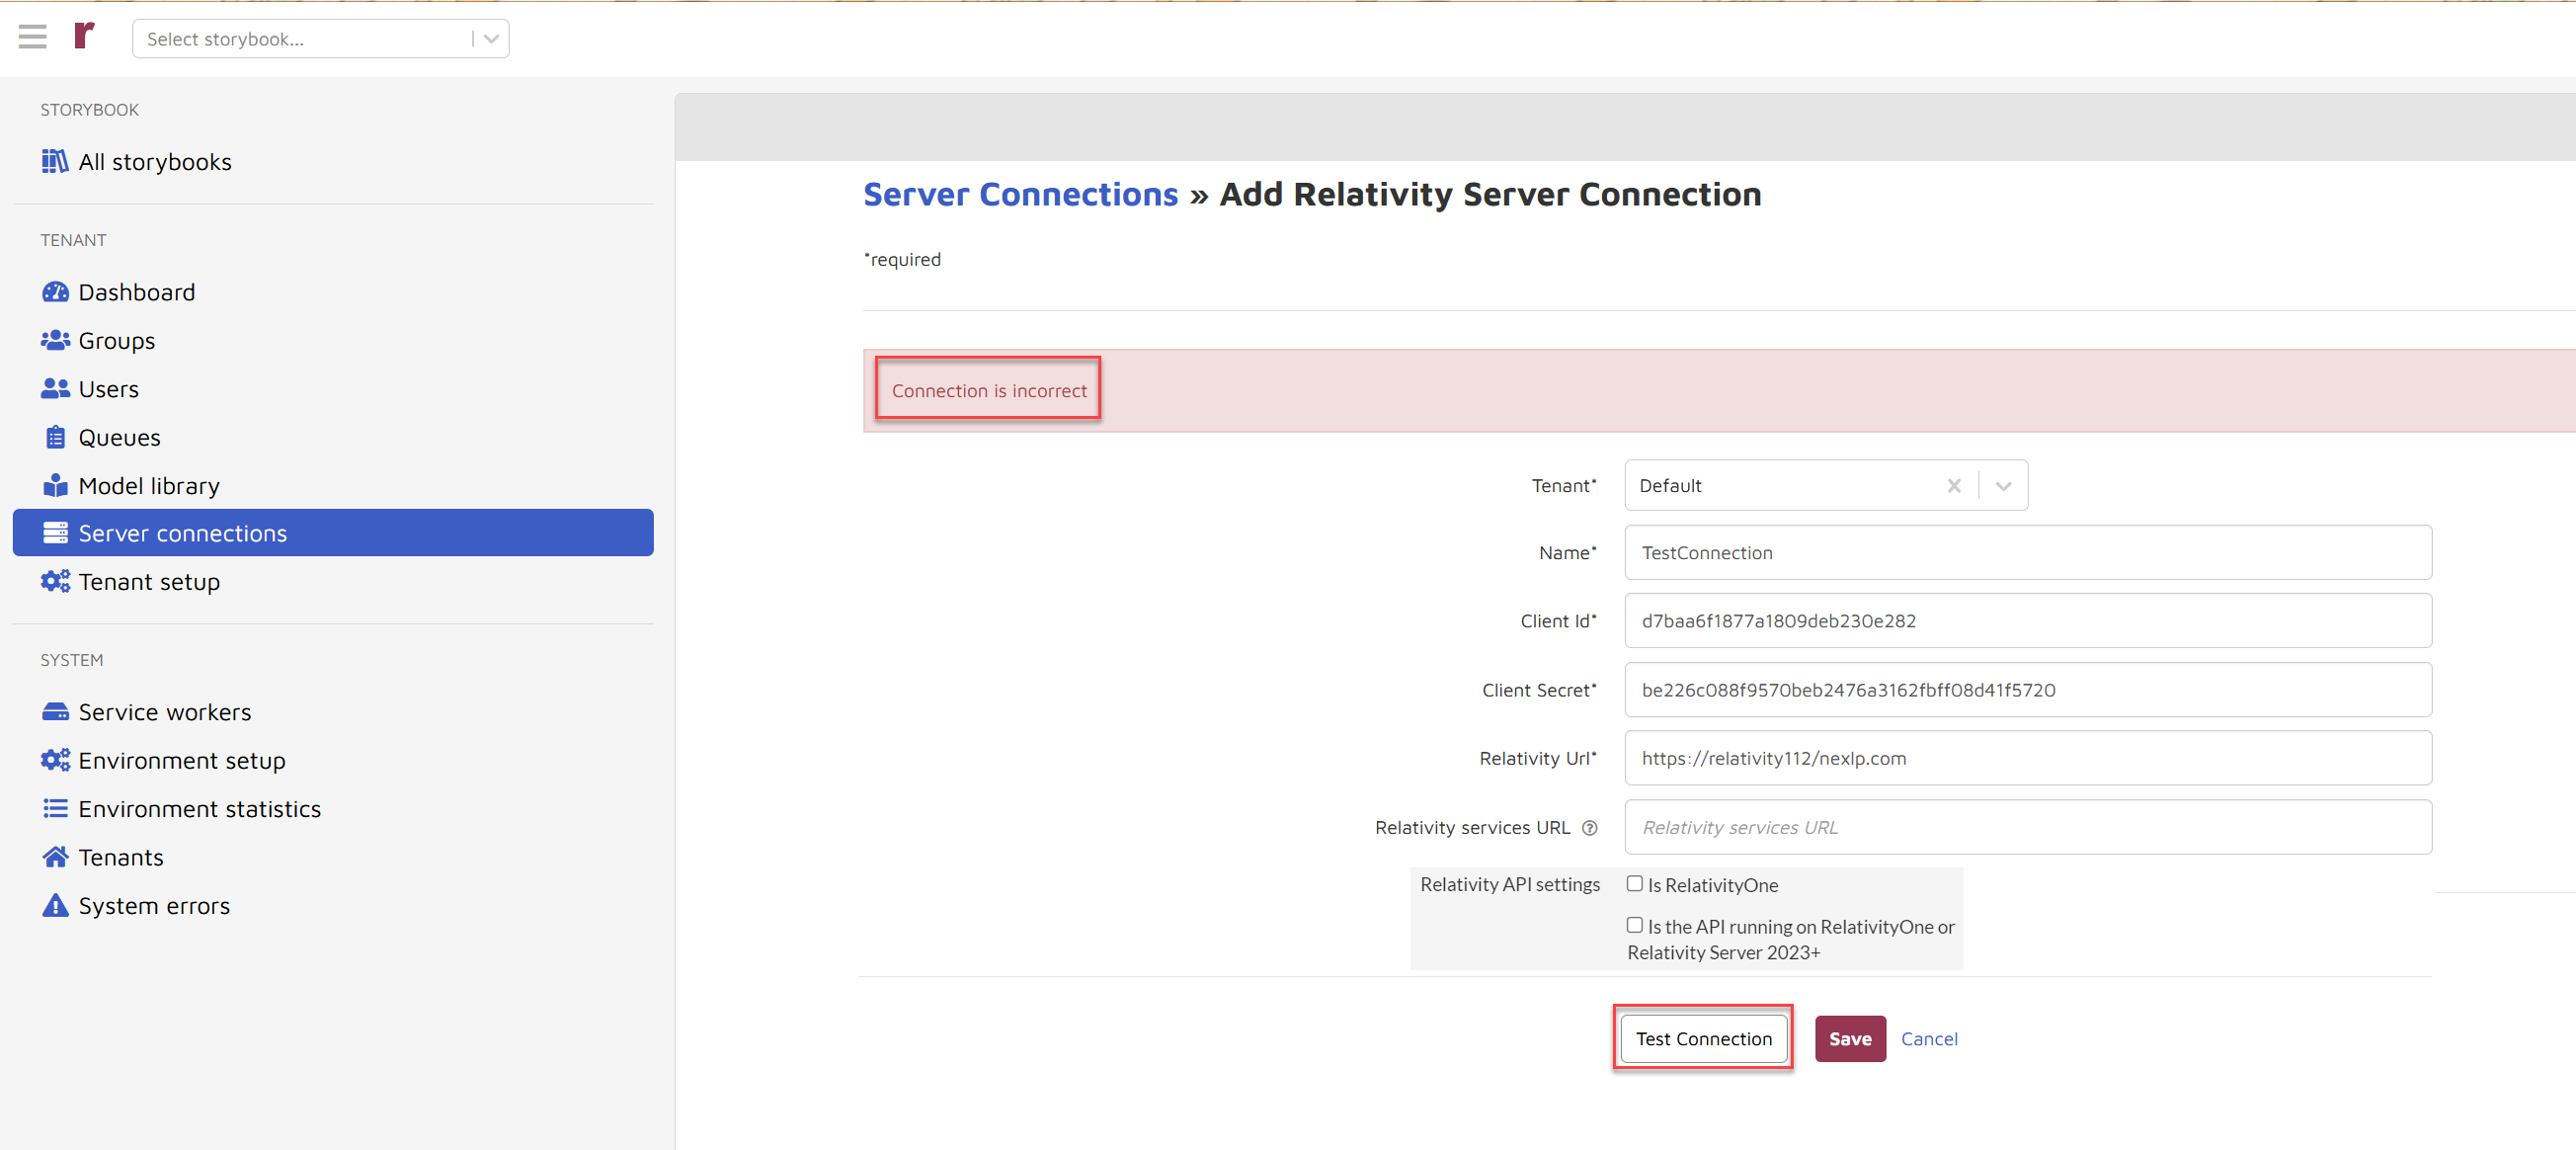
Choose Test Connection and if all the information is good Connection is correct is displayed. Otherwise, Connection is incorrect displays as shown below.
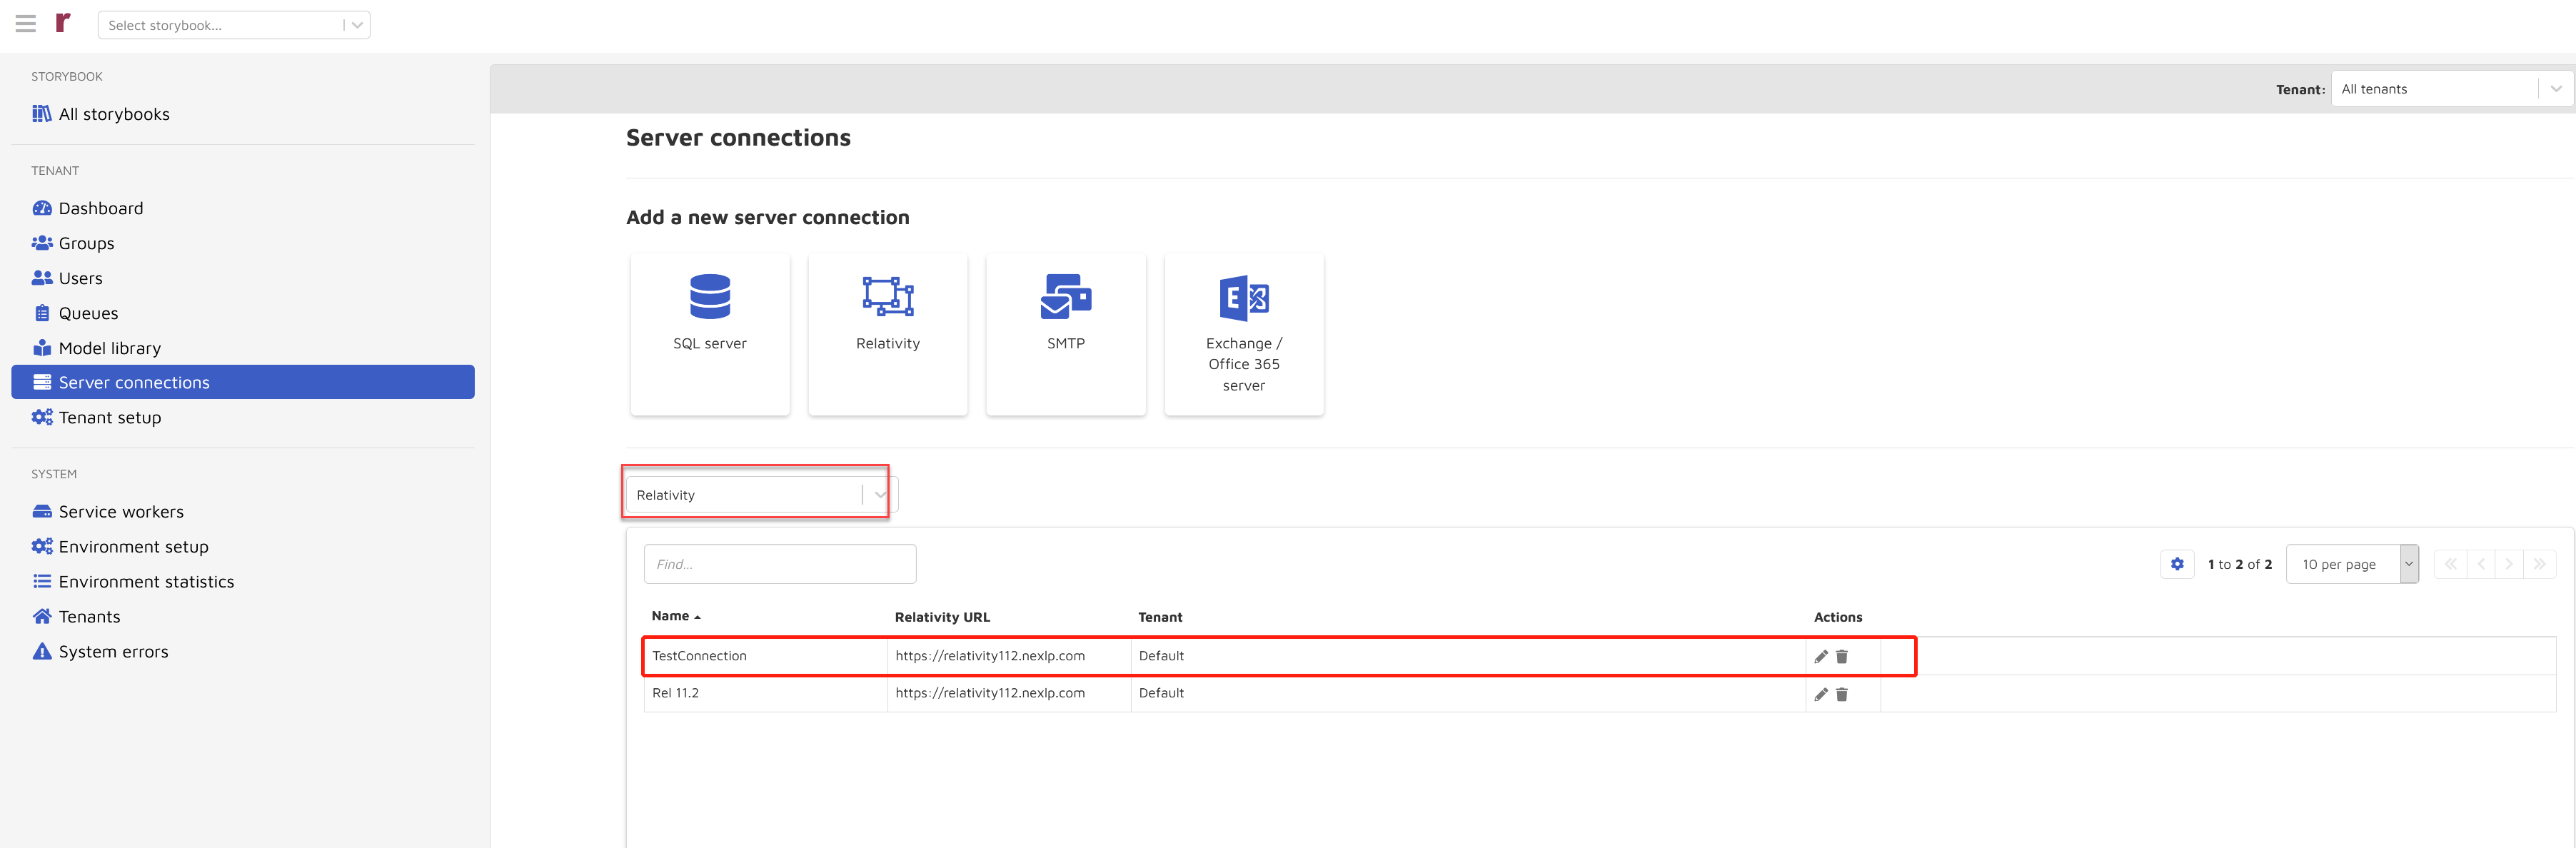
Assuming “Connection is correct” you will choose Save and a properly saved connection appears on the list of server connections in the Relativity® section of the Server connections page:
Import documents from Relativity®
If a storybook is set to have external type “Relativity”, the Relativity Documents button shown below will appear. This will allow you to import documents directly from Relativity®.
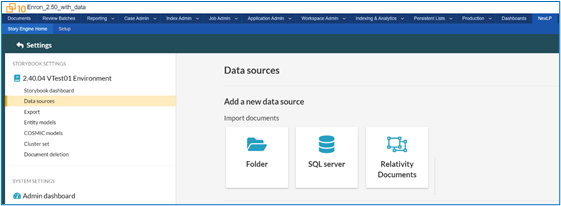
Click the Relativity Documents button to add a Relativity® document processing job.
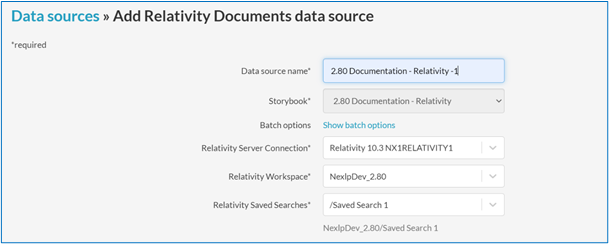
The following items are required:
Data source name: Create a name. Give your Relativity® data source a name that you can use to reference in Reveal AI. We recommend naming it with descriptive information referencing the Relativity® storybook name so you can easily identify it.
Storybook: This window is automatically populated with the name of the current storybook.
Batch options: Choose “Show batch options” and the following appears for you to edit:

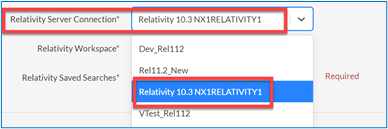
Relativity® Server Connections: Choose from the dropdown list. Select a source server you wish to read from. If your desired server is not available in the drop-down, go to Server connections to connect it.
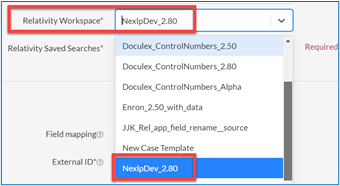
Relativity® Workspace: Choose the relevant workspace from the dropdown list.
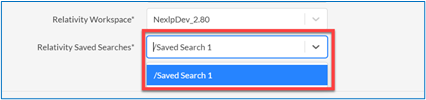
Relativity® Saved Searches: Choose from the dropdown list of Rellativity saved searches. Documents included in the saved search will be processed. Note that only those saved searches to which the OAuth2 client has access will be available in the dropdown.
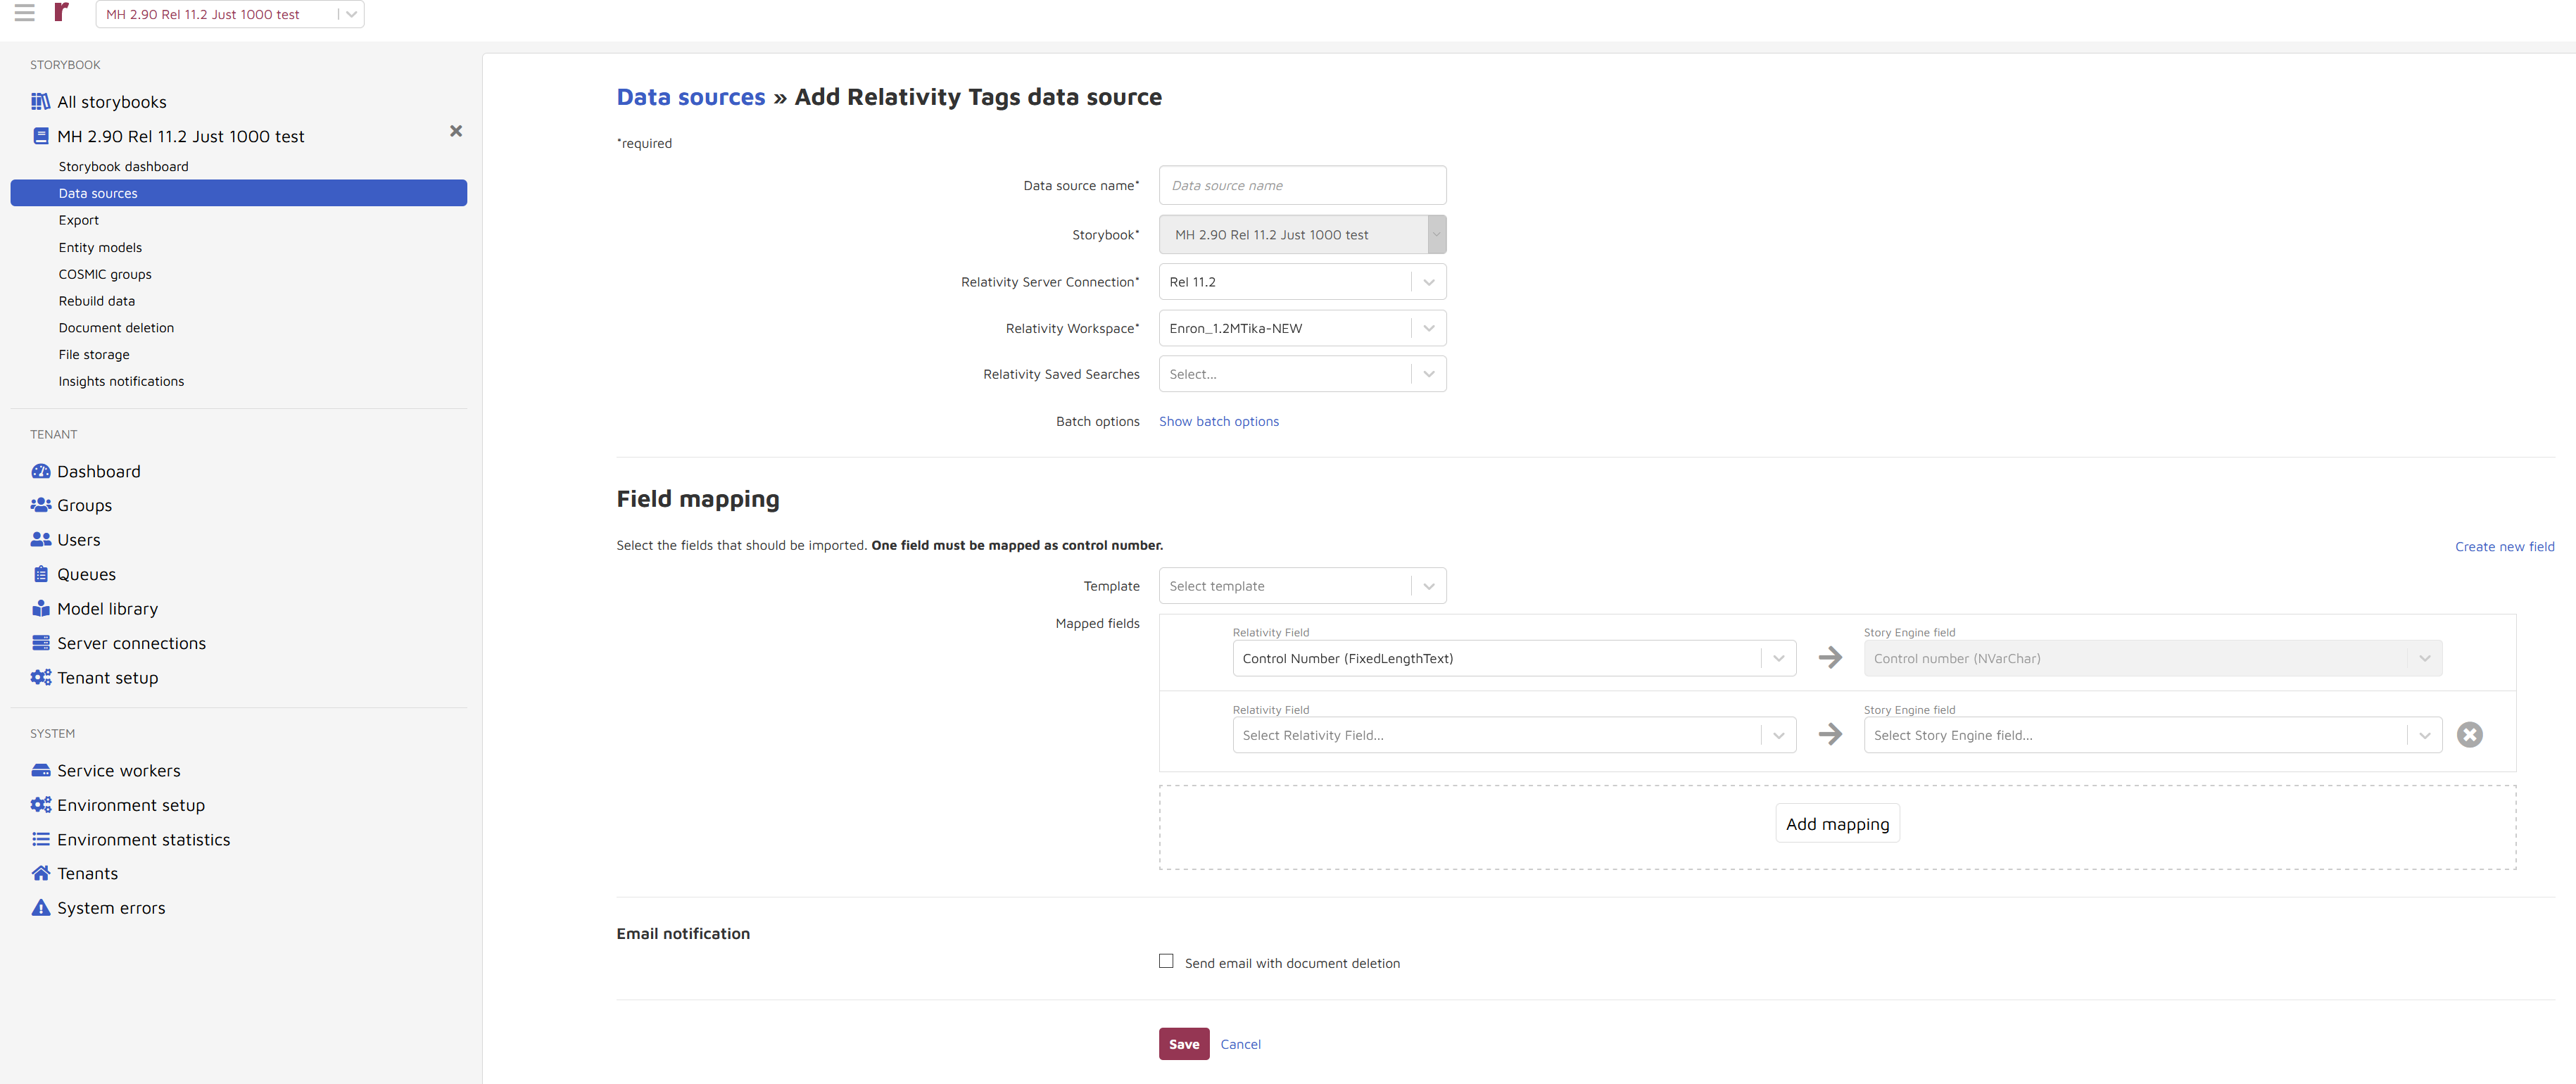
And map the fields.
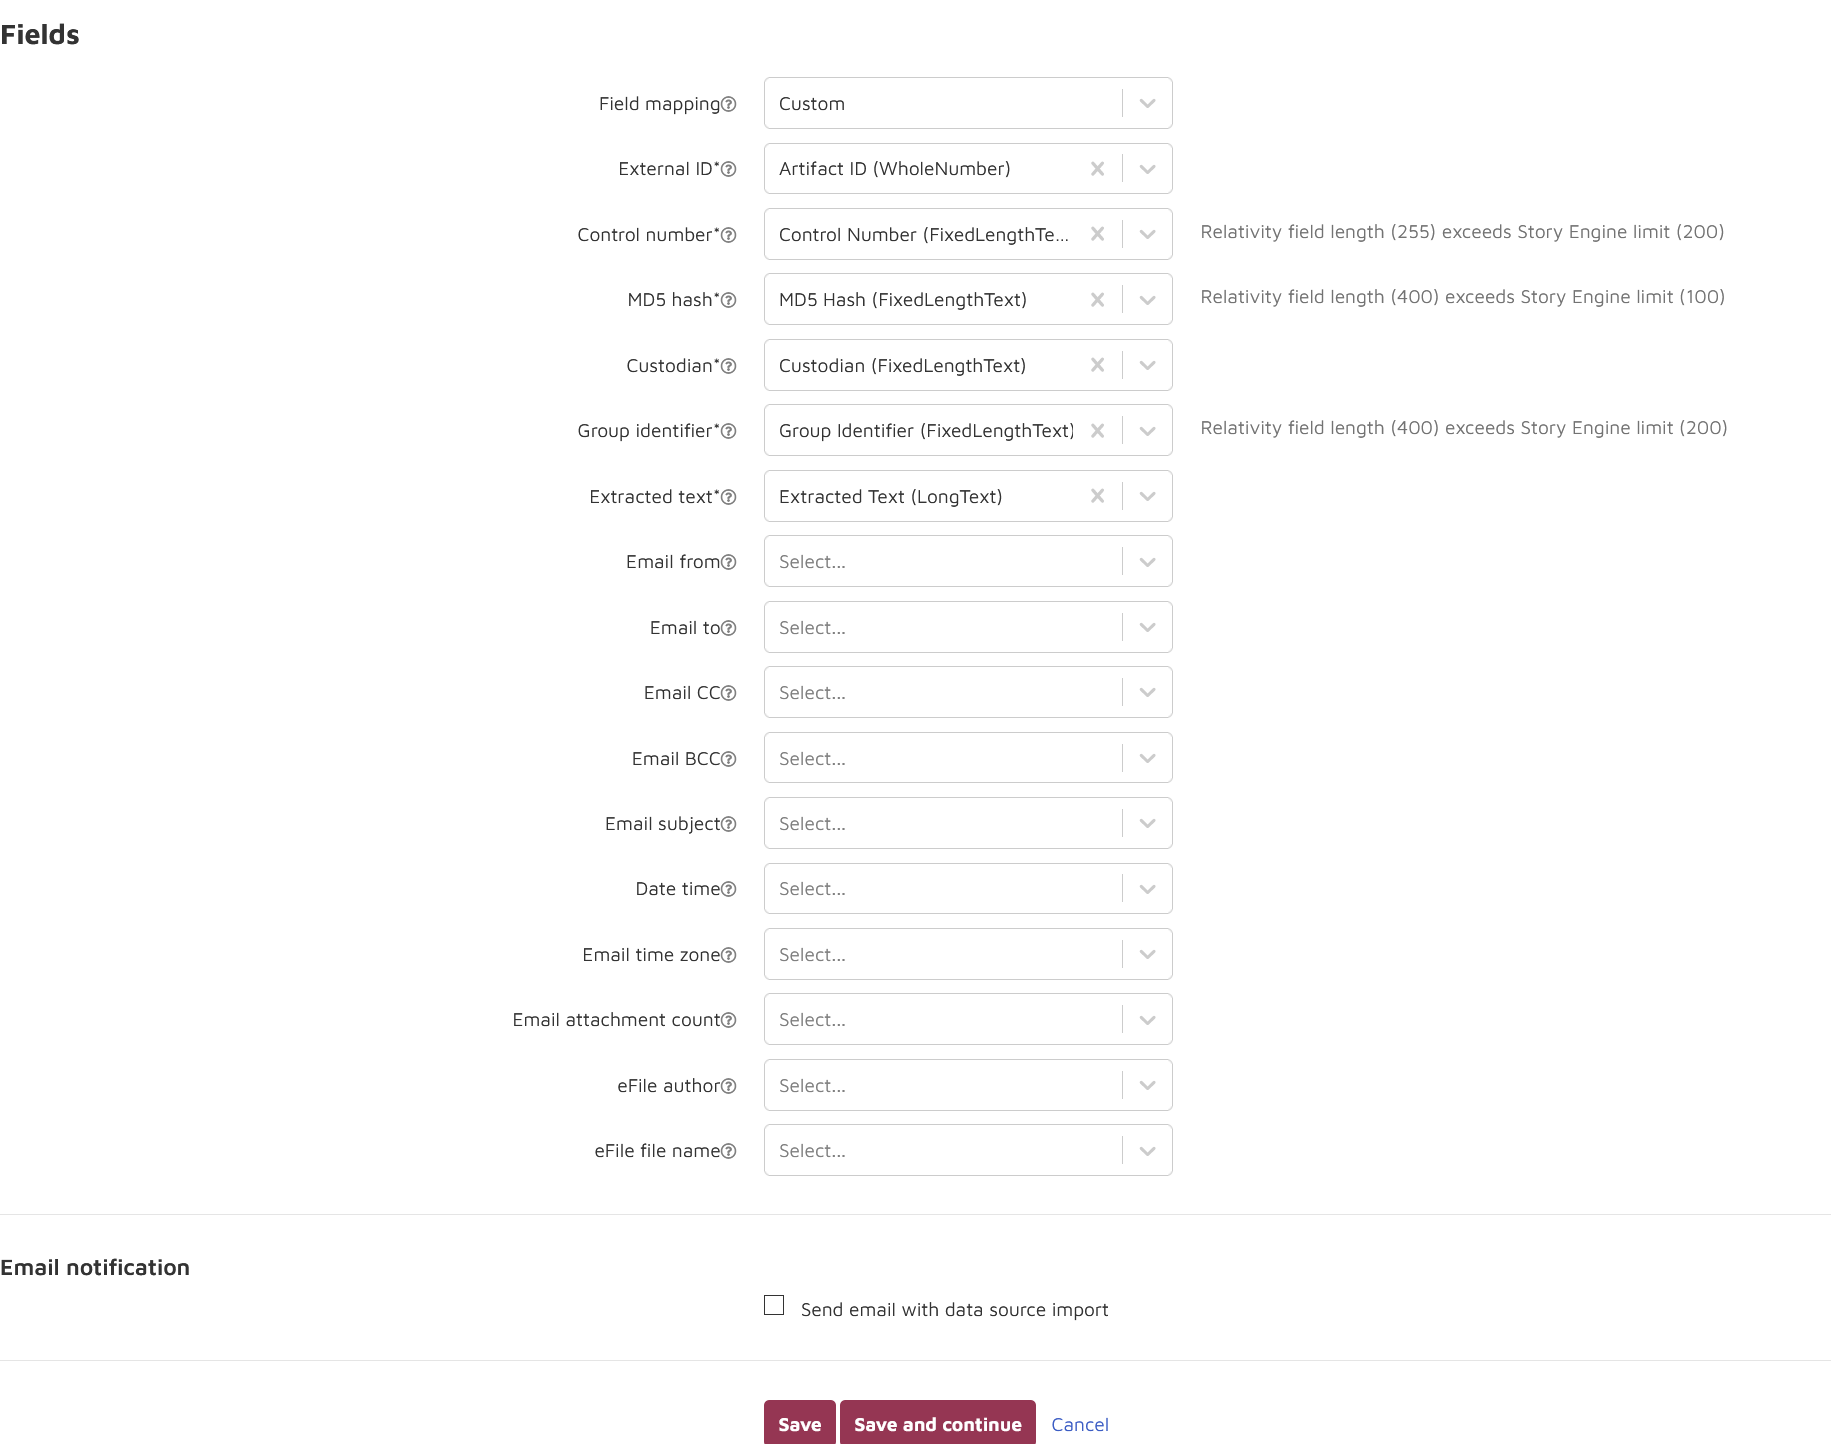
Relativity® fields
Field mapping: you can map Relativity® fields from scratch by selecting Custom or save time by loading mapping selections used previously.
Only fields with compatible field types will be displayed as mapping options. Asterisked fields are required for processing.
ID | Field Name | Field Type | Field description |
|---|---|---|---|
1 | External Id* | Number | Numeric identifier of the document. For Relativity®, use ArtifactID |
2 | Control Number* | Text | Text identifier of the document |
3 | MD5 hash* | Text | MD5 hash value, default to Control Number if empty |
4 | Custodian* | Text | Name of the custodian. If unavailable, processing will default empty values to “Empty Custodian”. |
5 | Group Identifier* | Text | Used to group email and attachments together; default to Control Number if empty. NOTE for parent, the Group Identifier must be equal to the Control Number |
6 | Extracted Text* | Text | Path to the text file exported, or text content itself |
7 | Email From | Text | Field only relevant to emails |
8 | Email To | Text | Field only relevant to emails |
9 | Email CC | Text | Field only relevant to emails |
10 | Email BCC | Text | Field only relevant to emails |
11 | Email Subject | Text | Field only relevant to emails |
12 | Primary Date Time | DateTime | Date and Time the email was sent, or last modified date time for attachments & e-files. It is important to include the “Time” part for this field. |
13 | Email Time zone | Text | The time zone with which the document should be processed. Most common values: EST/CST/PST/GMT |
14 | Email Attachment Count | Number | Field only relevant to emails. Number of attachments the email has. |
15 | eFile Author | Text | Last Author of the efile or attachment, if it exists |
16 | eFile Filename | Text | Filename of the efile or attachments |
The Processing data settings page shows you the steps the system will take once processing begins. There are several settings associated with the computer-generated content detection, ingestion, natural language pipeline and pattern detection steps that you may modify. You may also modify the processing XML to include any custom settings that may be desired.
After you finish mapping the fields, choose Save and Continue and the Process data source page appears:
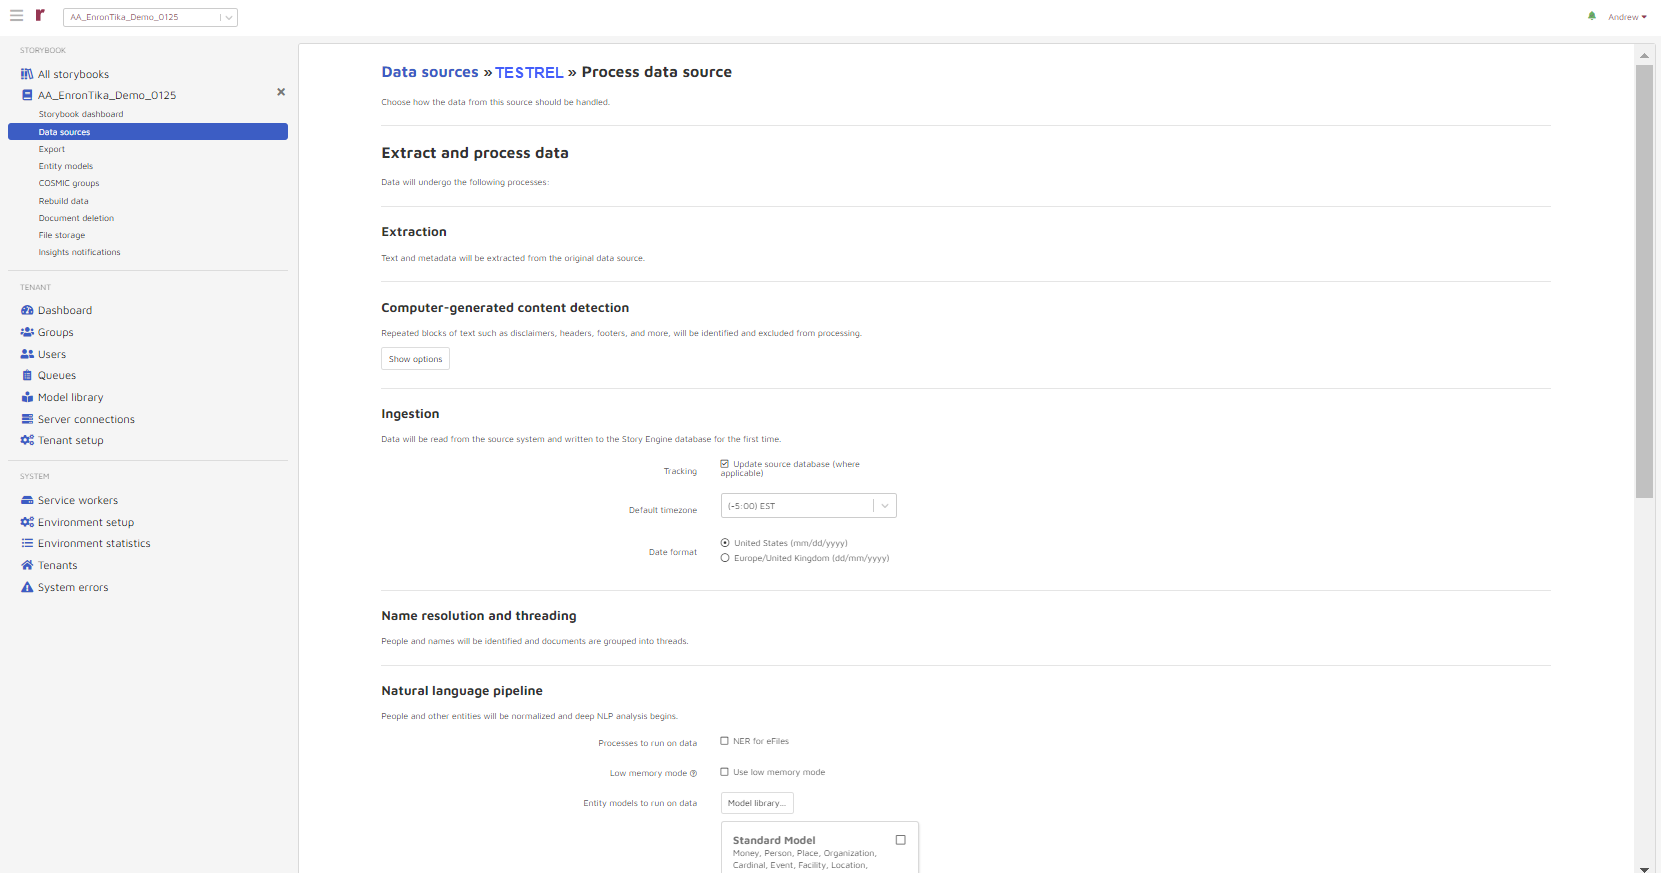
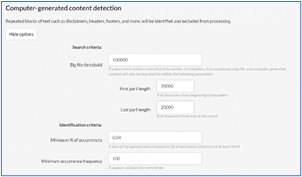
Computer-generated Content Detection: click the Show options button to view and set options for computer-generated content detection:
Under Ingestion:
Default Time zone: the “Default time zone” option tells Reveal AI which time zone to use when processing email text if the Time Zone information is missing in the header lines.
Date Format: the system will prioritize processing using either UK or US date formats based on user selection for this option.
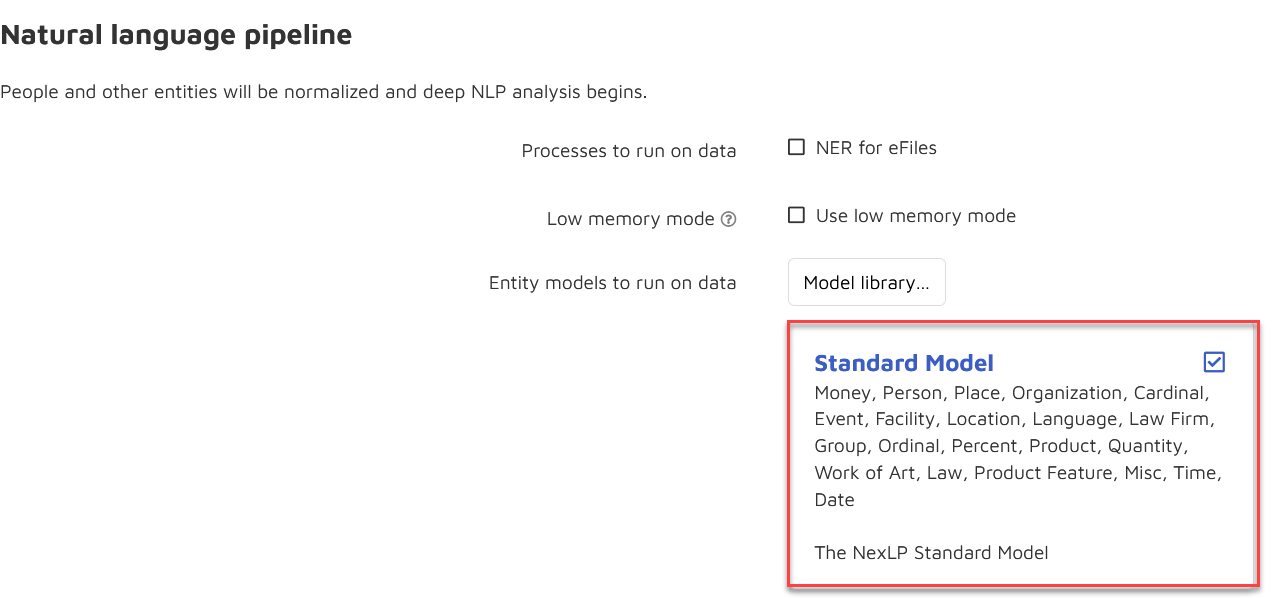
Under Natural language pipeline:
NER for eFiles: by default, Reveal AI only extracts Entities for emails. The “NER for eFiles” option allows user to extract Entities from loose files and attachments. Notice this could increase time needed for processing.
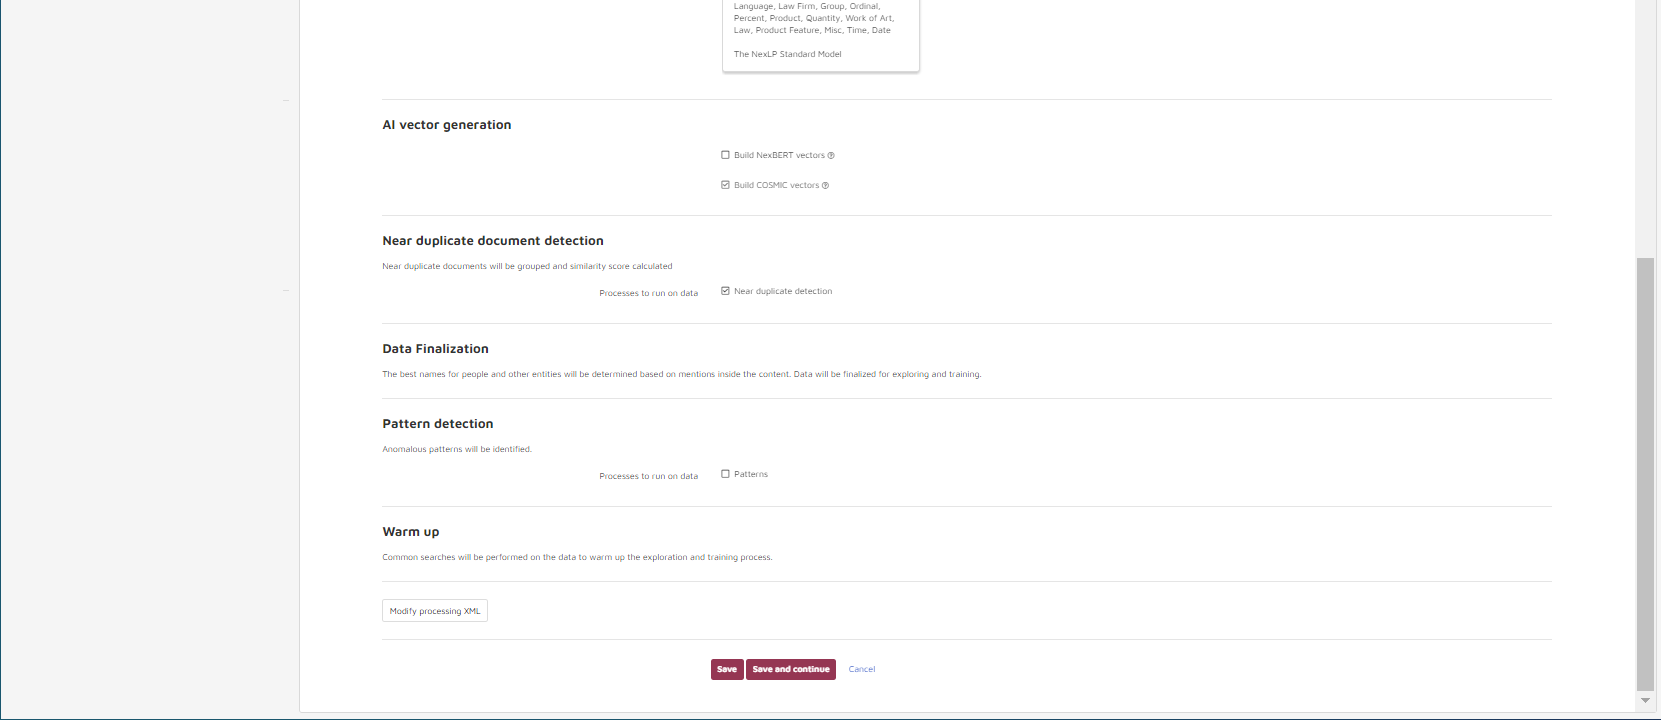
Entity models to run on data: Any models may appear by default according to your configuration. You may turn any model off by unchecking the associated checkbox. By pressing the Model library button you can view the list of additional available models as shown below. You may run any combination of models or none at all.
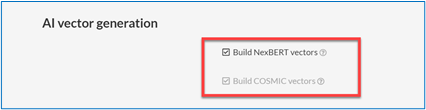
Under AI vector generation:
AI vector generation: by default you will build COSMIC vectors. You may optionally decide to build NexBERT vectors which is required if you are going to use NexBERT models.
Under Pattern detection:
Patterns: by default, Reveal AI processes Patterns. If Pattern Detection is not required, uncheck the Patterns checkbox.
Before kicking off processing, the system will confirm the number of documents you will be processing, and undergo final pre-flight checks to ensure the data is in good shape to process.
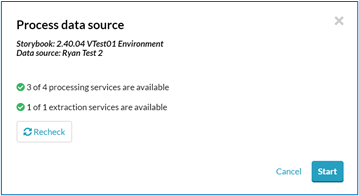
If your data isn’t set up correctly you may get a warning in this screen.
Note
Processing will kick off regardless of any warnings.
 There are no documents ready for processing
This is the number of documents with a process status=0. If this is not the number you were expecting, please check your data source and update the process status field.
0 of X processing services are available
Your processing service is stopped. If you click Start, your processing job will be added to the queue, but the processing service will need to be launched before this one begins.
No service found with POS Tagger API configured
Your POS Tagger service is stopped. If you click Start, your processing job will be added to the queue, but the POS Tagger service will need to be launched before this one begins.
No service found with NER configured
This data source was configured to run with entity extraction but no service was found with Named-Entity Recognition (NER) configured. It is recommended that this be configured to ensure actual results.
No service found with DCI configured
This data source was configured to run with dataless classification but no service was found with DCI configured. It is recommended that this be configured to ensure actual results.
Documents may not have attachments
Column “Groupidentifier” in Table “EDDSDBO.Document” of Database “EDDS1015555_Test” contains at least one blank or null value. Column “Groupidentifier” values will be replaced with values from Column “ControlNumber” for rows where this occurs. When this occurs, documents will not have any associated attachments.
Documents may not have valid md5 value
Column “MD5Hash” in Table “EDDSDBO.Document” of Database “EDDS1015555_Test” contains at least one blank or null value. Column “MD5Hash” values will be replaced with values from Column “ControlNumber” for rows where this occurs.
Documents may not have some necessary indexes
Table “EDDSDBO.Document” of Database “EDDS1015555_Test” does not have an index which contains the column Column””.
Create Missing Index
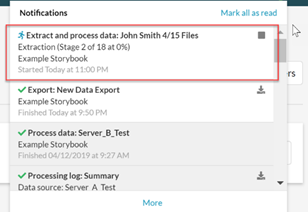
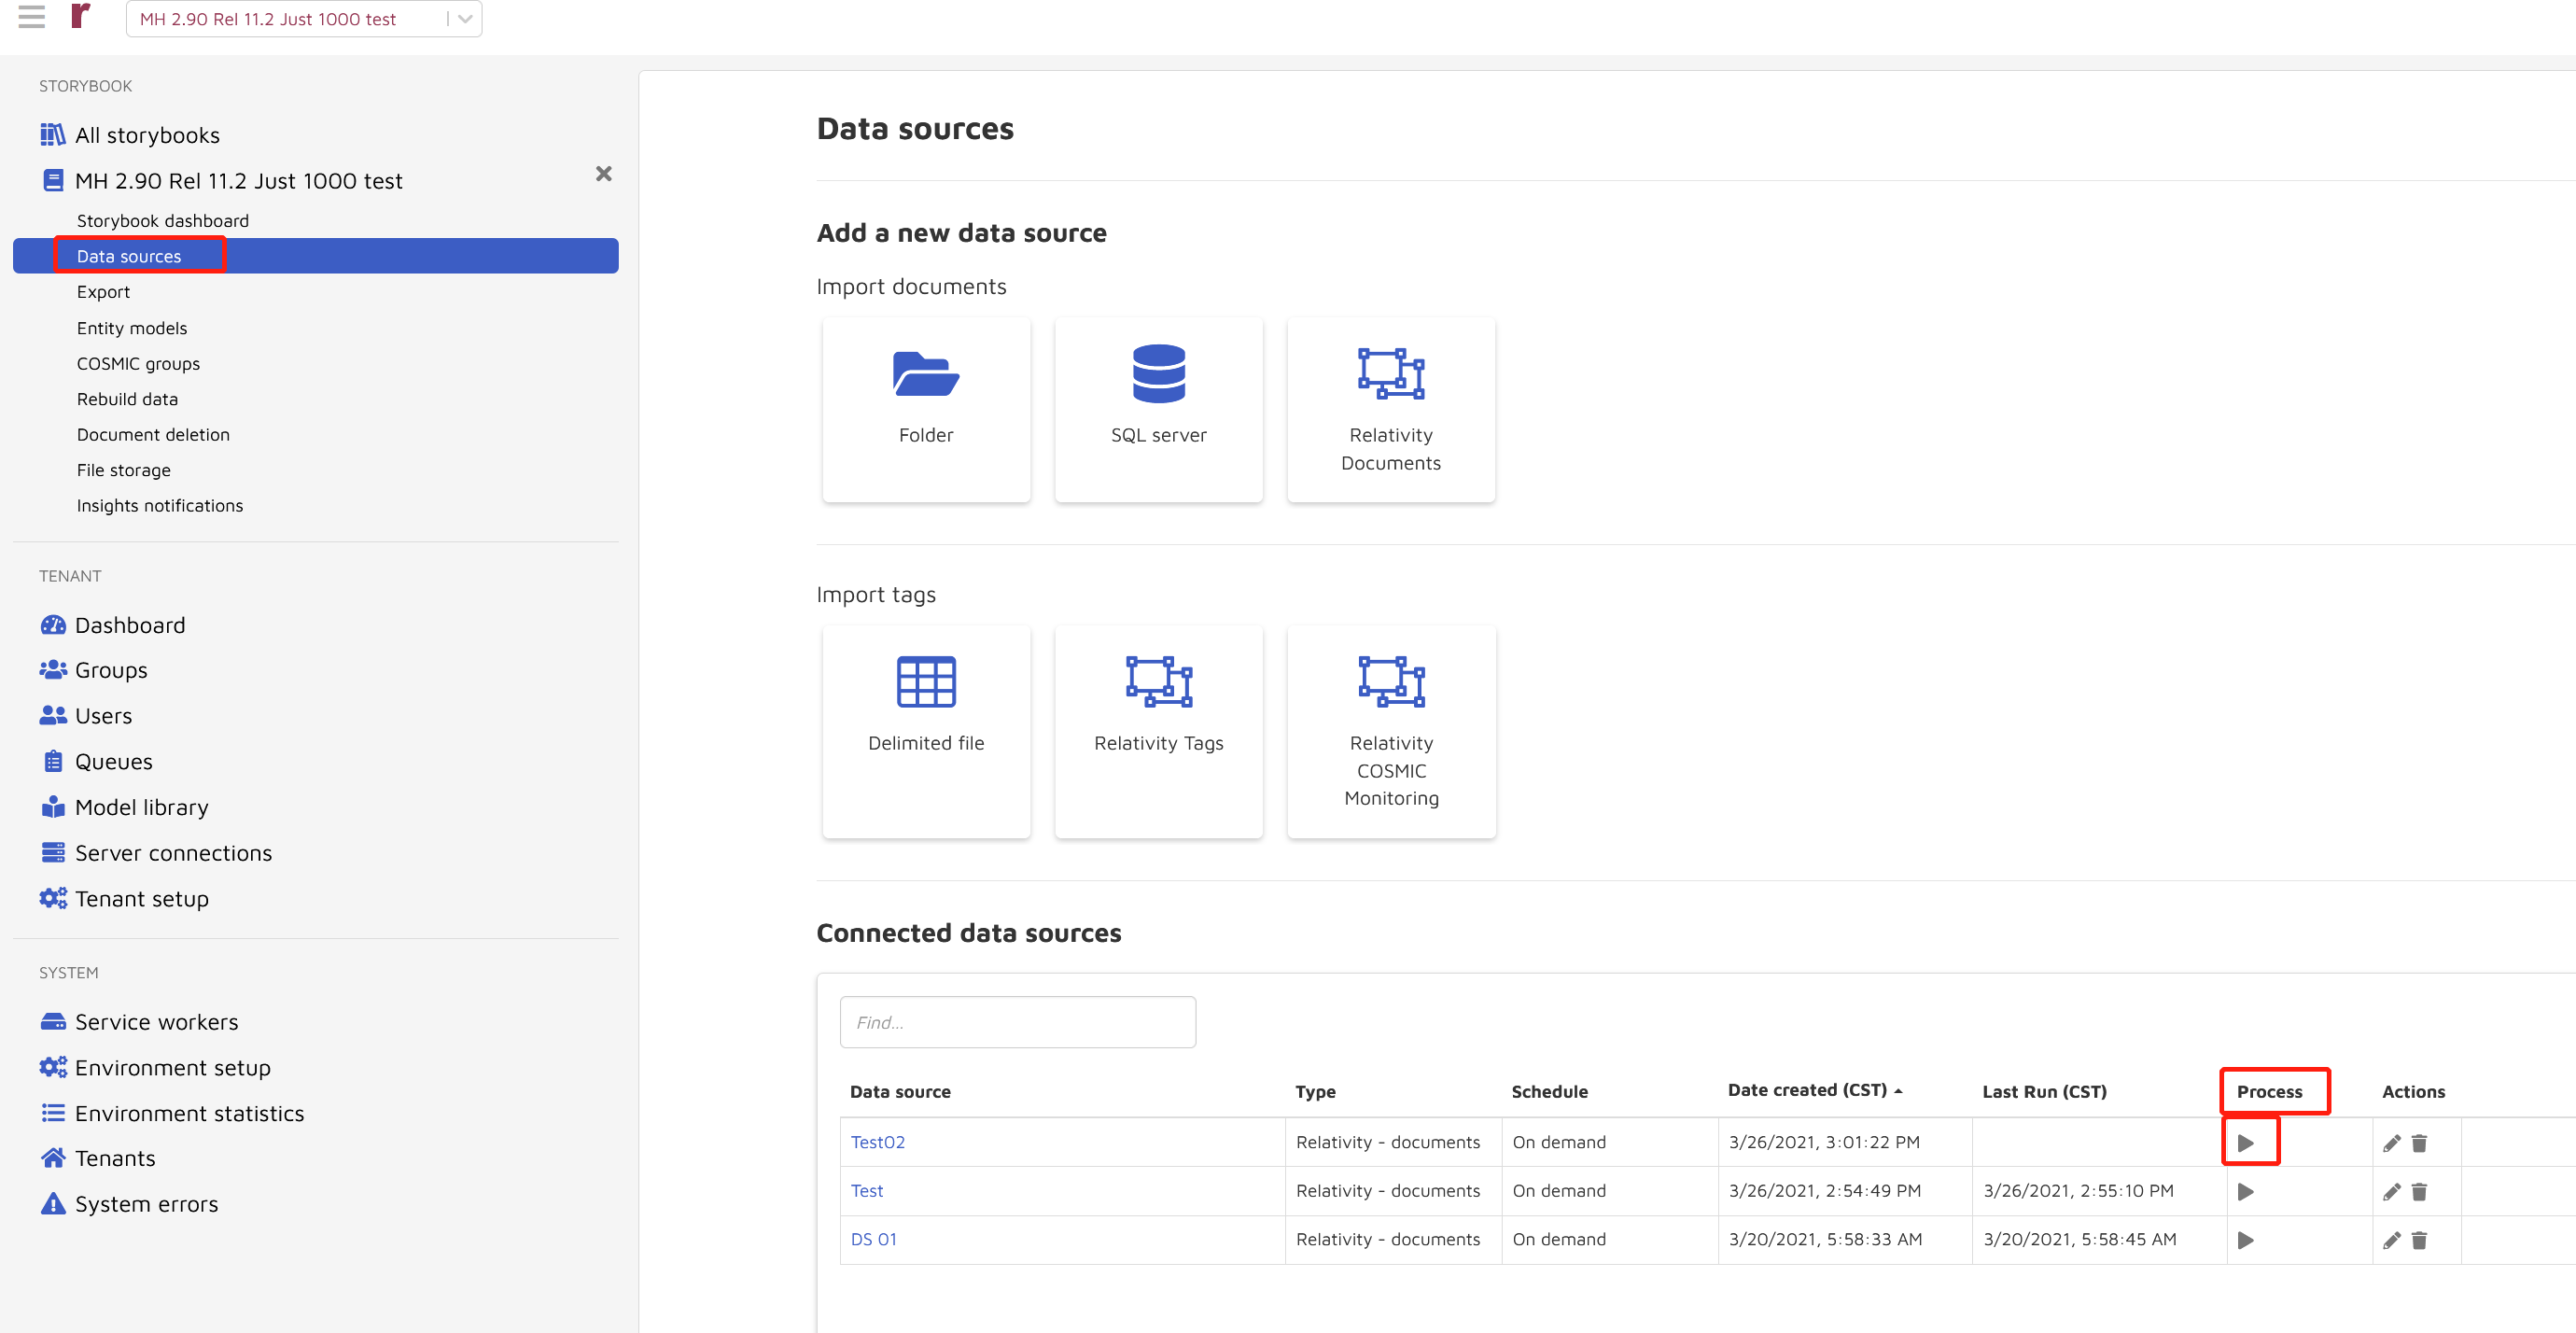
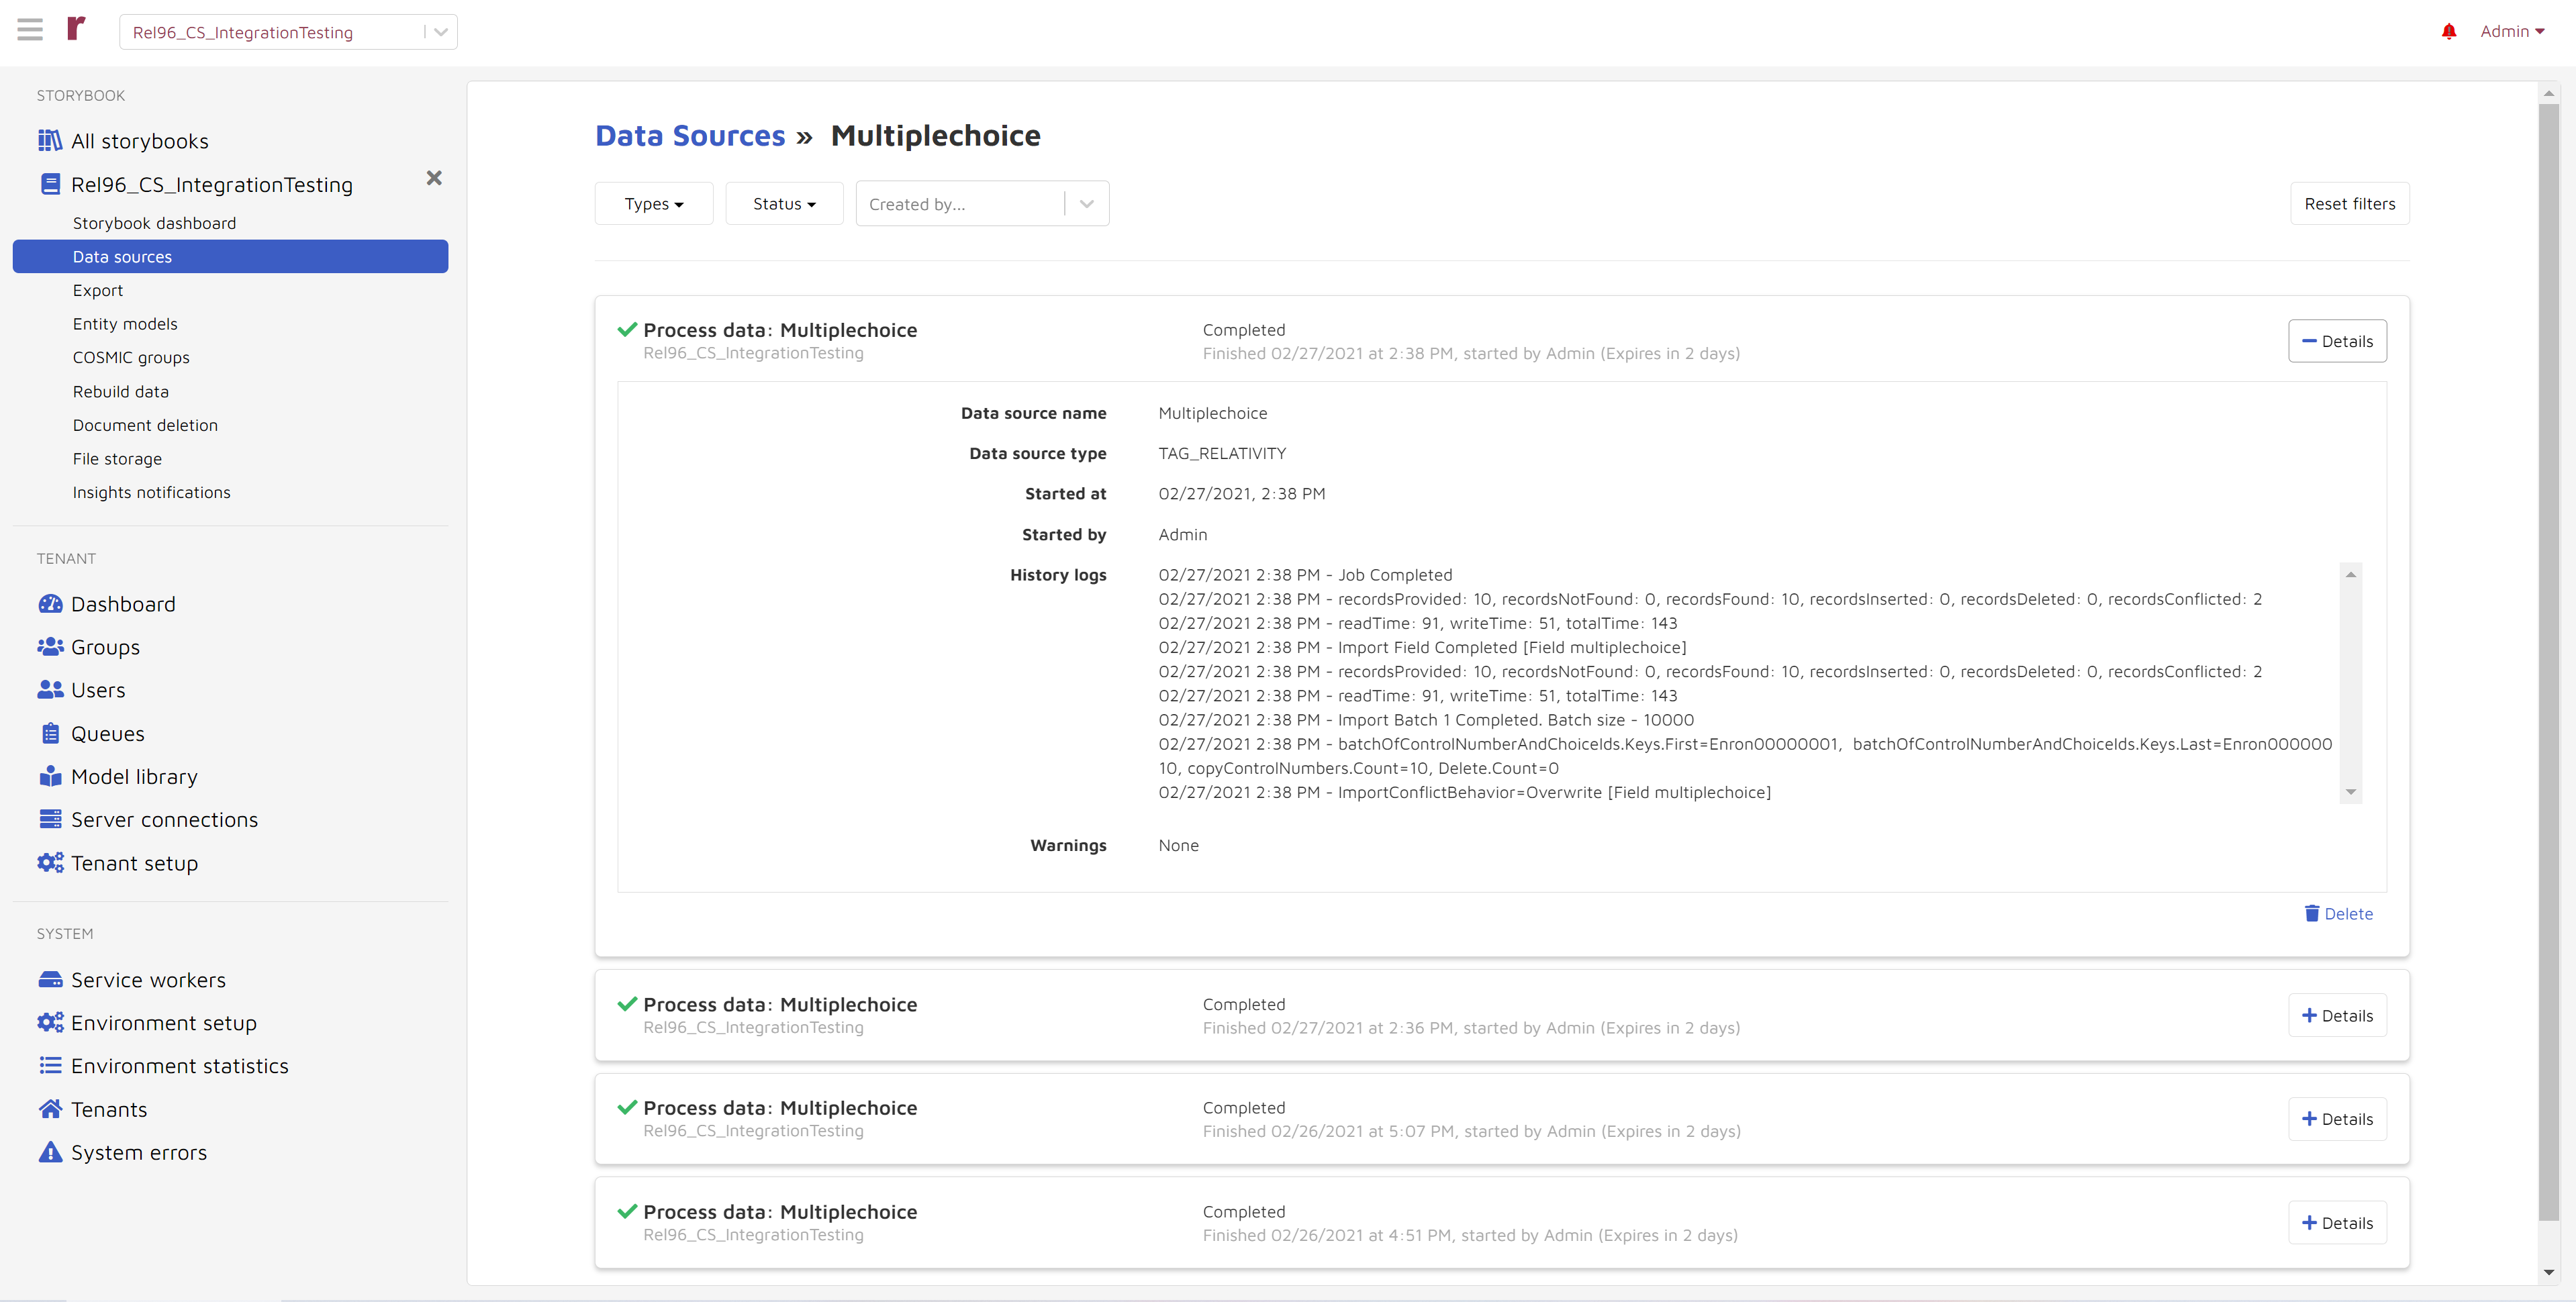
Once you click the Start button, processing will kick off immediately. You will be able to check the status of processing in the Notification center and/or storybook dashboard.
Notification center:
Storybook dashboard view:

If you decide to click the Stop button while data is processing, your progress will be saved. You can resume by going to the Data sources page and clicking the triangle icon under the “Process” column as shown below.
Import tags from Relativity®
If a storybook is set to have external type “Relativity”, the Relativity Tags shown below will appear. This will allow you to import tags directly from Relativity®.
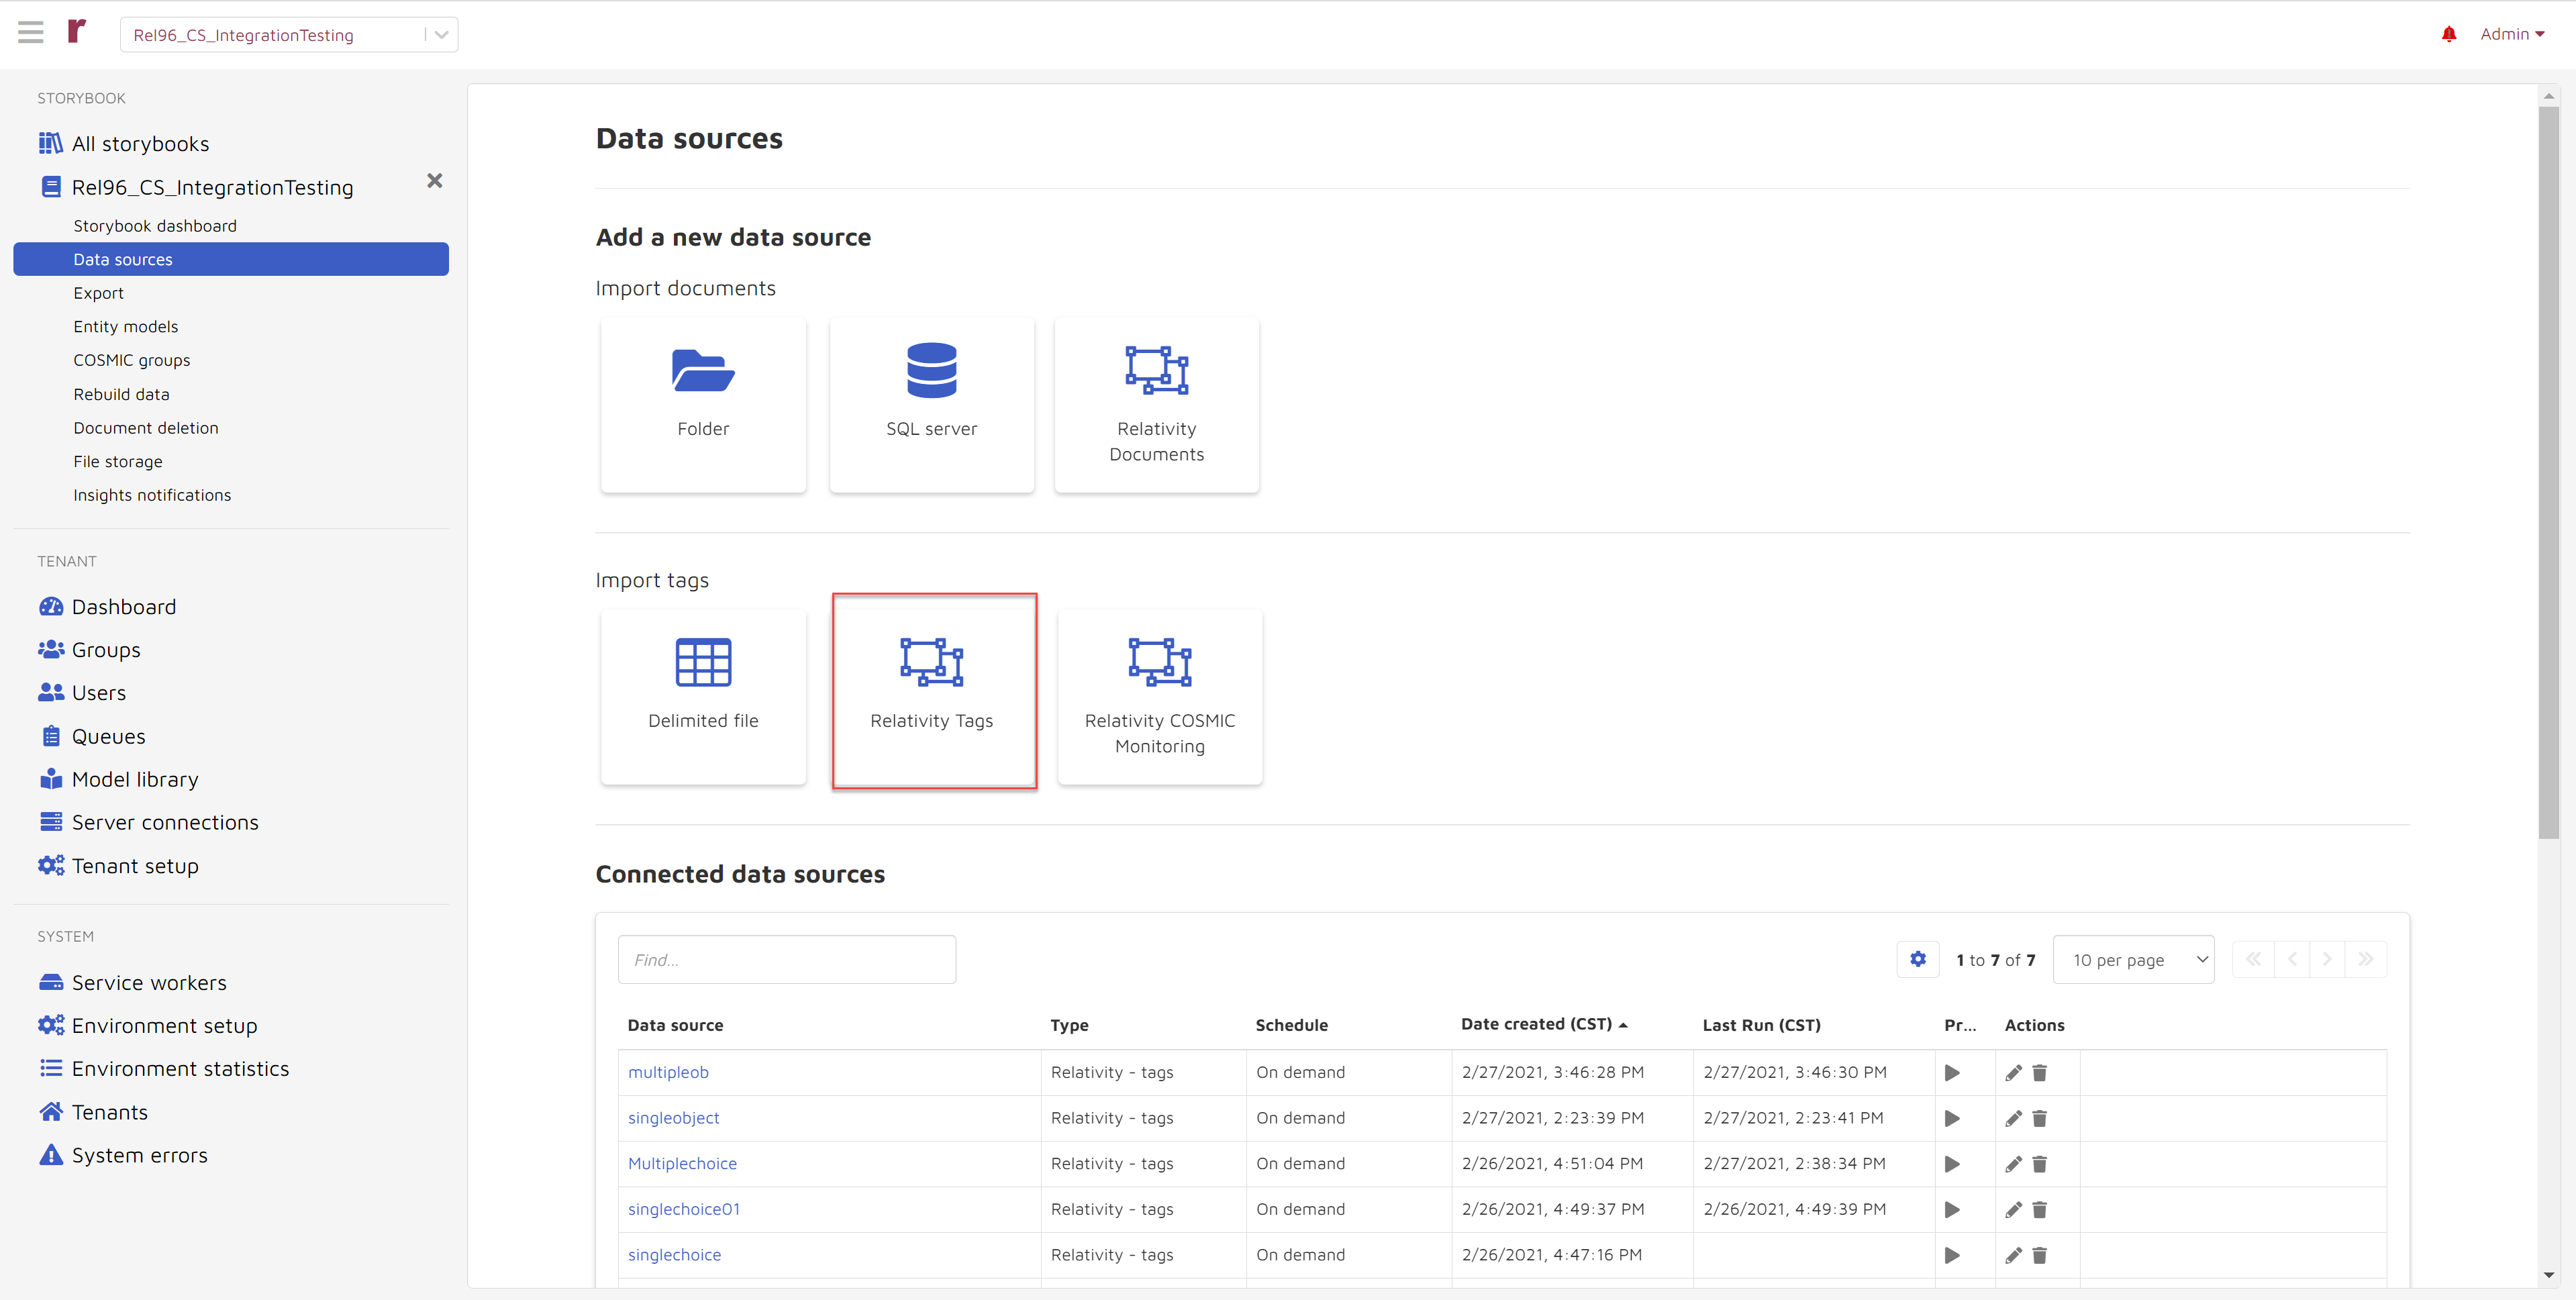
Choose the Relativity Tags icon.
The Add Relativity Tags data source page appears:
The following items are required:
Data source name: Create a name. Give your Relativity® data source a name that you can use to reference in Reveal AI. We recommend naming it with descriptive information referencing the Relativity® storybook name so you can easily identify it.
Storybook: This window is automatically populated with the name of the current storybook.
Relativity® Server Connections: Choose from the dropdown list. Select a source server you wish to read from. If your desired server is not available in the drop-down, go to Server connections under Tenant Settings to connect it.
Relativity® Workspace: Choose the relevant workspace from the dropdown list.
Relativity® Saved Searches: Choose from the dropdown list of Relativity® saved searches. Documents included in the saved search will be processed.
Note
Only those saved searches to which the OAuth2 client has access will be available in the dropdown.
Batch options: Choose Show batch options and the following appears for you to edit:
Then select the Relativity® fields and the associated Reveal AI fields to which you wish to map.
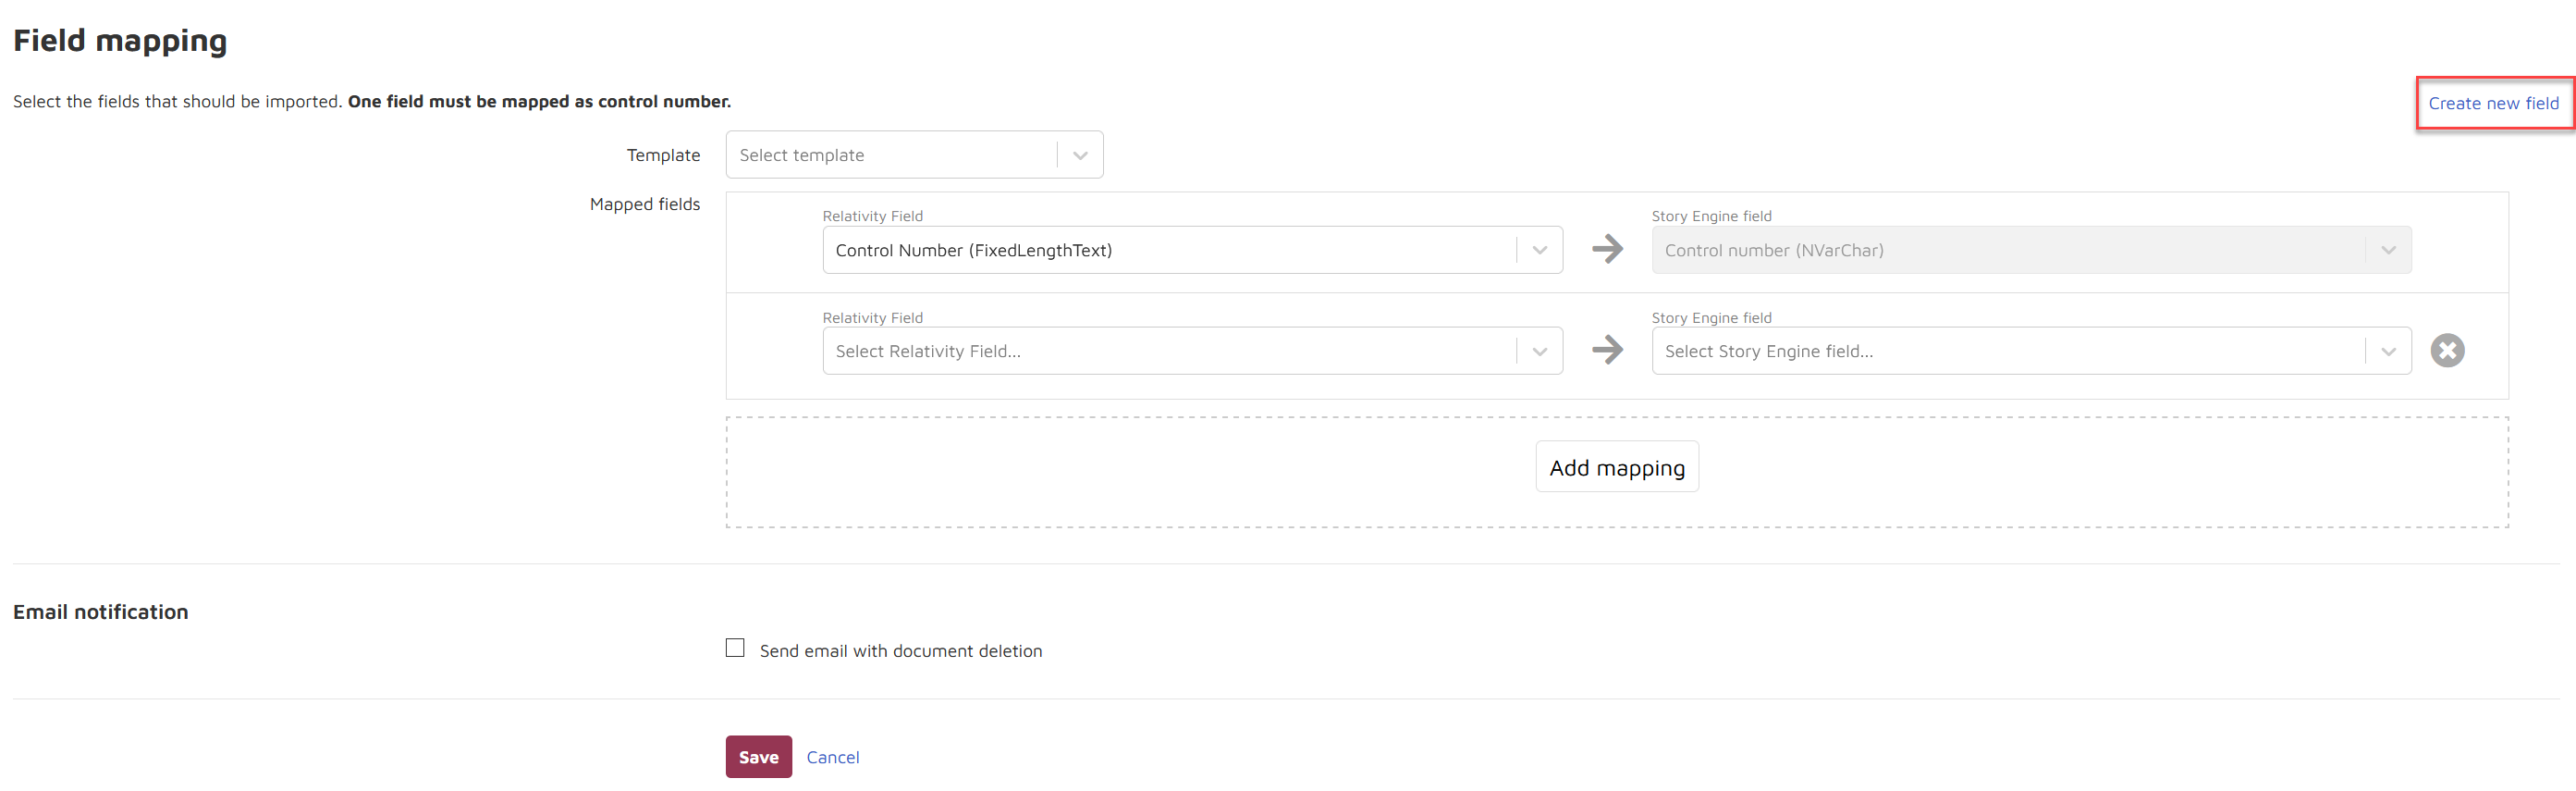
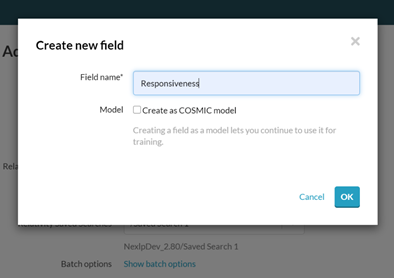
If you wish to create a new field, choose Create new field.
Name the field and choose whether to create as a model:
You may map to COSMIC fields or external fields.
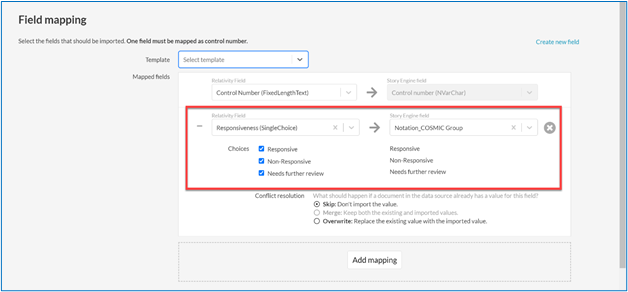
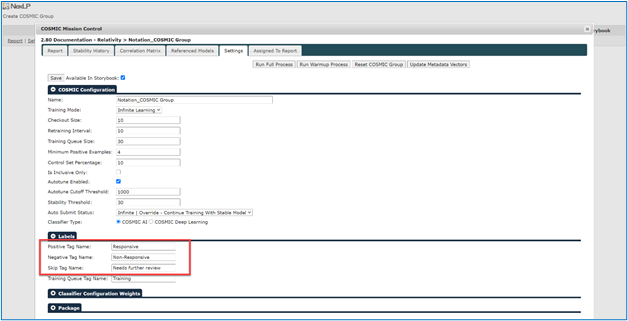
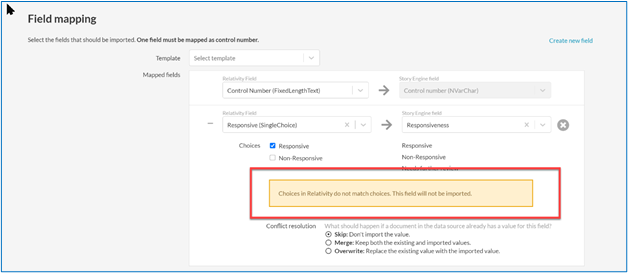
Note that successful mapping of a Relativity® field to a Reveal AI COSMIC field requires the Relativity® field choices to be identical to the Reveal AI COSMIC field user labels. For example, if the relevant COSMIC Mission Control Labels show as follows...
...then the equivalent Relativity® field choices must also read Responsive, Non-Responsive and Needs further review. Absent this exact correspondence, an attempt at field mapping will result in an error notification.
Once you click Save and Continue the job will begin processing. You can track this job in the Storybook Admin dashboard.
And it will be available in the Connected data sources section.
Export to Relativity®
Export to Relativity® can be configured in various ways according to the project requirements. Notably, it can be used to export tagging and scoring information in conjunction with COSMIC-Relativity® Sync or COSMIC Monitoring.
In Reveal AI Admin choose the relevant storybook and then Export. In the typical project in a joint COSMIC/Relativity® environment, the Relativity® icon appears as an export option.
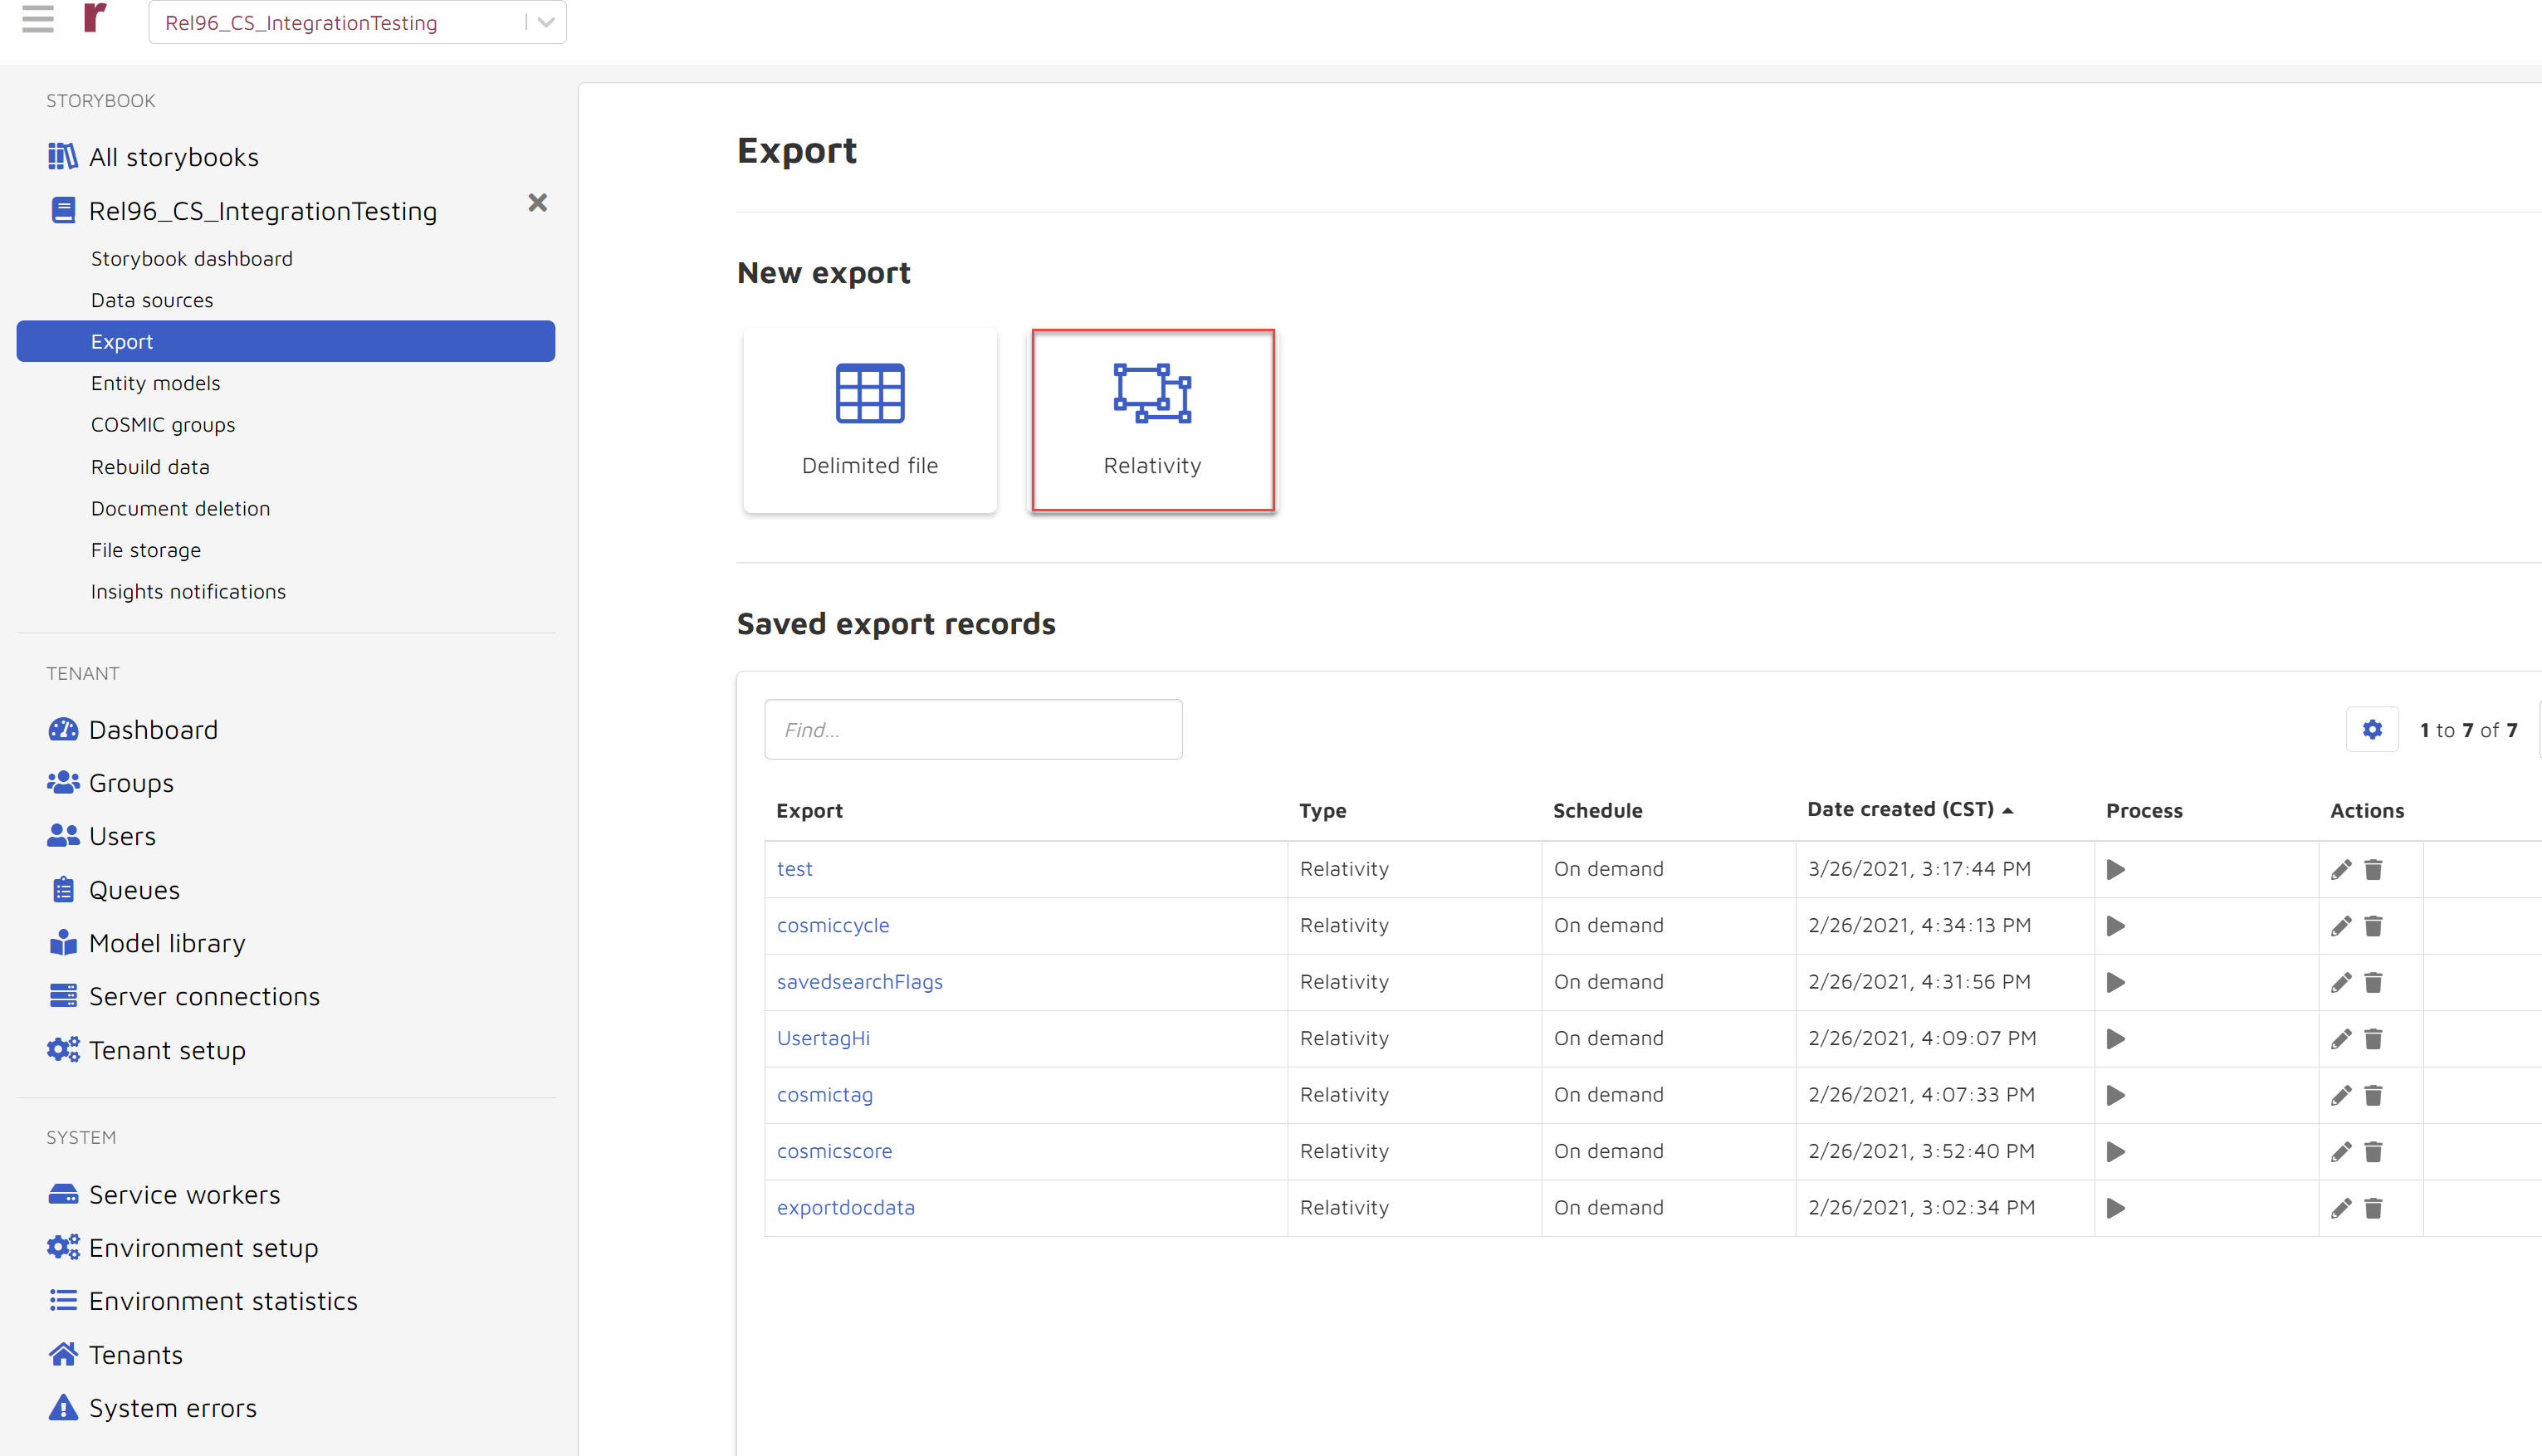
Choose the Relativity® icon and you are presented with Export >> New Relativity® Report.
This page requires you to make a number of export configuration choices:
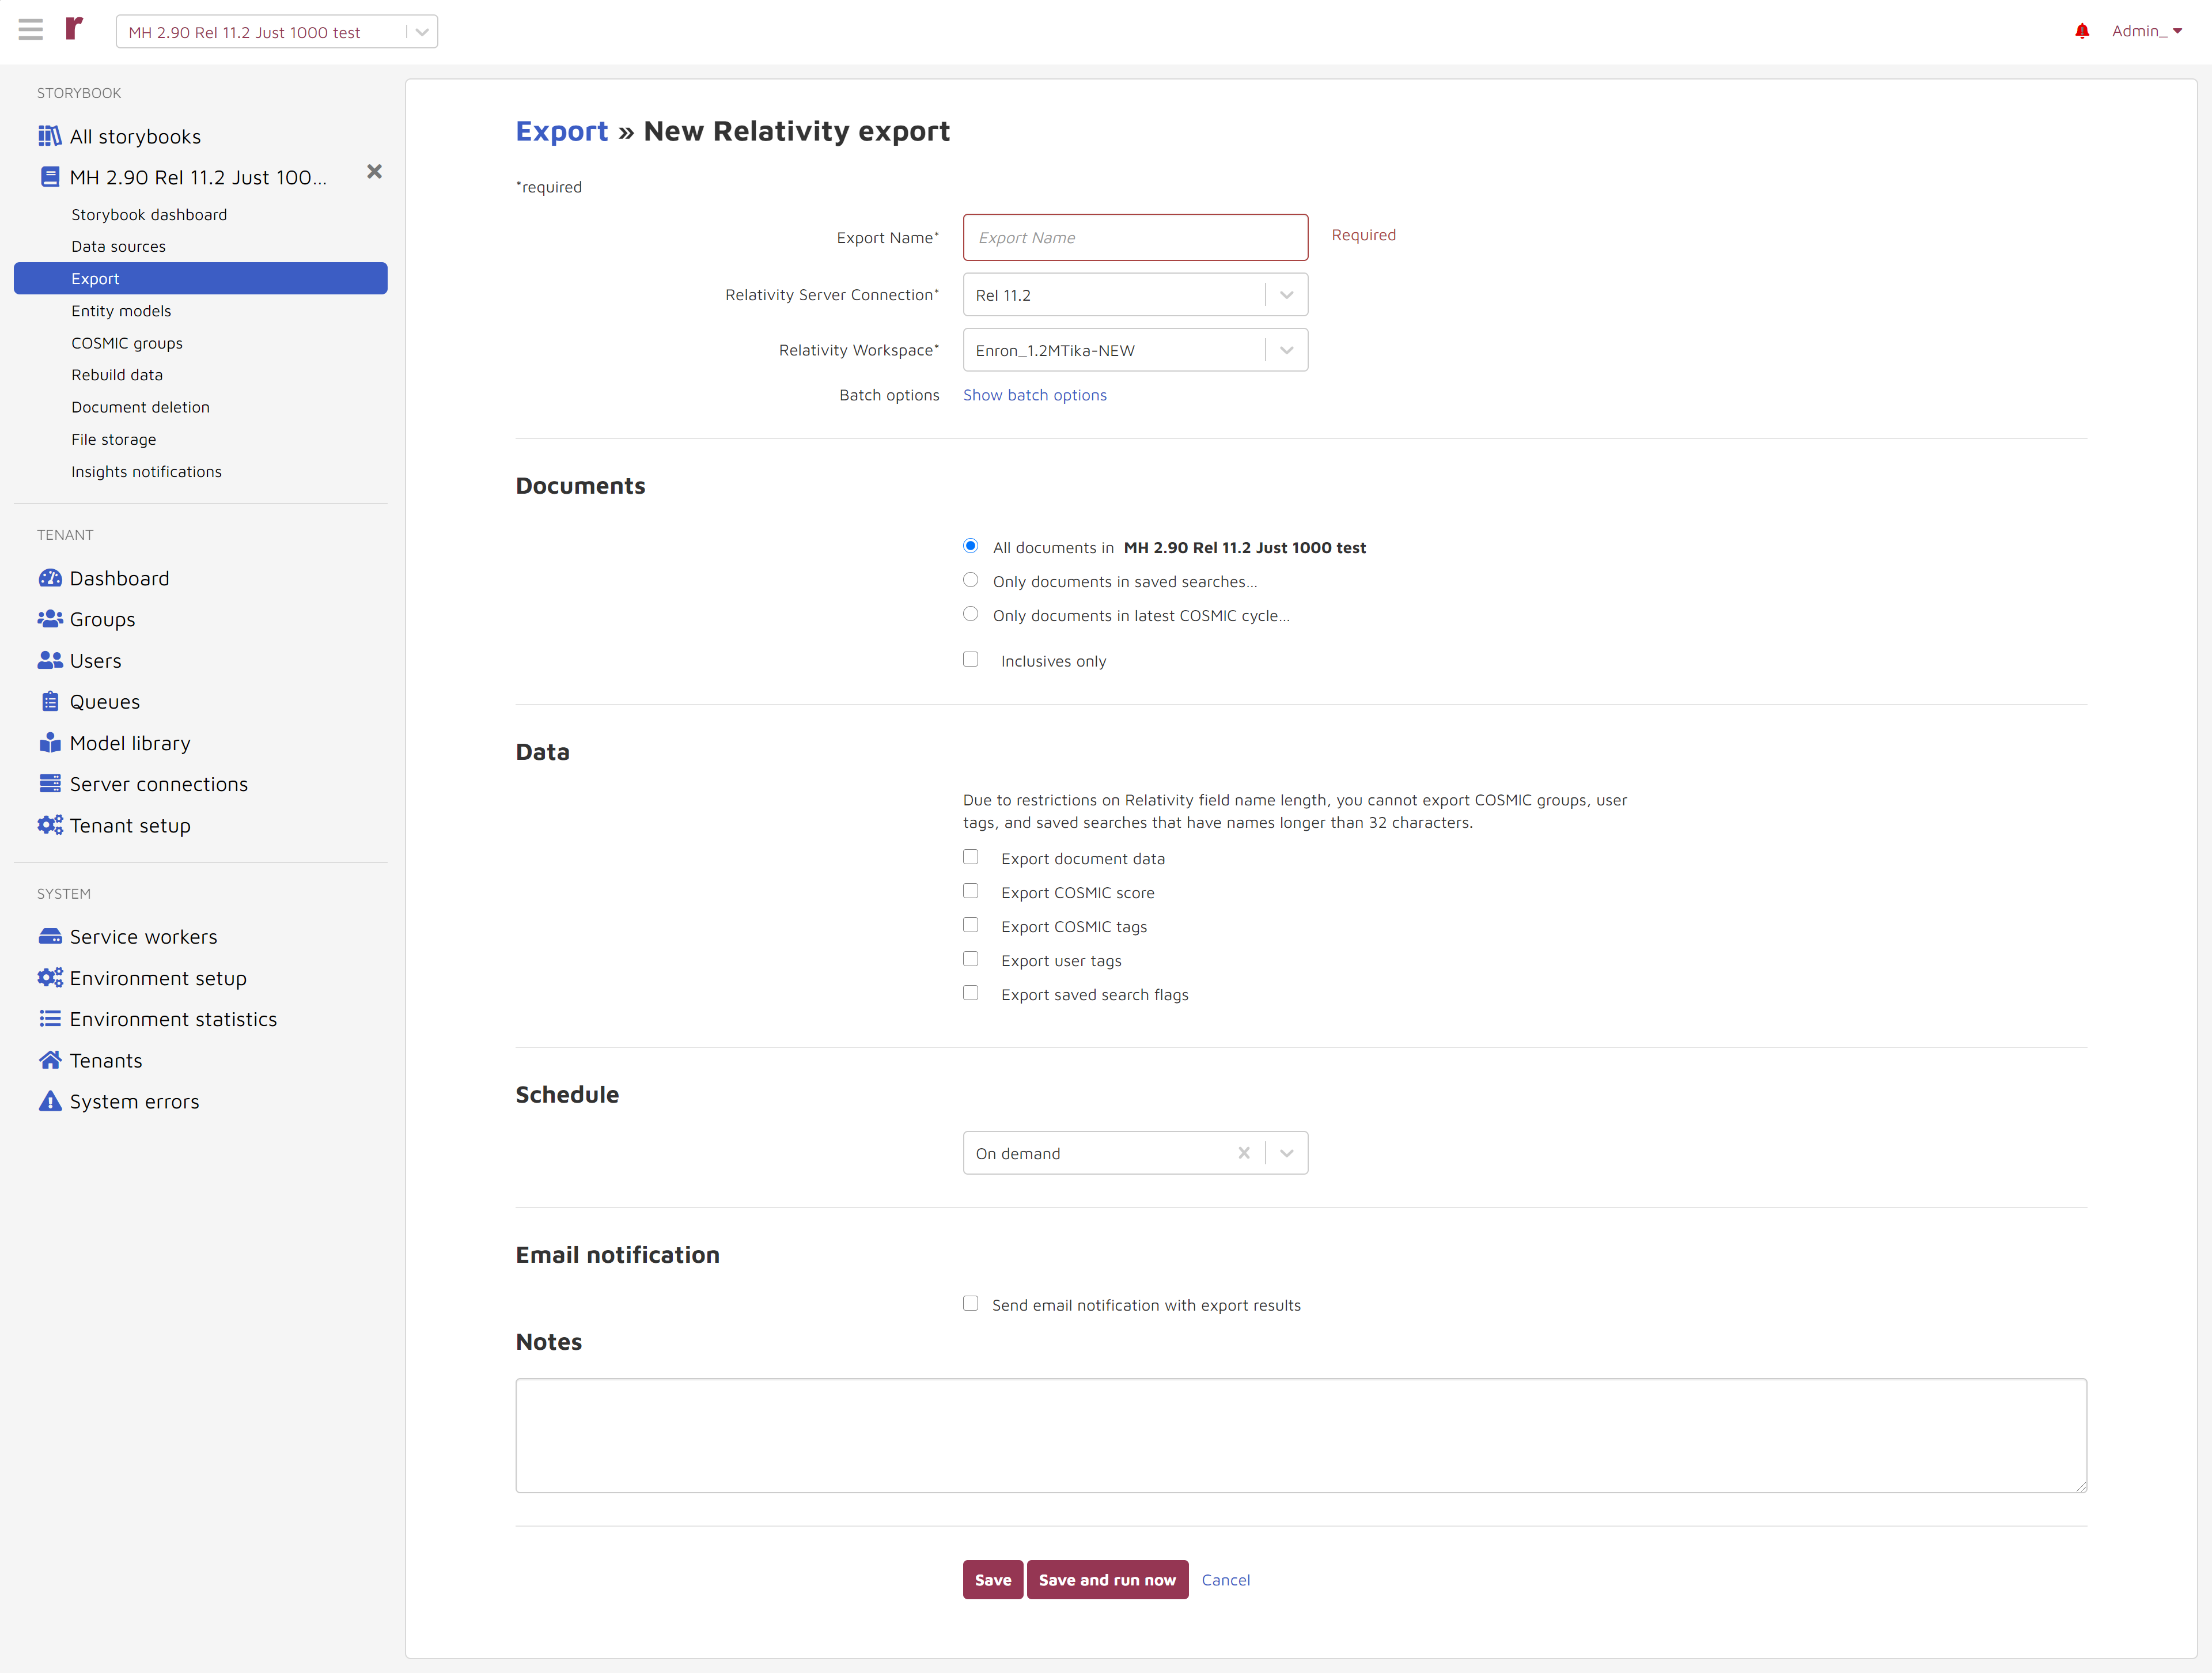
At the top of the Export >> New Relativity® export configuration page you enter the following information:
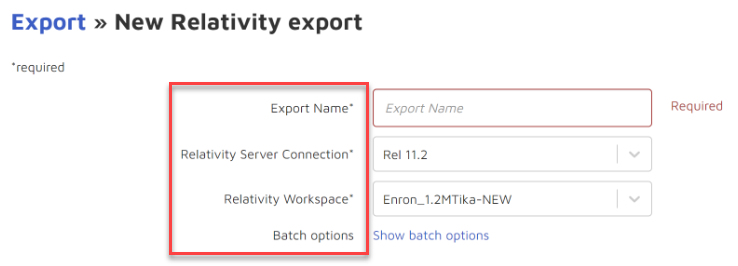
Export Name*: (required) Choose a name that reflects purpose.
Relativity® Server Connection*: (required) Choose the Connection from dropdown list.
Relativity® Workspace: Choose the name of the workspace in Relativity® from the dropdown list.
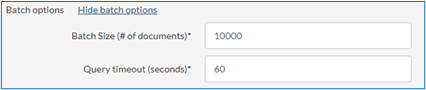
Batch options: Where applicable – choose Show batch options.
For Batch options, enter number (as shown below).
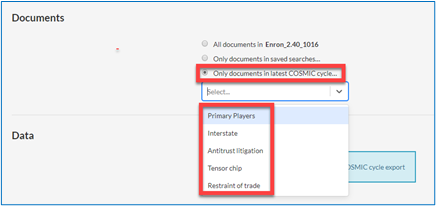
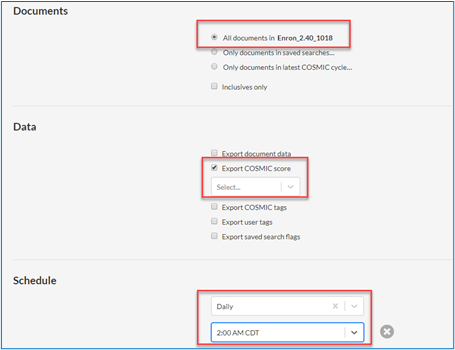
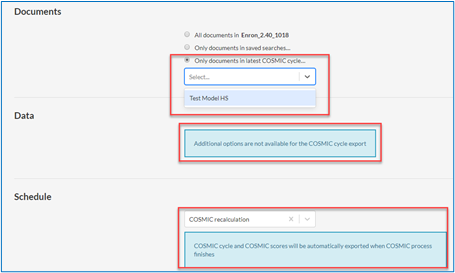
Documents
Next, choose document specifications, from one of the following:
All documents in [the storybook name] and check the Inclusives only box if applicable.
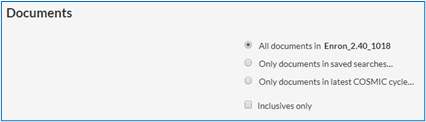
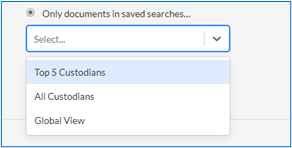
Only Documents in Saved Searches...: choose the saved search from the dropdown list and check the Inclusives only box if applicable.
Only Documents in latest COSMIC cycle…: choose from the dropdown list of COSMIC models.
Data
If you have chosen either of the first two Document choices shown above, then the following multi-choice data options appear. Select what data you want in your export.
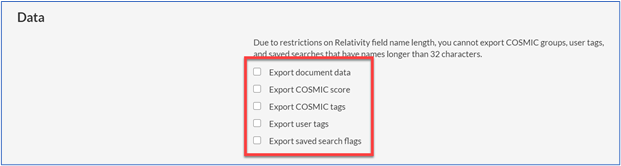
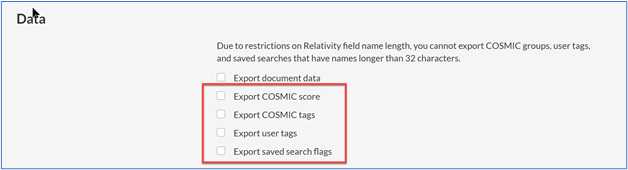
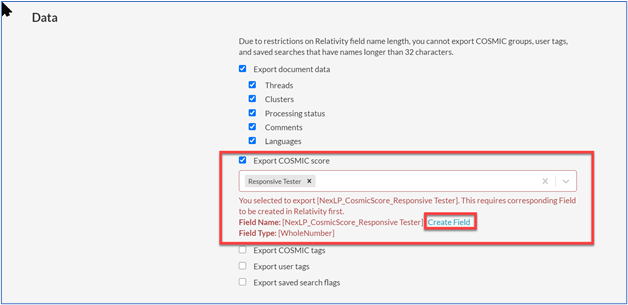
Choose Export document data to specify what is included in export:
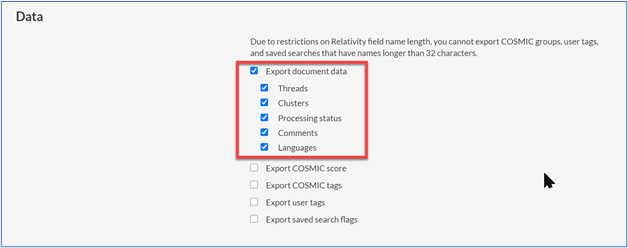
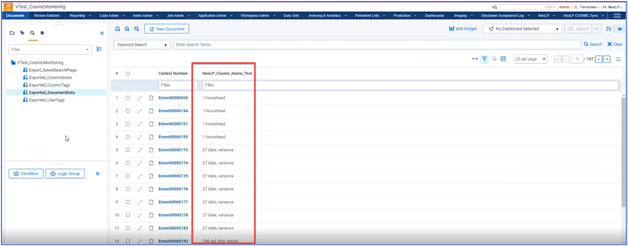
Note that as of 2.80 the Reveal AI cluster information now appears in Relativity® in the <NexLP_Cluster_Name_Text> field which is a fixed length text field. The cluster information appears in Relativity® as in this Documents view:
As of Reveal AI 2.80, the export options highlighted below require you to create corresponding fields in your Relativity® Workspace.
Relativity® Field and Value Names for Data Received from Reveal AI:
Selection | Columns included |
|---|---|
Cosmic Scores | Select COSMIC groups to export scores. Column/Relativity® Field name format:
Value format:
|
Cosmic Tags | Column/Relativity® Field name format:
For Document level COSMIC Tags in Release 2.50, choices created in Relativity® will be based on labels set in COSMIC, for example, if labels are customized to “Responsive, Not Responsive,” the choices created are
Similarly, for Segment level COSMIC Tags in Release 2.50 the export value will be
For Document level COSMIC Tags in Release 2.80 and above, the values created will always be regardless of the labels set in COSMIC:
For Segment level COSMIC Tags in Release 2.80 and above, the export value will always be
|
User Tags | Select User Tags to export. Notice imported Tags cannot be exported. Column/Relativity® Field name format:
Value format:
|
Saved Searches | Selected Saved Searches to export. If exporting to Relativity®, a new field will be created for each Saved Search selected Column/Relativity® Field name format:
Value format:
|
If you choose Export COSMIC score, Export COSMIC tags, Export user tags or Export saved search flags and have not already created a corresponding field in Relativity®, a notice will appear as shown below. The notice provides field name and field type in brackets a well as a Create Field button. Choose Create Field and the appropriate field will be created in Relativity®.
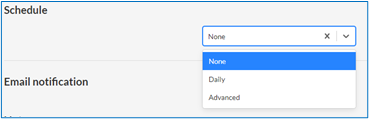
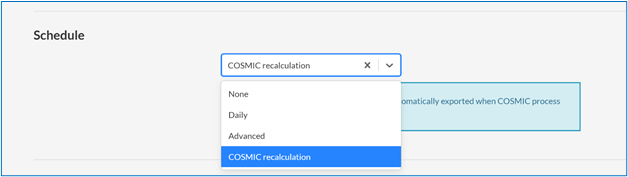
Schedule – available to Admins only, not Users
Choose None, Daily,Advanced…
None: which allows manual export by choosing Save then Save and continue.
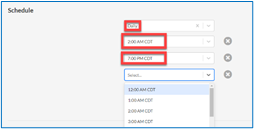
Daily: choose as many different times of the day as needed from the dropdown.
Advanced: for more advanced scheduling you can enter a valid Cron expression. Invalid expressions will be rejected.
 Assistance in developing valid Cron expressions is available from various sites such as https://crontab.guru/ (as of this publication).
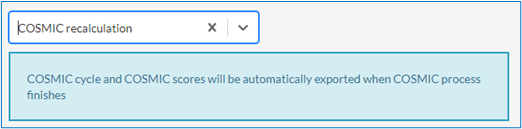
COSMIC recalculation
Or, if Only documents in latest COSMIC cycle… has been chosen in the Documents section, then there is the additional choice under Schedule of COSMIC recalculation.
COSMIC recalculation: is a variable schedule in which export is triggered whenever the model is recalculated.
See Section 4 - Integration with 3rd Parties, A. Relativity® > 5. Install and Configure NexLP COSMIC Sync Application below for more information.
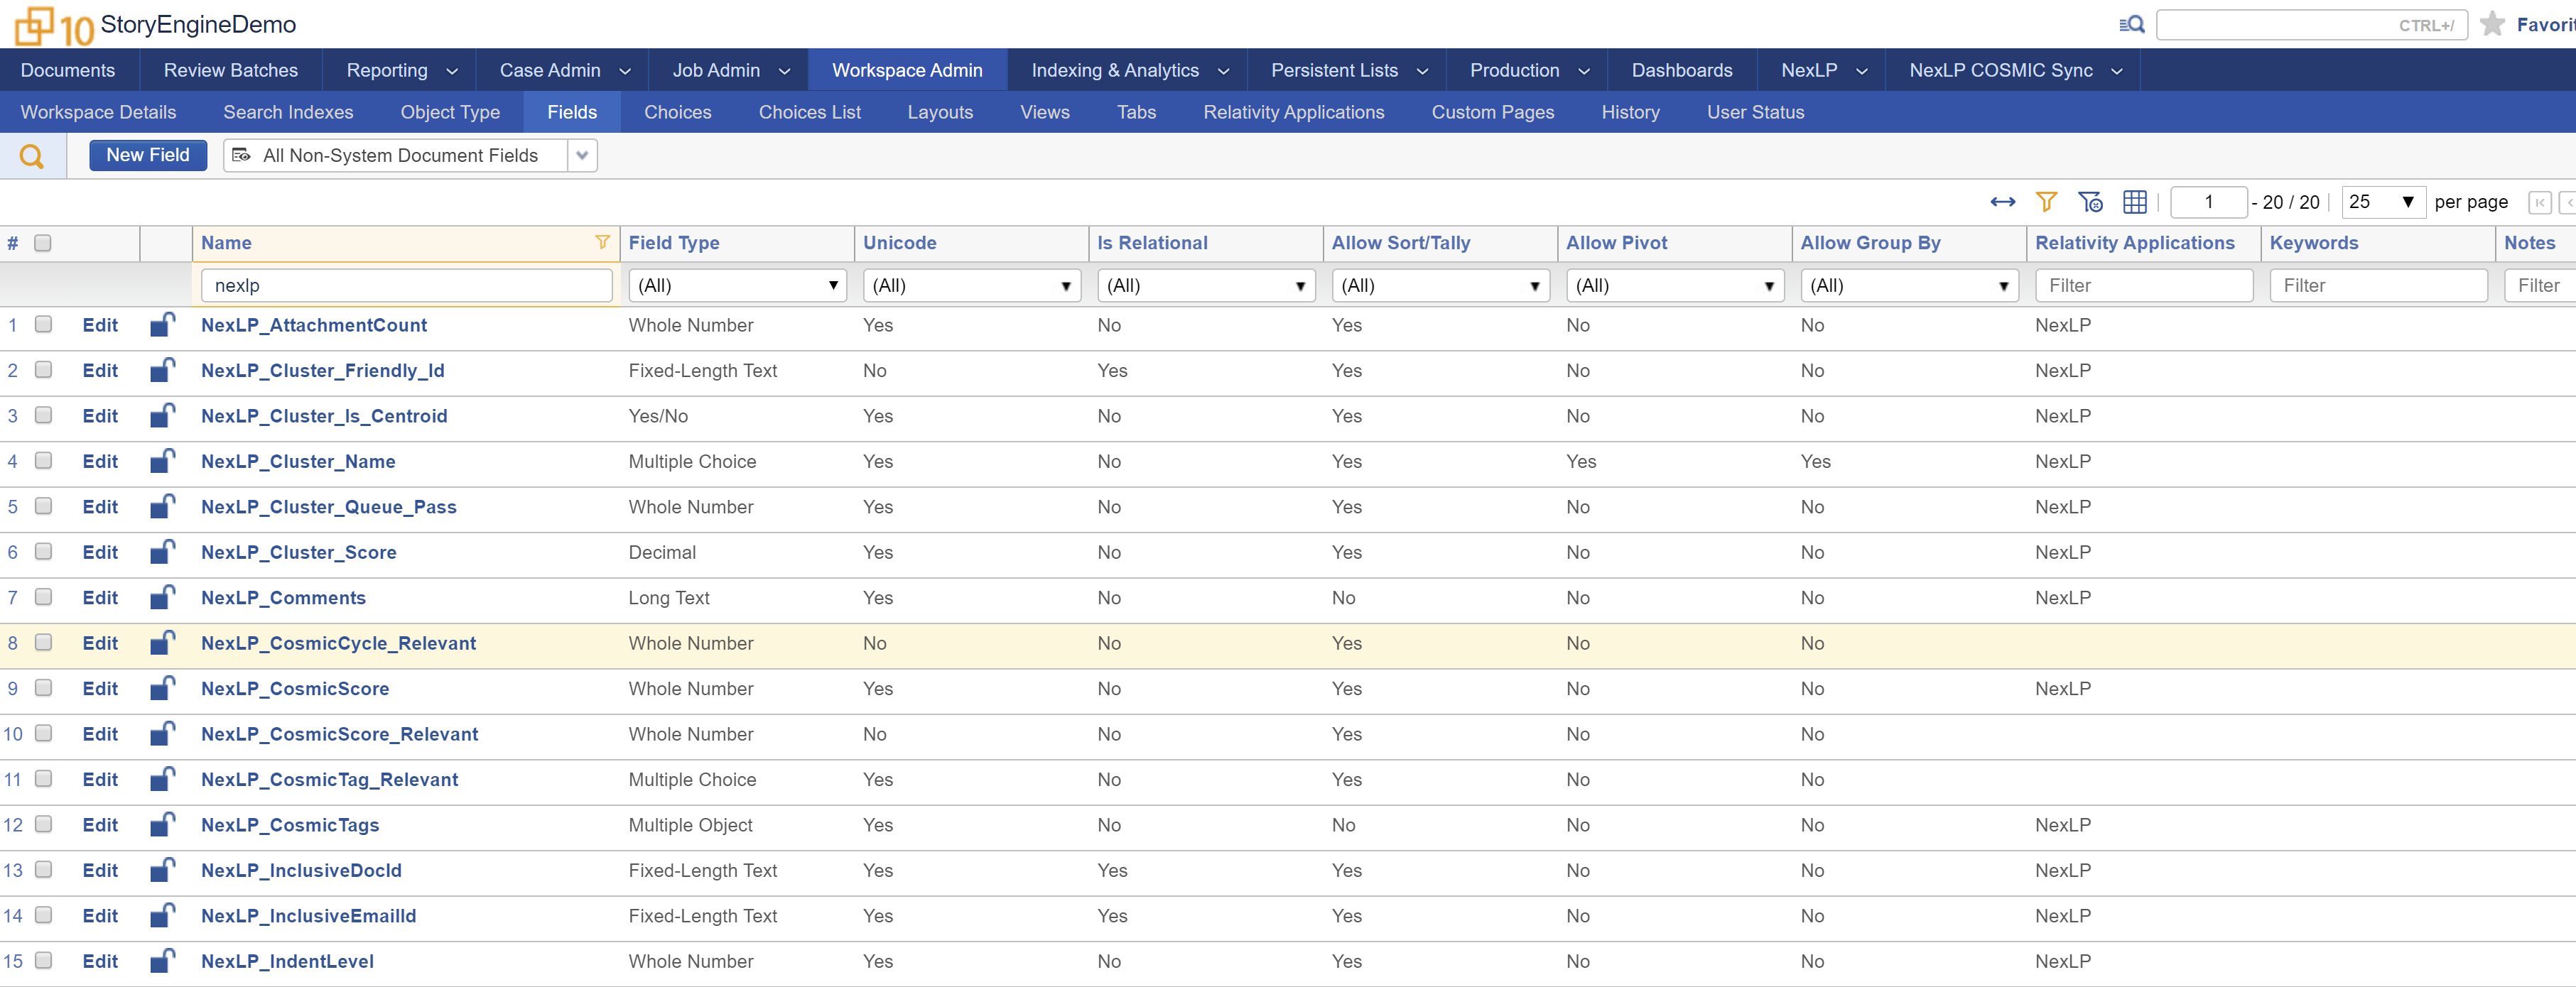
When you choose COSMIC recalcuation as the export trigger, a new field is created in Relativity® called COSMIC_Cycle_[COSMIC GROUP NAME] which can be used to configure auto-batching in Relativity®.
Email notification – available to Admins only, not Users
This will allow notifications of export results.
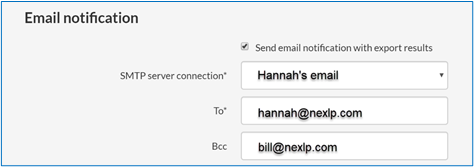
Once you check “Send email notification with export results” then enter the following:
SMTP server connection (required): from SMTP setup see Section 2 - Tenant Settings > F. Server Connections.
To (required):primary notificatin recipient.
Bcc (optional): secondary notification recipient.
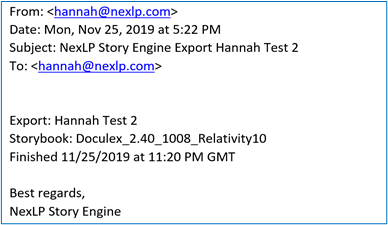
As a result of this setup you will receive export results notification such as:
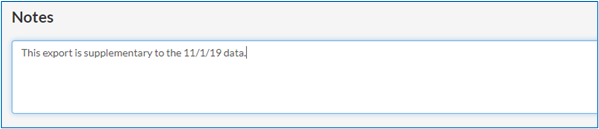
Notes - available to Admins only, not Users
This is free text space for any additional information you would like. These notes do not automatically appear in the email.
When all of the above is complete hit Save.
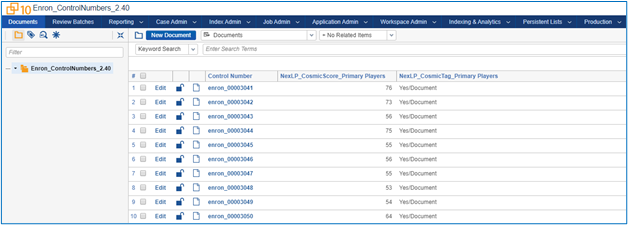
When the export completes, document-specific COSMIC information can be viewed in Relativity®:
Recommended Export Configurations for COSMIC-Relativity® Sync
Configurations will vary according to project requirements. Here are two recommended configurations for common tasks:
All documents – fixed schedule
In this scheme, all documents are chosen, you export COSMIC scores for the specified COSMIC group on a daily schedule that complements daytime and evening review (such as 2 am).
Continuous Loop
In this approach, there is no fixed export schedule. Rather, the COSMIC scores (for only the documents in the latest COSMIC cycle) are exported whenever they are recalculated. This results in continuous reprioritization which drives queueing in Relativity®.
For further information on COSMIC-Relativity® Sync, see Section 4 - Integration with 3rd Parties > A. Relativity® > 5. Install and Configure NexLP COSMIC Sync Application immediately below.
Install and configure NexLP COSMIC Sync application
Overview
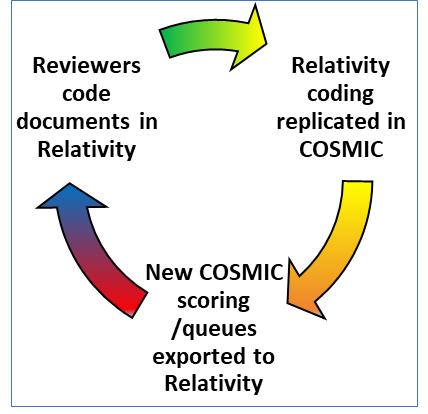
COSMIC-Relativity® Sync is a process that drives review in Relativity® through automated communication between Reveal AI and Relativity®. In this process, all document coding is executed in Relativity® and is replicated real-time in Reveal AI for COSMIC scoring. In turn, prioritized re-queueing can be directed from COSMIC into Relativity® as required. This synced workflow for high powered predictive coding requires initial admin installation and configuration of NexLP COSMIC Sync in Relativity® and configuration in Reveal AI.
Important
COSMIC sync will not work with RelativityOne using the new API connector patch. For RelativityOne tag synchronization use COSMIC monitoring.
The COSMIC-Relativity® Sync Process
Install NexLP COSMIC Sync
There are now two custom applications concerning Reveal AI available for Relativity®. To make COSMIC-Relativity® Sync available, the Relativity® admin needs to install NexLP COSMIC Sync which we provide and have tested in Relativity® through 11.2. This is in addition to the already required NexLP application described in Section 4 - Integration with 3rd Parties > A. Relativity® > 7. Install and Configure NexLP Relativity® Application below.
You must install both NexLP and NexLP COSMIC Sync in order to utilize NexLP COSMIC Sync. The following describes installation of NexLP COSMIC Sync. Once installed and configured, NexLP COSMIC Sync links coding in Relativity® with that in Reveal AI so that any document coding in Relativity® is automatically replicated in Reveal AI. You install NexLP COSMIC Sync into specific Relativity® workspaces as required.
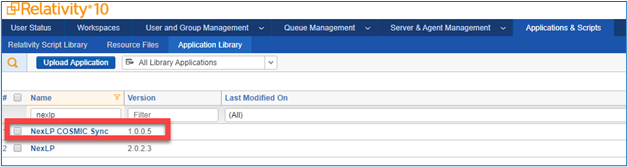
Download NexLP COSMIC Sync into Library
In Relativity® Application Library, choose and load NexLP COSMIC Sync into Application Library. It then appears in the Library list as shown below.
Install into Workspace
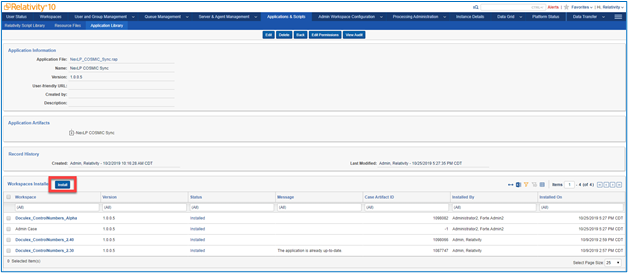
Choose NexLP COSMIC Sync to install into a workspace. The following application page appears showing a list of Workspaces in which the application has already been installed as well as an Install button:
Choose Install and this page offers “Workspaces” followed by an ellipsis:
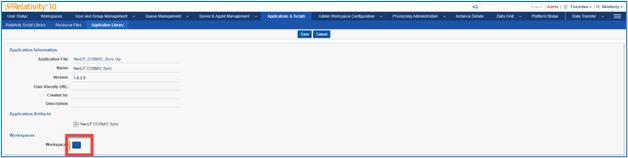
Choose the ellipsis to get a list of available workspaces:

Check the checkboxes for the Workspace(s) in which you want to install NexLP COSMIC Sync. Then choose OK. This page shows the Workspace or list of Workspaces ready to receive the new application.
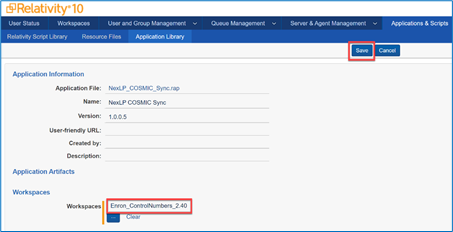
Choose Save and installation begins and the Application Information page shows installation status:
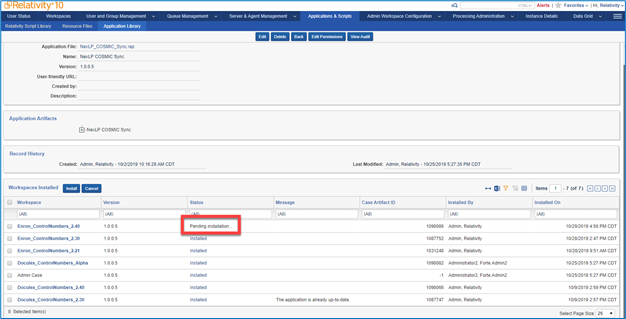
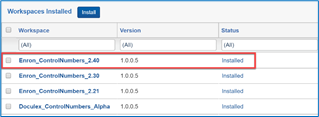
Once installation completes the status changes to “Installed”...
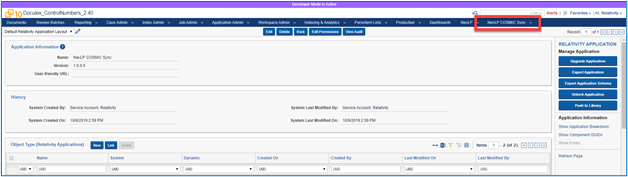
...and you can review the Application Information by choosing the Workspace, then Application Administration >> Relativity® Applications >> NexLP COSMIC Sync.
The Application Information Page shows the NexLP COSMIC Sync components including Object Type, Field, View, Layout, Tab and Event Handler.
Configuring NexLP COSMIC Sync in Relativity® Workspace
Note that in the Application Information Page the Field section shows both NexLP COSMIC Model ID and the associated Relativity® Single Choice Field.

By choosing the NexLP COSMIC Sync Tab in the Application Information page...
...the Field Map will appear as follows:

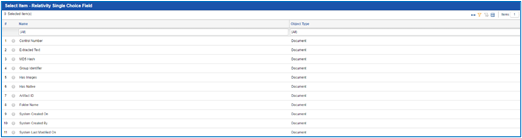
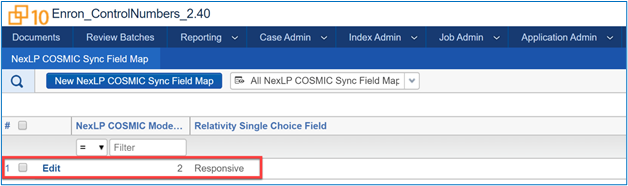
To make an entry into the Field Map, choose New NexLP COSMIC Sync Field Map. You will use this page for choosing the Relativity® Single Choice Field as well as the NexLP Cosmic Model ID.

Begin by choosing the ellipsis to the right of Relativity® Single Choice Field:

You will be presented with a list of all Relativity® Fields:
And you select an individual field, such as “Responsive.” You must limit your choice to a single choice field.
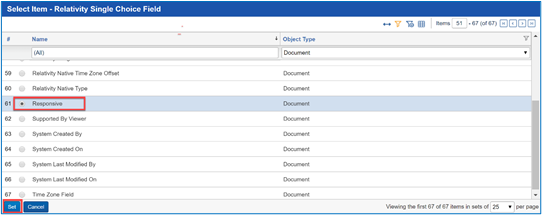
Then click SET, which returns you to the NexLP COSMIC Sync Field Map Layout showing your choice.

In order to find the corresponding NexLP COSMIC Model ID, you must go to Reveal AI, open the appropriate storybook and view the list of COSMIC models.
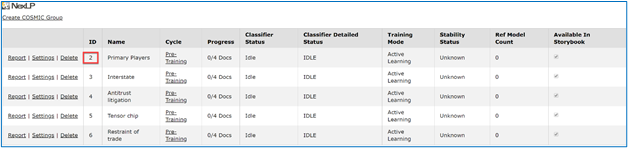
Find the ID number of the COSMIC Group you want to associate to the chosen field. Return to Relativity® and enter that code to the right of “NexLP COSMIC Model ID”.

Press Save, Save and New or Save and Back.
Save and Back will return you to the NexLP COSMIC Sync Field Map list where your new entry now appears.
The Relativity® Field must be single choice. The choices in the associated Relativity® field and COSMIC Model must be identical.
The final step to setup synced coding is to deploy these fields in a layout. Once this is accomplished, if you click Save or Save and Next in the coding panel (and assuming there is no Error Message) …

...that coding decision will be replicated in Reveal AI and overwrite any existing coding in Reveal AI.
Note
In the COSMIC-Relativity® Sync process, all document coding is executed in Relativity® and is replicated real-time in Reveal AI for COSMIC scoring.
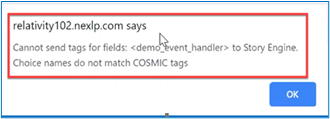
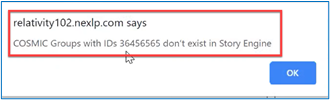
When you code in Relativity®, three possible error types may occur:
Choices in associated fields in both platforms must match. Inconsistent choices will result in this error:
If the specified destination COSMIC Group ID number is illegitimate, that will result in an error notification such as the following:
If a Relativity® field was chosen that was NOT a single value, that will result in an error notification.
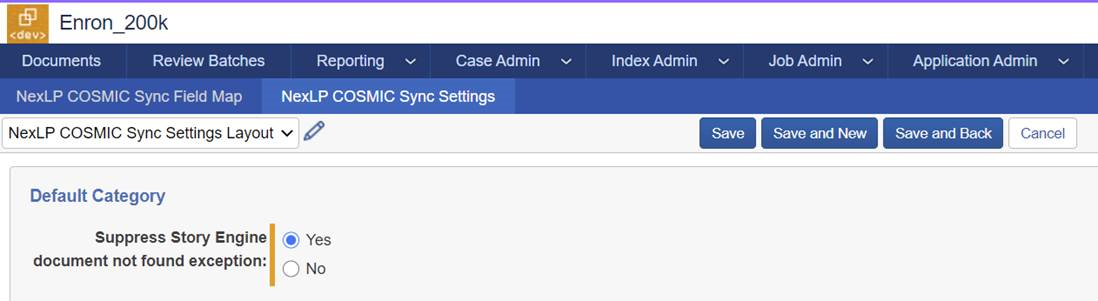
Errors that occur where a document exists in Relativity® and not in Reveal AI have no bearing on the tagging of a document in Relativity®, so a setting has been implemented in Reveal AI 2.80 to suppress display of these errors.
Click NexLP COSMIC Sync Settings tab.
Add a new “NexLP Cosmic Sync Settings” object.
Set “Suppress NexLP document not found exception” to Yes and Save.
Summary of COSMIC-Relativity® Sync
The two main components required for COSMIC-Relativity® Sync are:
Installation and configuration in Relativity® of the NexLP COSMIC Sync app described above in Section 4 - Integration with 3rd Parties > A. Relativity® > 1. Configure Connection and Authentication in Relativity® above.
Configuration of Reveal AI export described in Section 4 - Integration with 3rd Parties > A. Relativity® > 4. Export above.
The result is a tightly integrated automated loop including real-time replication of Relativity® coding decisions in Reveal AI and scheduled exports of COSMIC scoring into Relativity® to drive queueing. Export scheduling can be either based on a fixed schedule or triggered by updates in COSMIC scores, providing maximum flexibility in workflow structure.
Add Relativity® COSMIC Monitoring data source
COSMIC monitoring is an alternative to COSMIC Sync designed to support an integrated Relativity®/Reveal AI workflow utilizing Relativity® Rest API. COSMIC Monitoring uses scheduled high frequency sweeps to replicate Relativity® document coding in Reveal AI.
To utilize COSMIC monitoring, you will have had to enable COSMIC monitoring along with your 2.80 upgrade during installation. Please consult with your installation team to make sure it is enabled before using this feature.
Storybook prerequisite
Create a COSMIC group in the storybook. The COSMIC group coding choices will have to be precisely replicated in the relevant Relativity® workspace.
“Track Document Field Edits by Reviewer” needs to be installed in the relevant Relativity® workspace.
Installing “Track Document Field Edits by Reviewer” in Relativity®
Refer to Relativity® User Documentation for installation of the “Track Document Field Edits by Reviewer” solution through the following link:
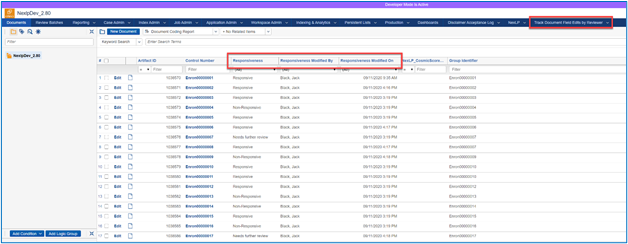
You will want to add the fields to be monitored: the Single Choice Field to Monitor, Reviewed on Field and Reviewed By Field. The Relativity® fields you create will then appear in the dropdown lists in Reveal AI for configuring the Relativity® COSMIC Monitoring data source as shown below.
The Relativity® Documents view might look something like this:
Add Relativity® COSMIC Monitoring data source
Under Data Sources – Import Tags choose Relativity COSMIC Monitoring.
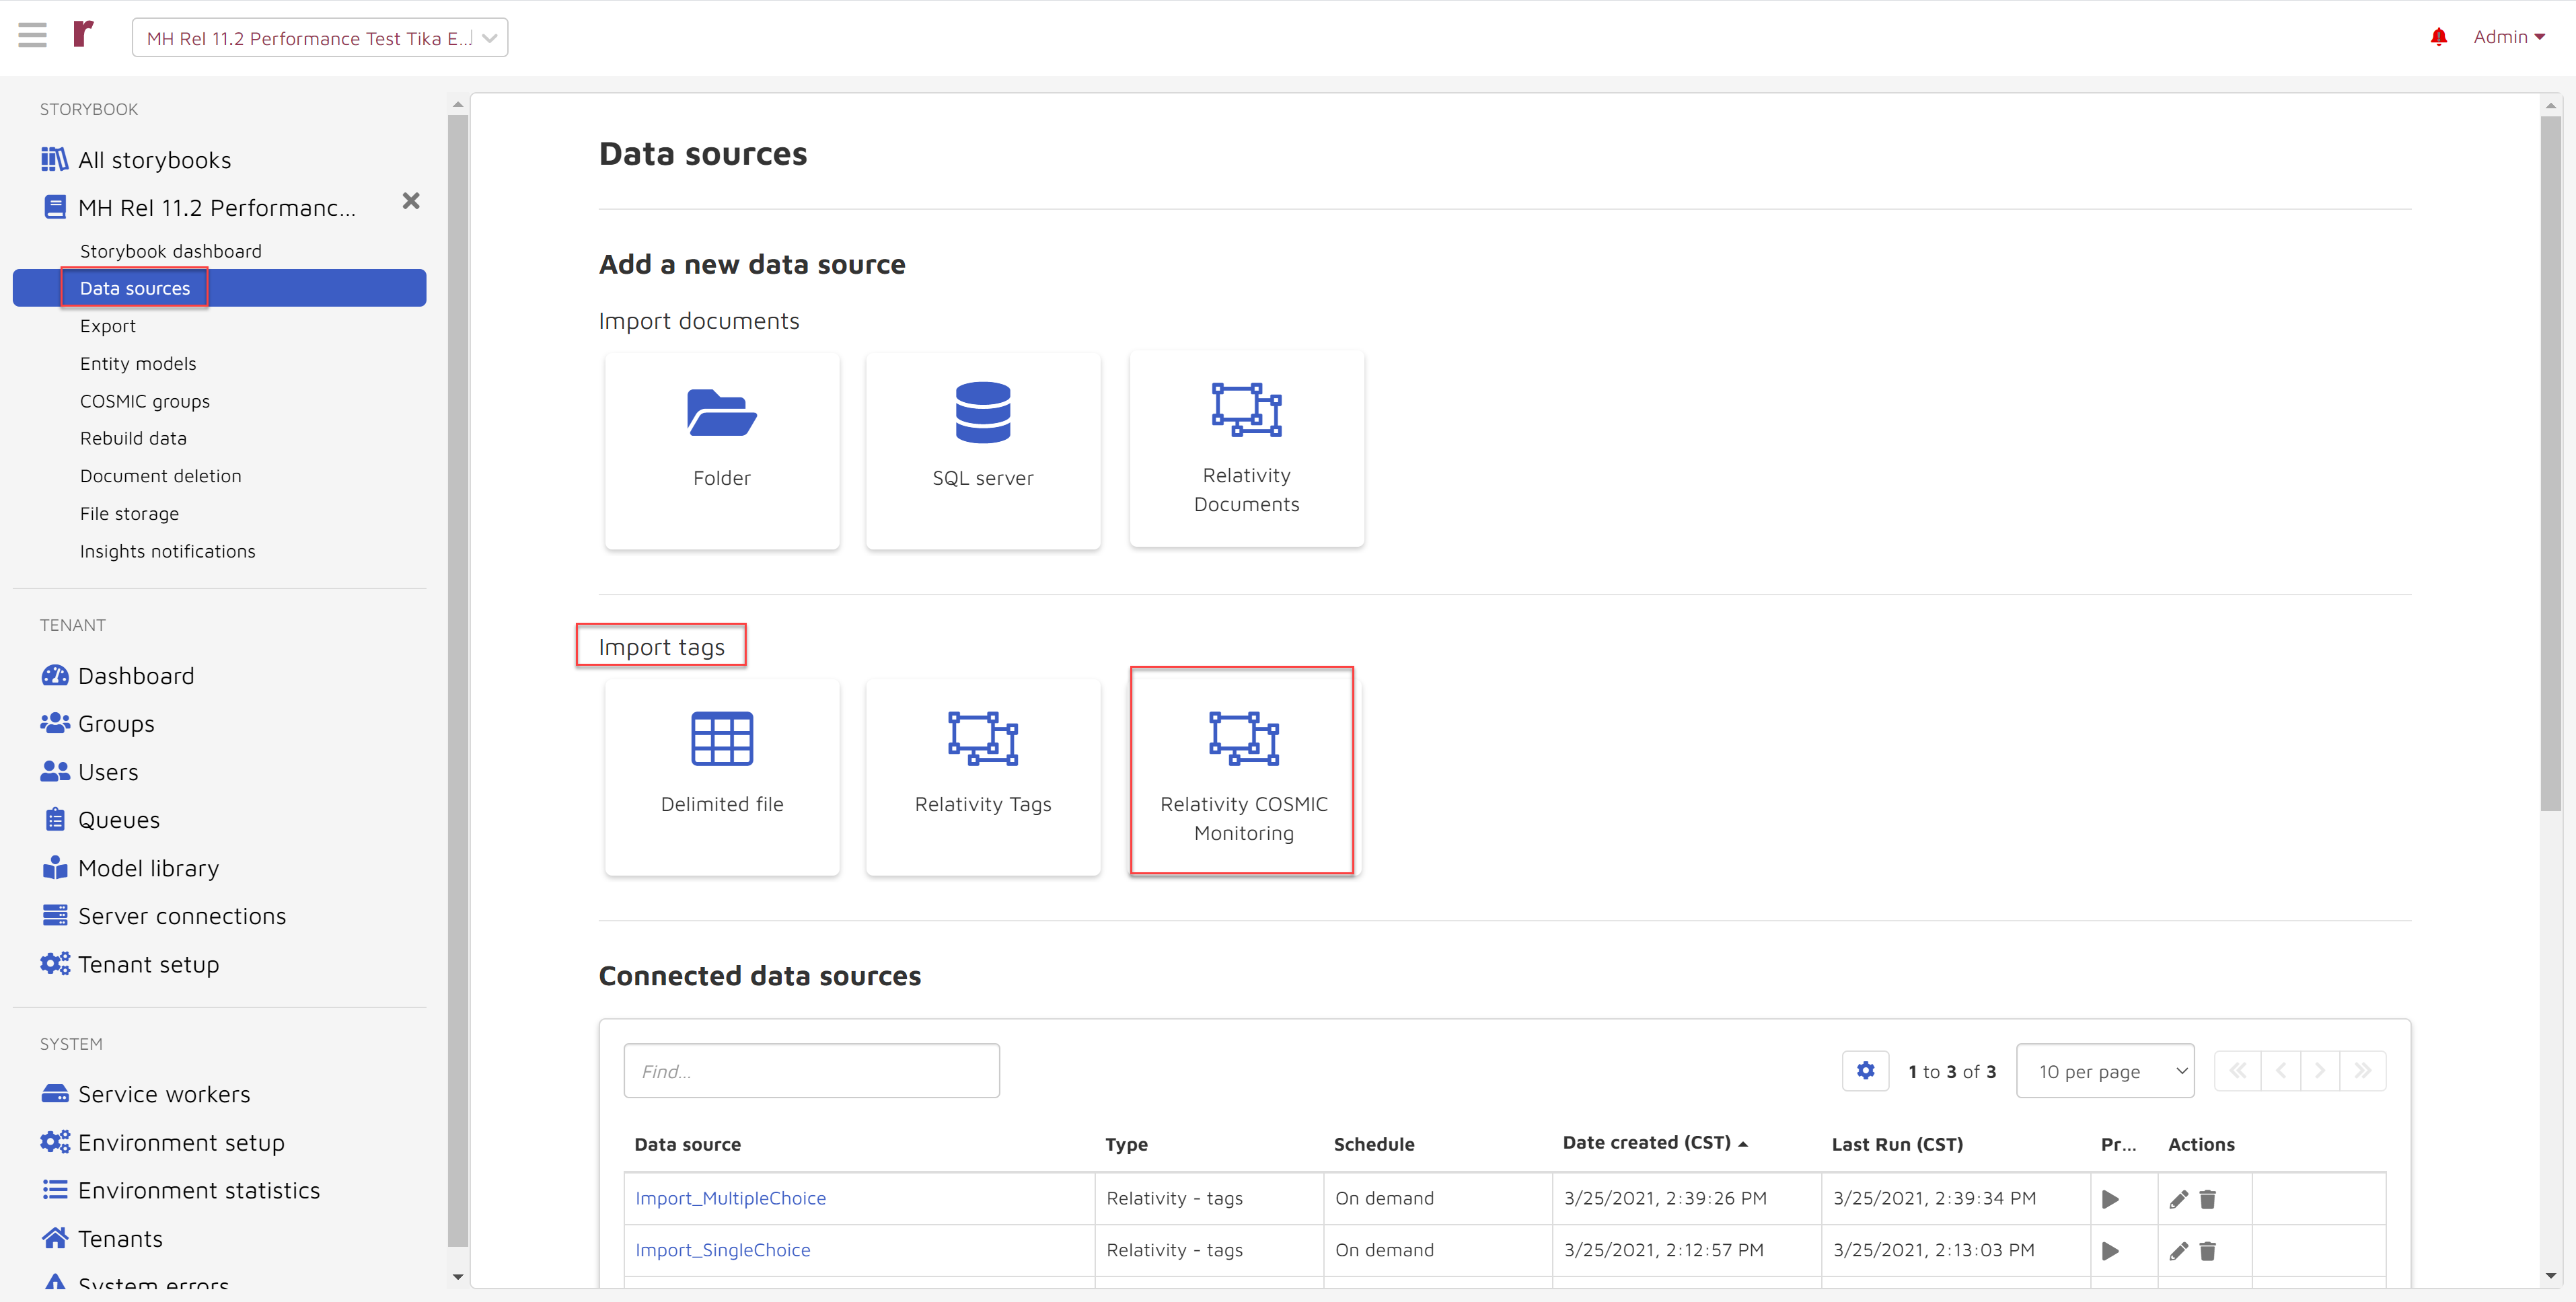
The following page appears:
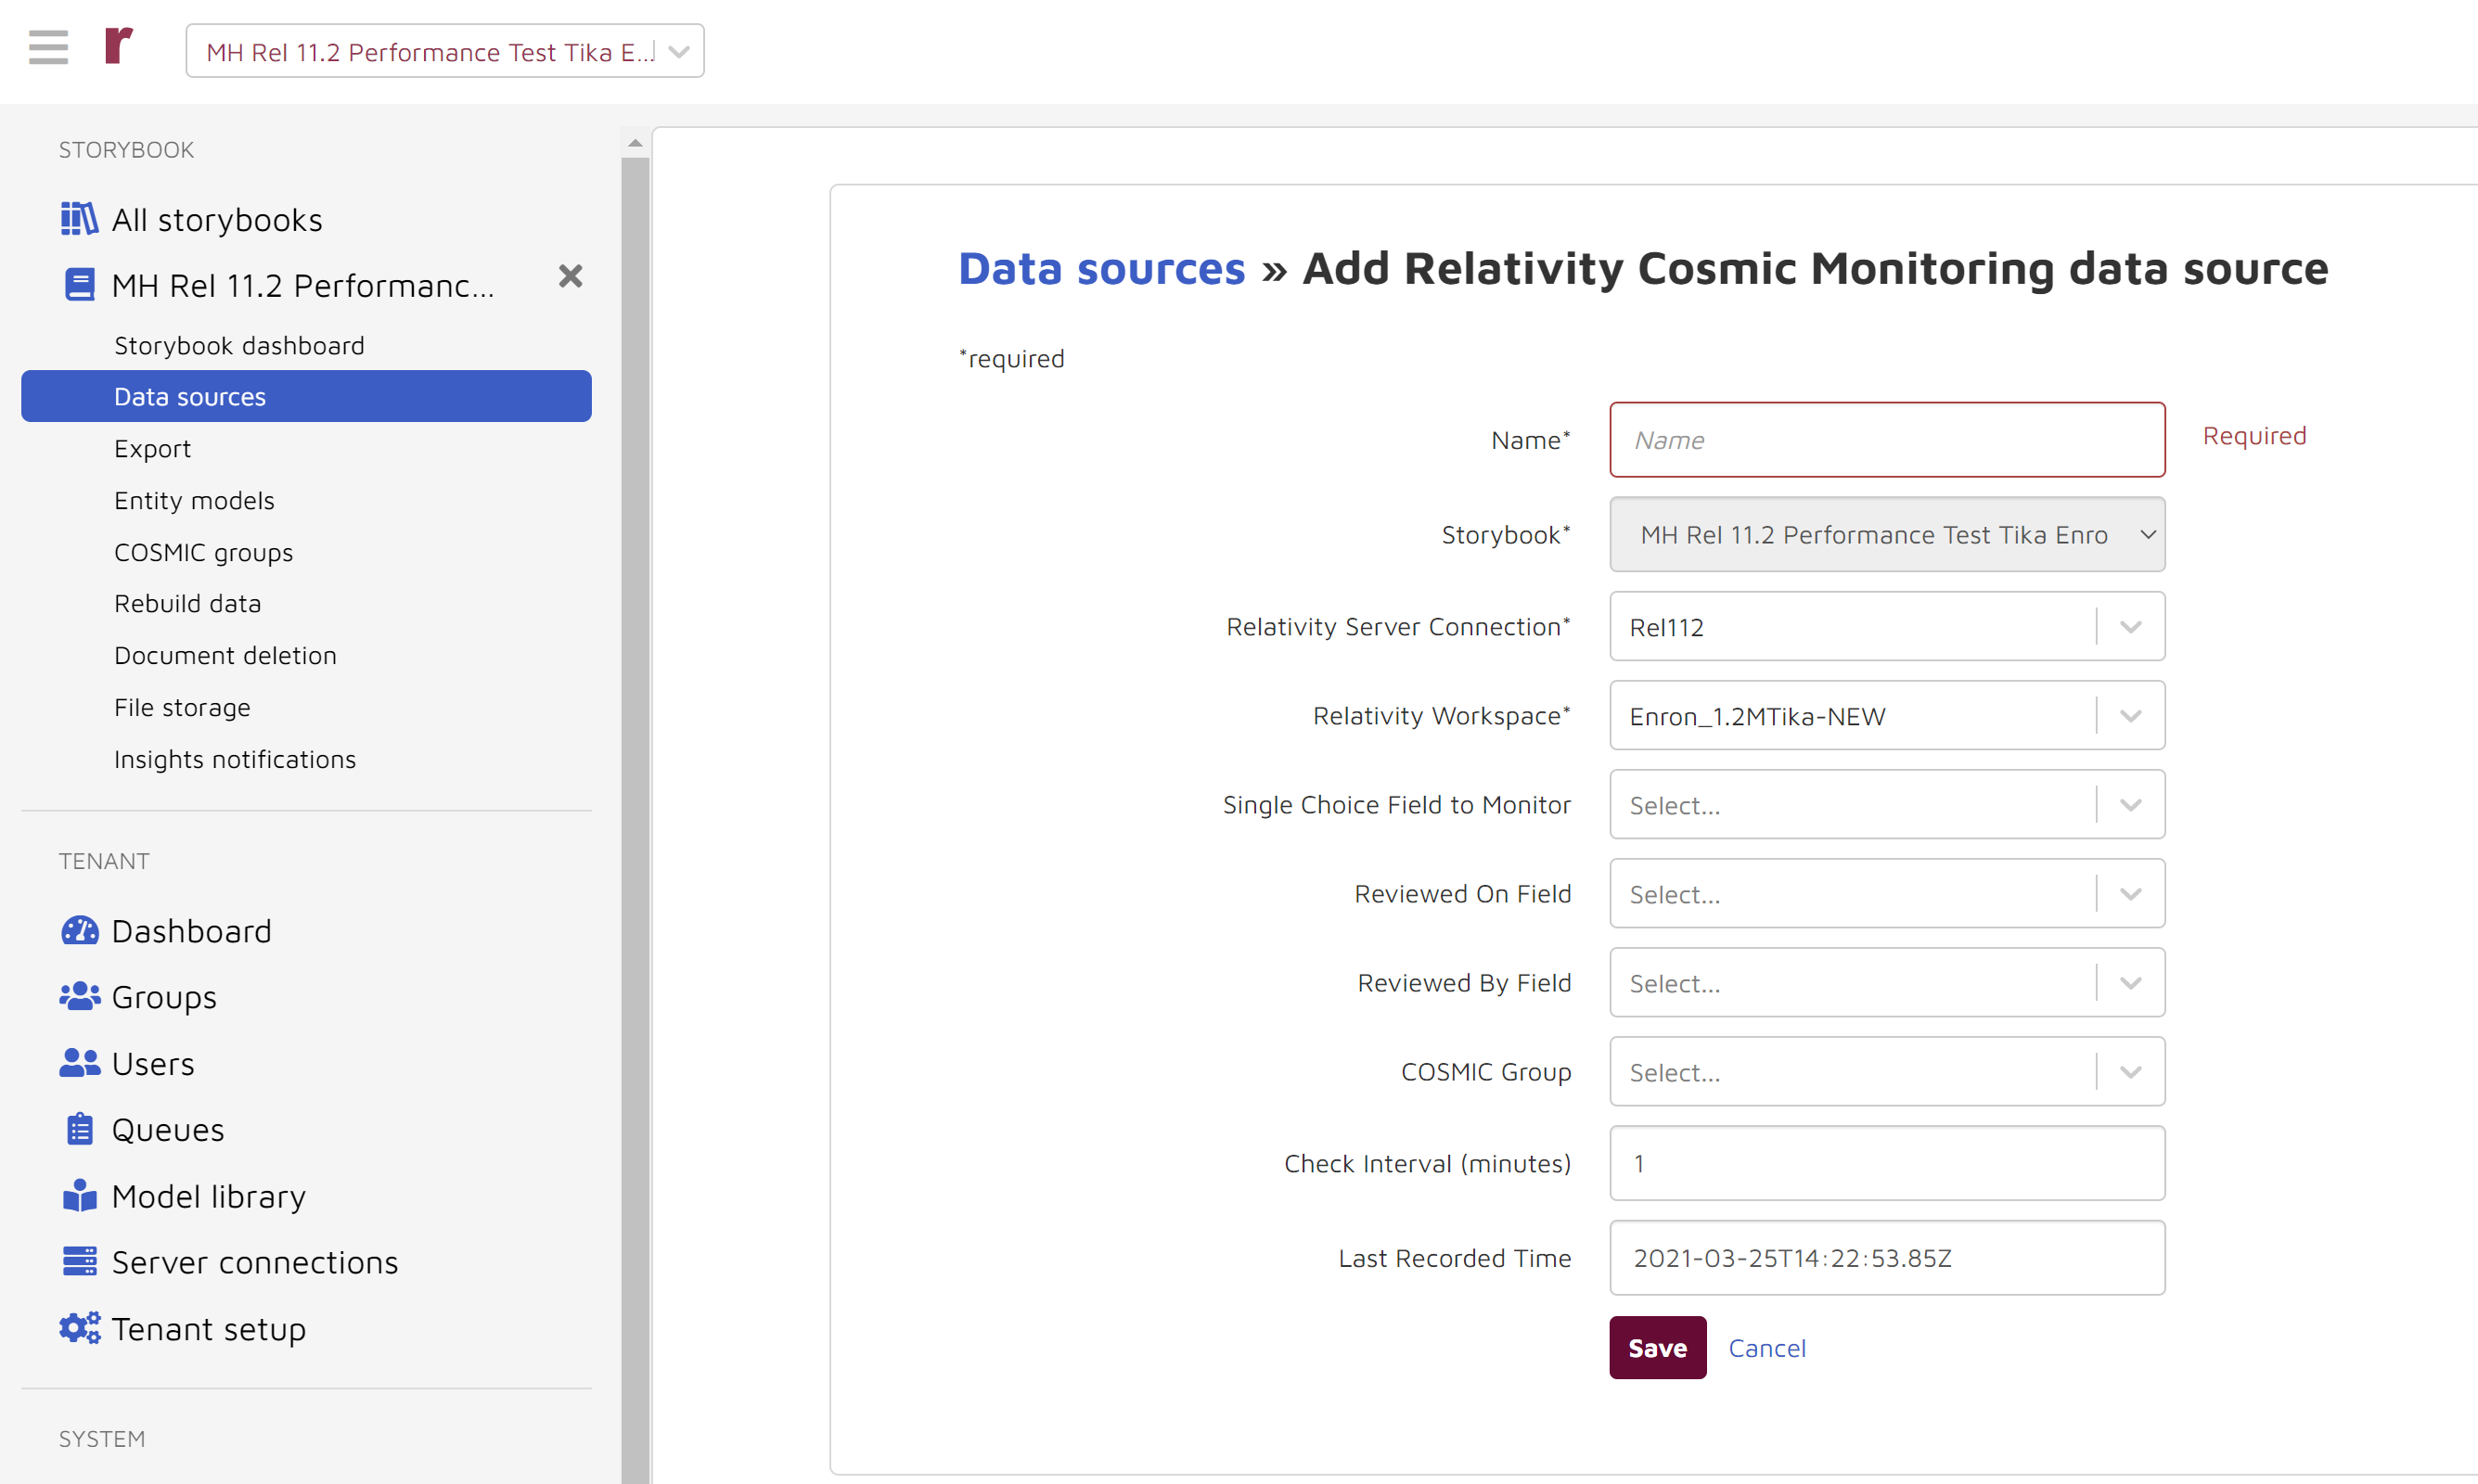
The following information is required:
Name: You name the Relativity® COSMIC Monitoring data source. This is a free text space.
Storybook: This is name of the storybook you are configuring and is auto-populated.
Relativity® Server Connection: Choose the correct Relativity® server from the dropdown list.
Single Choice Field to Monitor: The contents of this dropdown list are based on the above choice of Relativity® Server Connection.
Reviewed On Field: Choose the equivalent Relativity® field from the dropdown list.
Reviewed By Field: Choose the equivalent Relativity® field from the dropdown list.
COSMIC Group: Choose the storybook COSMIC Group that will utilize the monitored Relativity® coding.
Check Interval: This is a free text space. Enter the desired sweep interval in minutes.
Last Recorded Time: This is auto-populated.
The resulting page will look something like this:
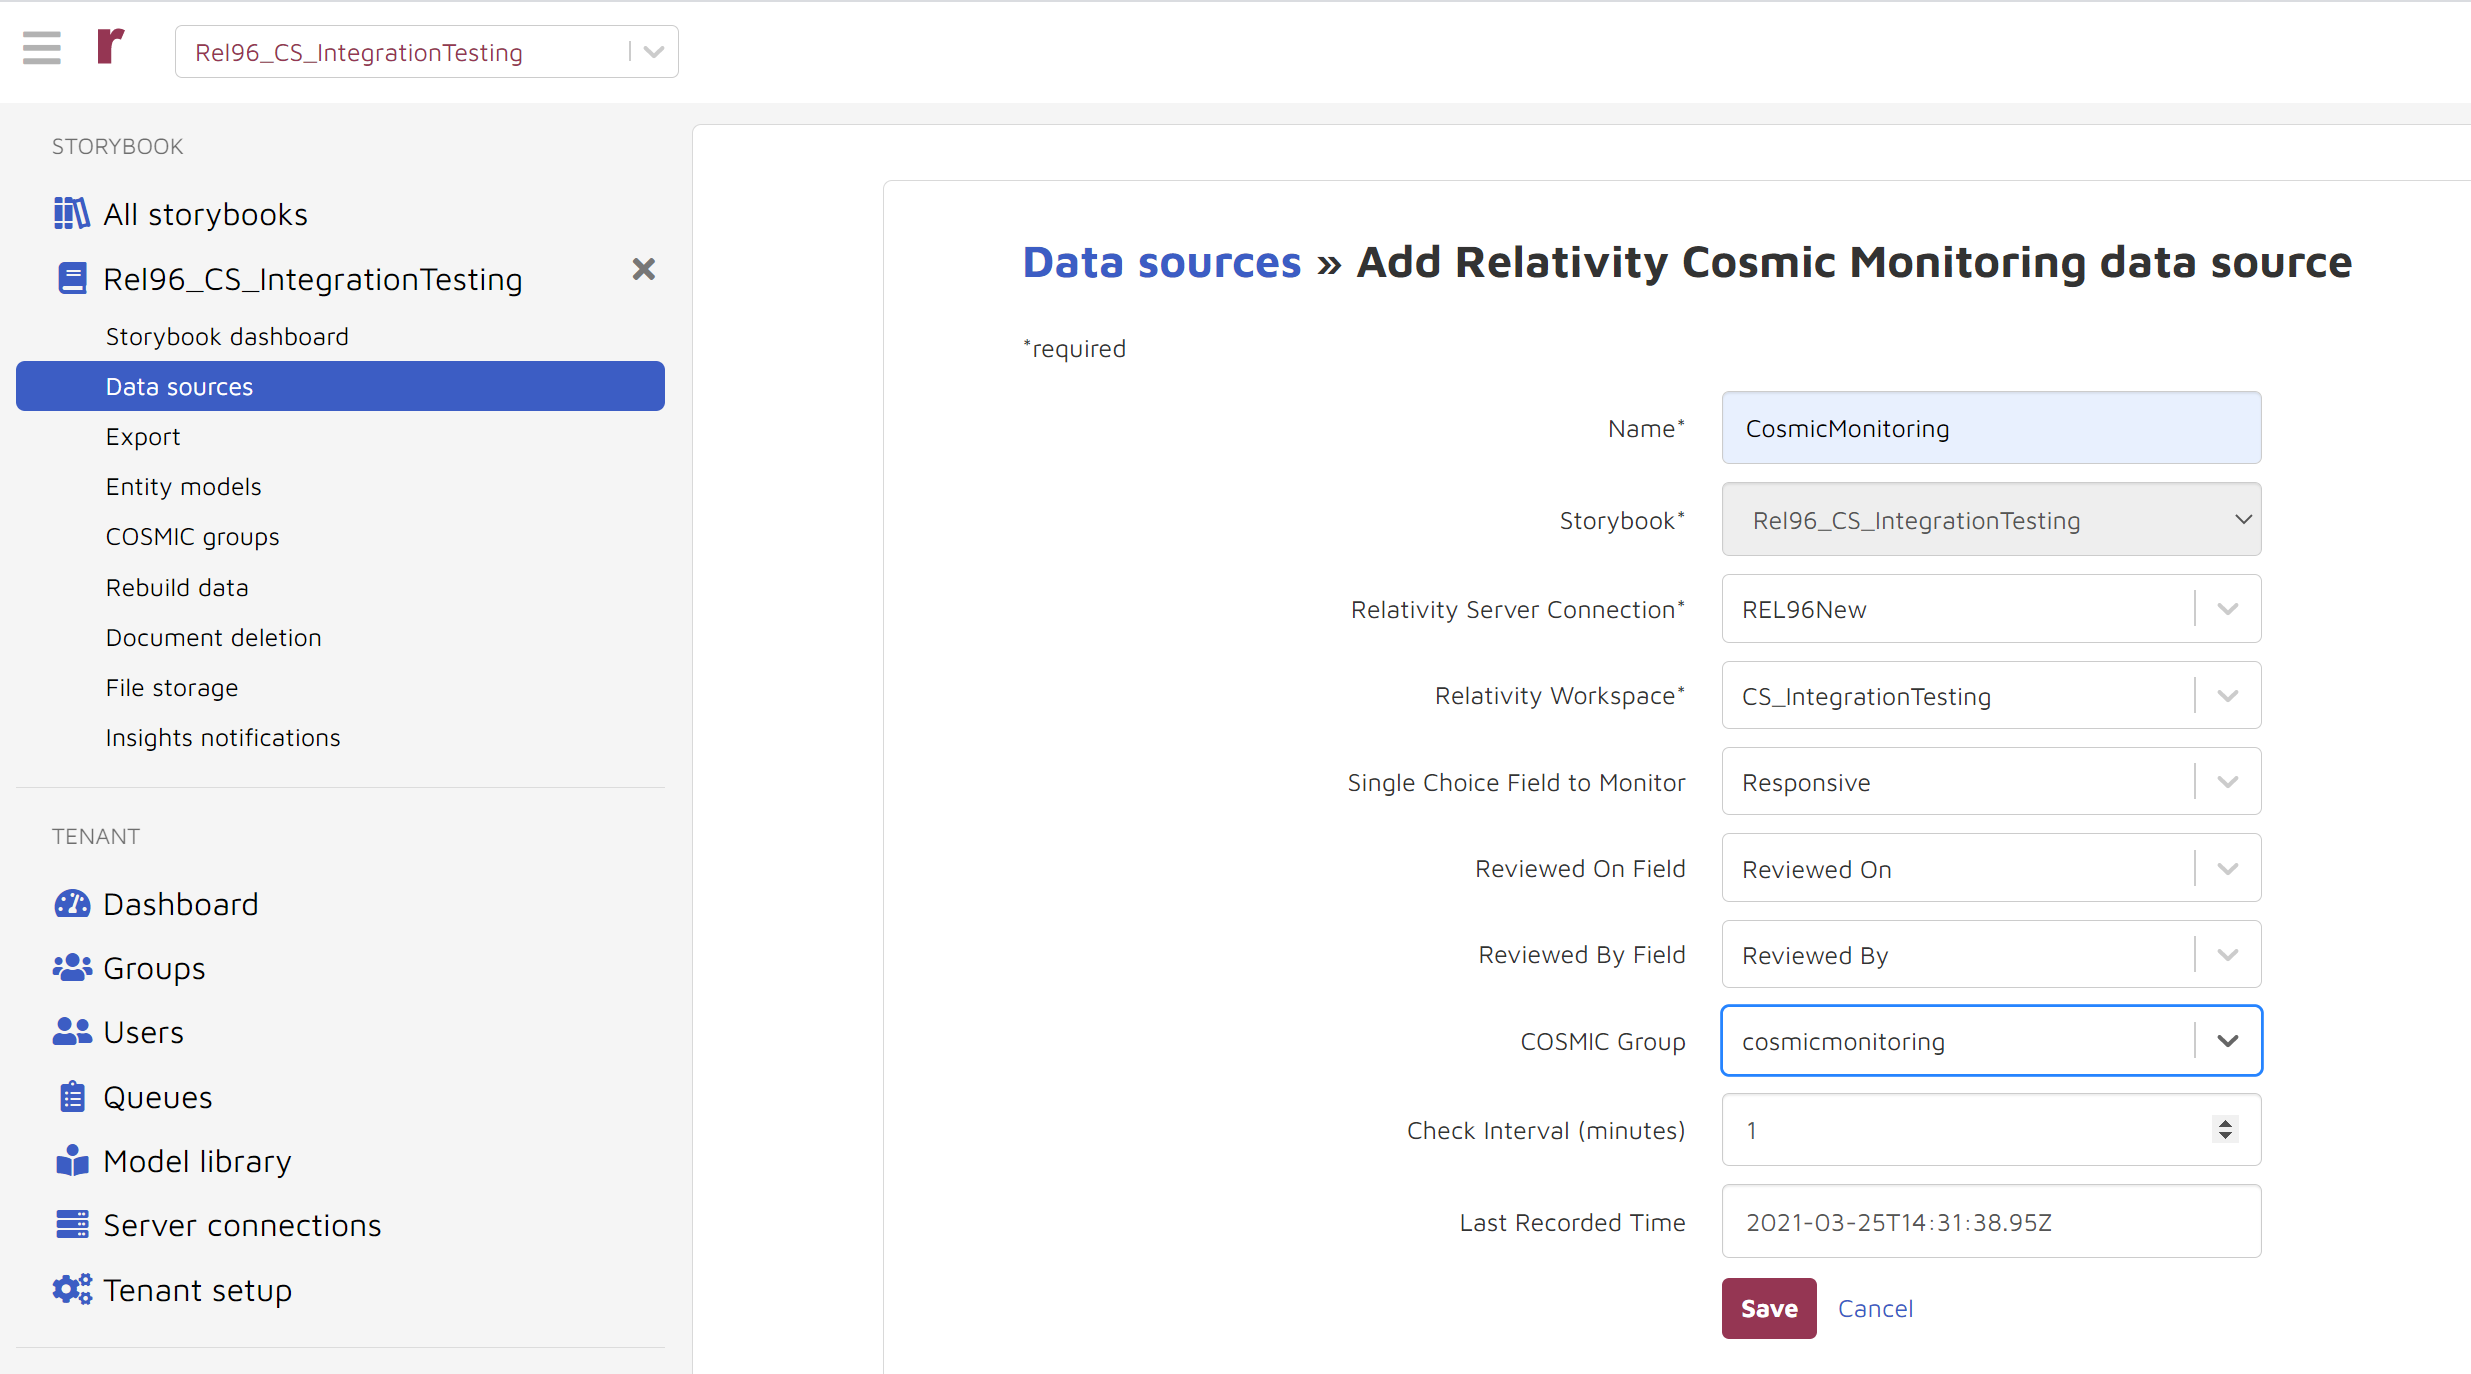
Choose Save and verify that coding in Relativity® is being replicated in Reveal AI.
Install and configure NexLP Relativity® applications
If you want to embed Reveal AI inside Relativity® to provide a seamless user experience, the following steps can be used.
Import NexLP Relativity® Application to the target Relativity® workspace.
The rap files are located in the “06.RelativityIntegration” folder.
Use the latest RAP package. For Reveal AI v2.90.12 it is Nexlp_RelativityIntegration_2.80.0.9.rap.
The Application will add a “NexLP” menu to the workspace.
Go to “NexLP” menu,
click Setup, and then
click New NexLPSetup to create a new NexLPSetup object.
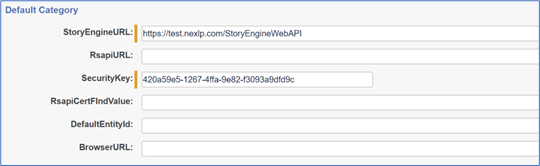
In the NexLPSetup object layout, enter the following parameters; the following table list fields and their purposes:
Name
Details
Example
StoryEngineURL
The URL to access the Reveal AI Web API URL, set during installation, is typically the URL used to login plus "API"
https://nexlp.company.com/StoryEngineWebAPI
RsapiURL
Optional, for setting RSAPI on a different web server
http://web02/Relativity.Services, or enter [RELATIVITY] if you want to use the default RsapiURL
SecurityKey
Security key for the corresponding Story Book
8a5c6a87-ad69-4f27-ab50-37ab393b3e16
RsapiCertFindValue
Optional, the certificate find value used for RSAPI
WEB02
DefaultEntityId
Optional, the starting entity id. If not set, Reveal AI will always open “Top 5 Custodian” search when user logs in
12345
Note
Notice only StoryEngineURL and Security Key are mandatory for setup.
Click Save to save the NexLPSetup Object created above.
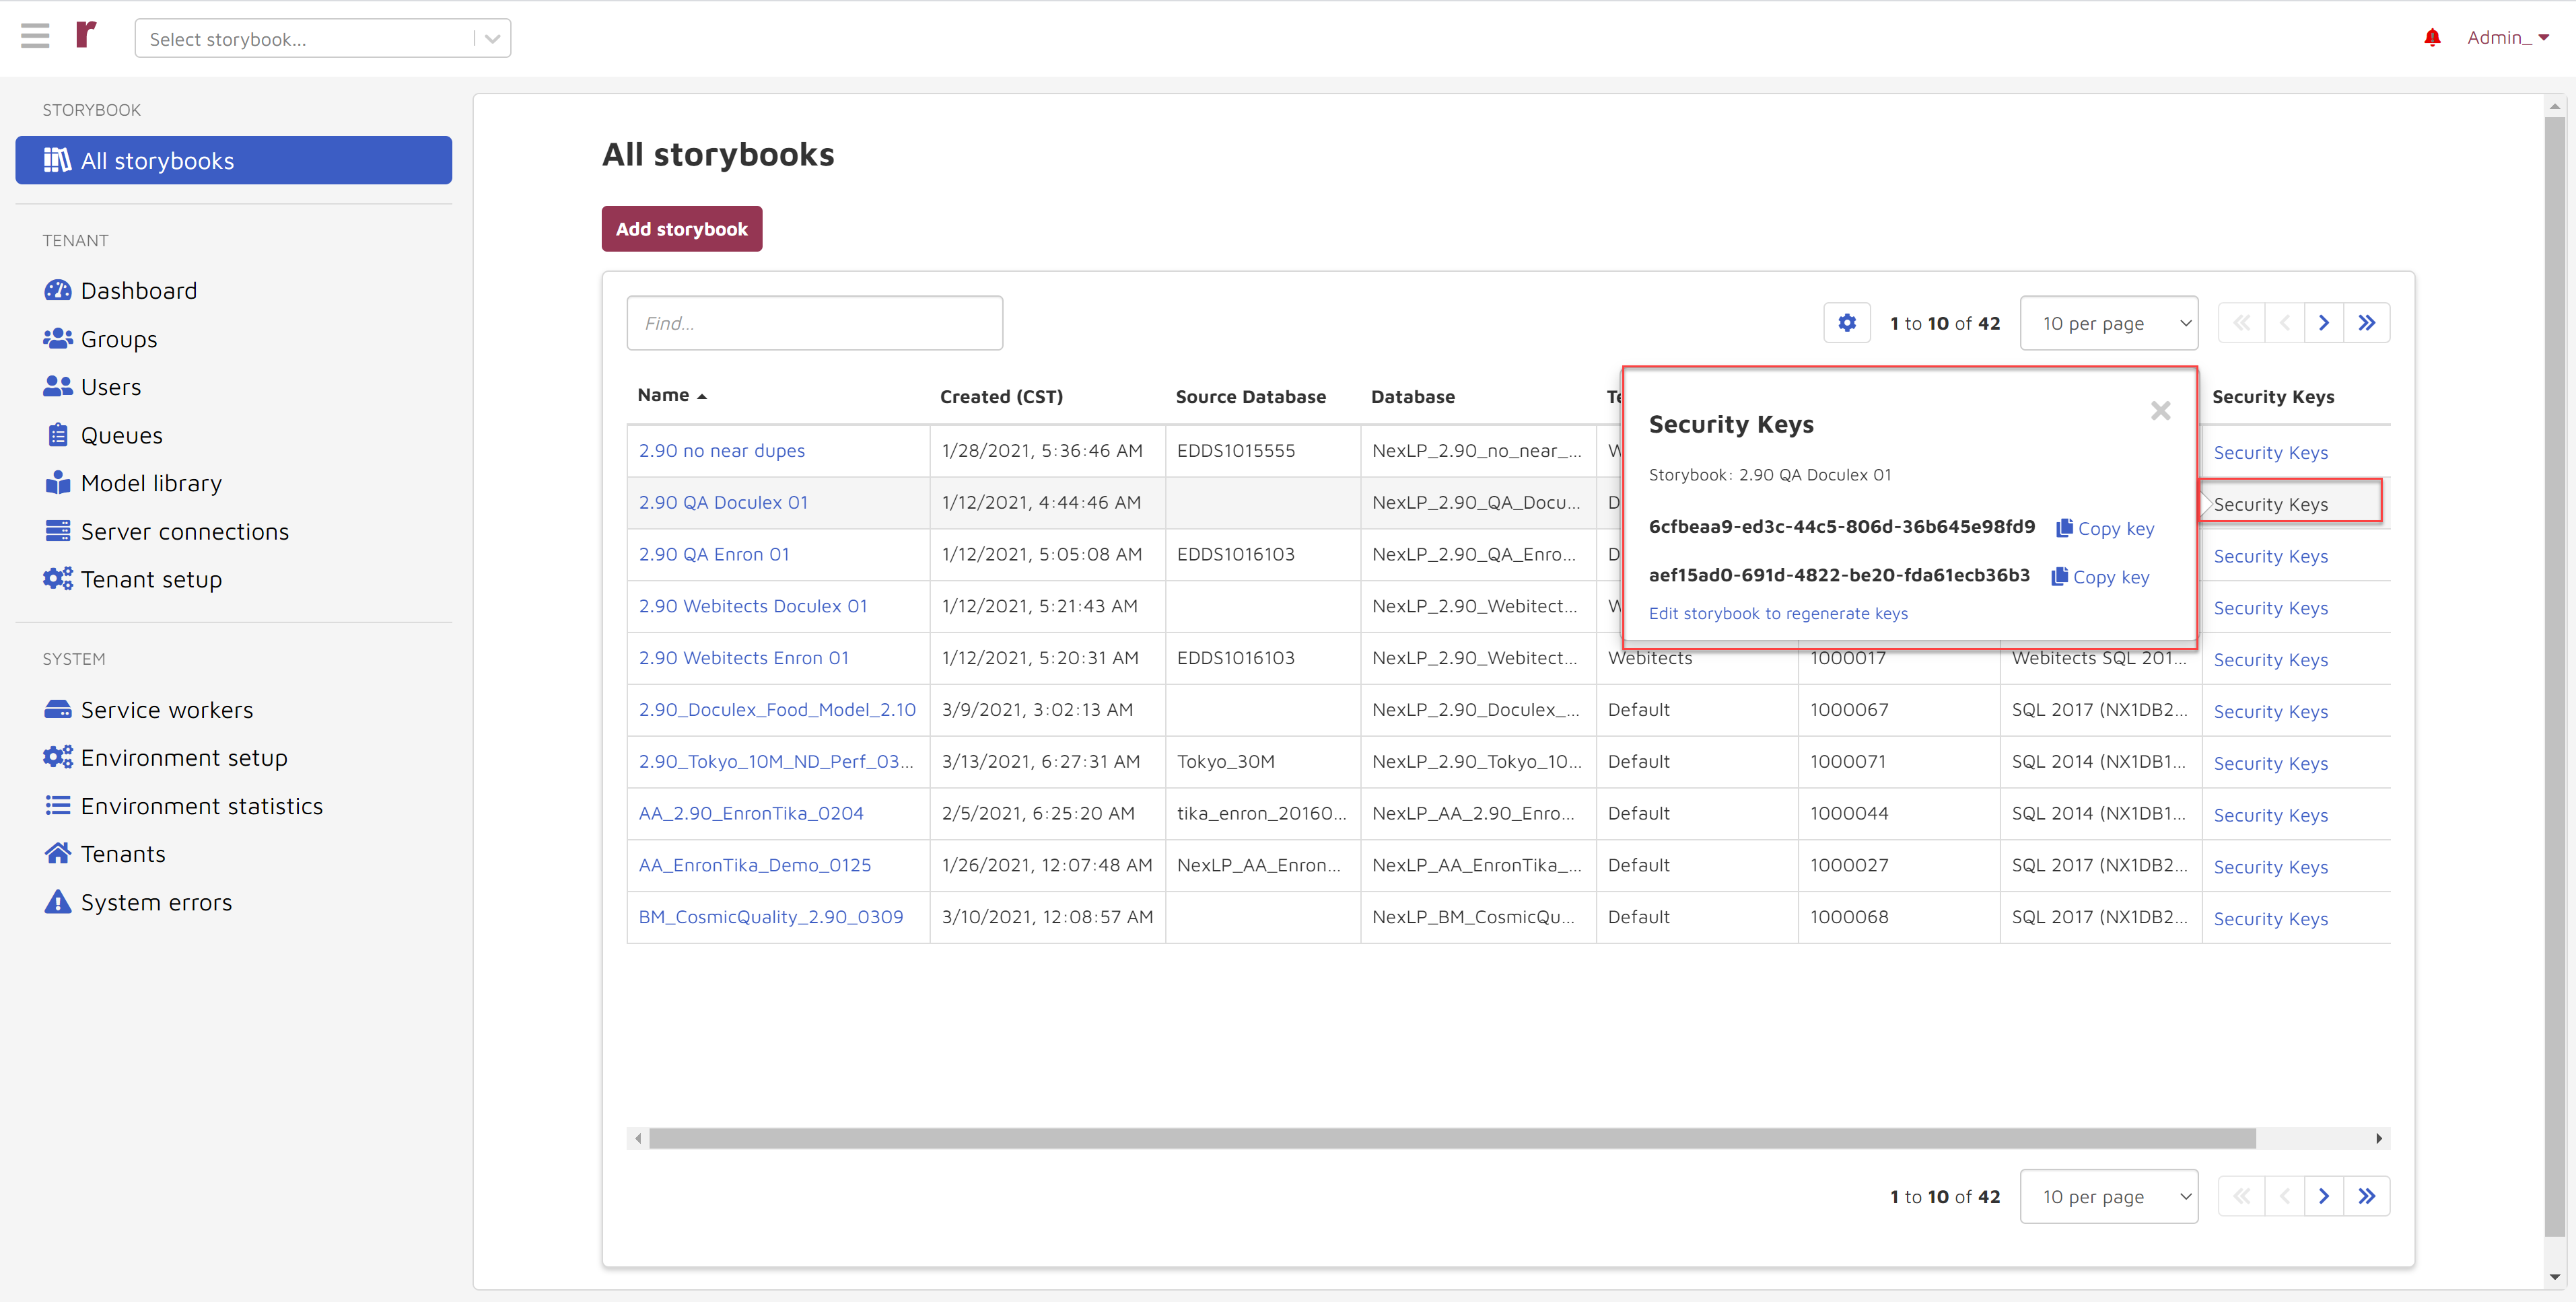
Note that the Security Key is obtained from the All storybooks page in Reveal AI Administration:
Smoke Test
To test the connection between Relativity® and Reveal AI, login to the Relativity® Workspace and go to “NexLP/Reveal AI Home”: this will automatically log user into Reveal AI’s workbook.
Set up Group Permissions for Reveal AI
The permissions of Reveal AI are integrated within Relativity®. Following the steps below to give the target group permission to access Reveal AI:
For Relativity® 8, open Workspace Security management page, select the Relativity® group you want to set up. Scroll down to find “NexLP Setup” and “NexLP Tag” objects:
Allow the group to view the “NexLP Setup” object.
Allow the group to view/add/edit/delete “NexLP Tag” object.

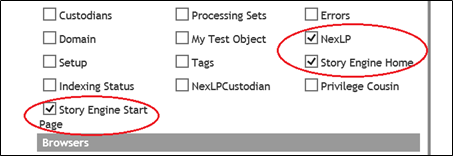
Under “Tab Visibility”, give the group permission to access “NexLP”, “Story Engine Home” and “Story Engine Start Page”:
For Relativity® 9, open Workspace Security management page, go to “Object Security” and select the Relativity® group you want to set up. Scroll down to find “NexLP Setup” and “NexLP Tag” objects:
Allow the group to view the “NexLP Setup” object.
Allow the group to view/add/edit/delete “NexLP Tag” object.

Go to “Tab Visibility”, select the Relativity® group you want to give access to, and give the group permission to access “NexLP”, “Story Engine Home” and “Story Engine Start Page”:

Note
The “Story Engine Start Page” is a customized link and can be added manually after installing ADS package.
Uninstall NexLP Relativity® Application
To uninstall NexLP Relativity® Application, delete the “NexLP” application from the Relativity® Application management interface.
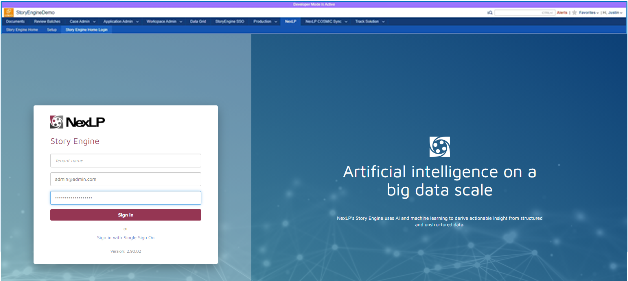
Alternative to Story Engine Home Tab
As an alternative to the Story Engine Home tab, you may create an external tab in Relativity® called, for instance, “NexLP Home Login”.
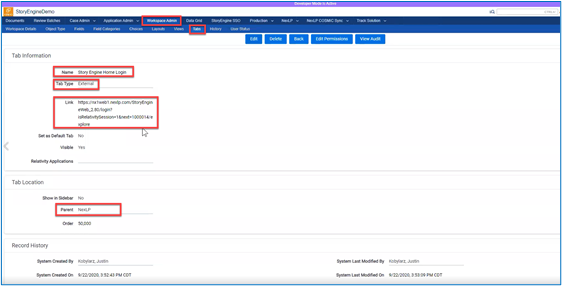
The following information is notable:
Name: (suggested name) NexLP Home Login
Tab Type: External
Link: The link is constructed according to this formula:
[NexLP login URL] ?isRelativitySession=1&next= [Storybook Id] /explore
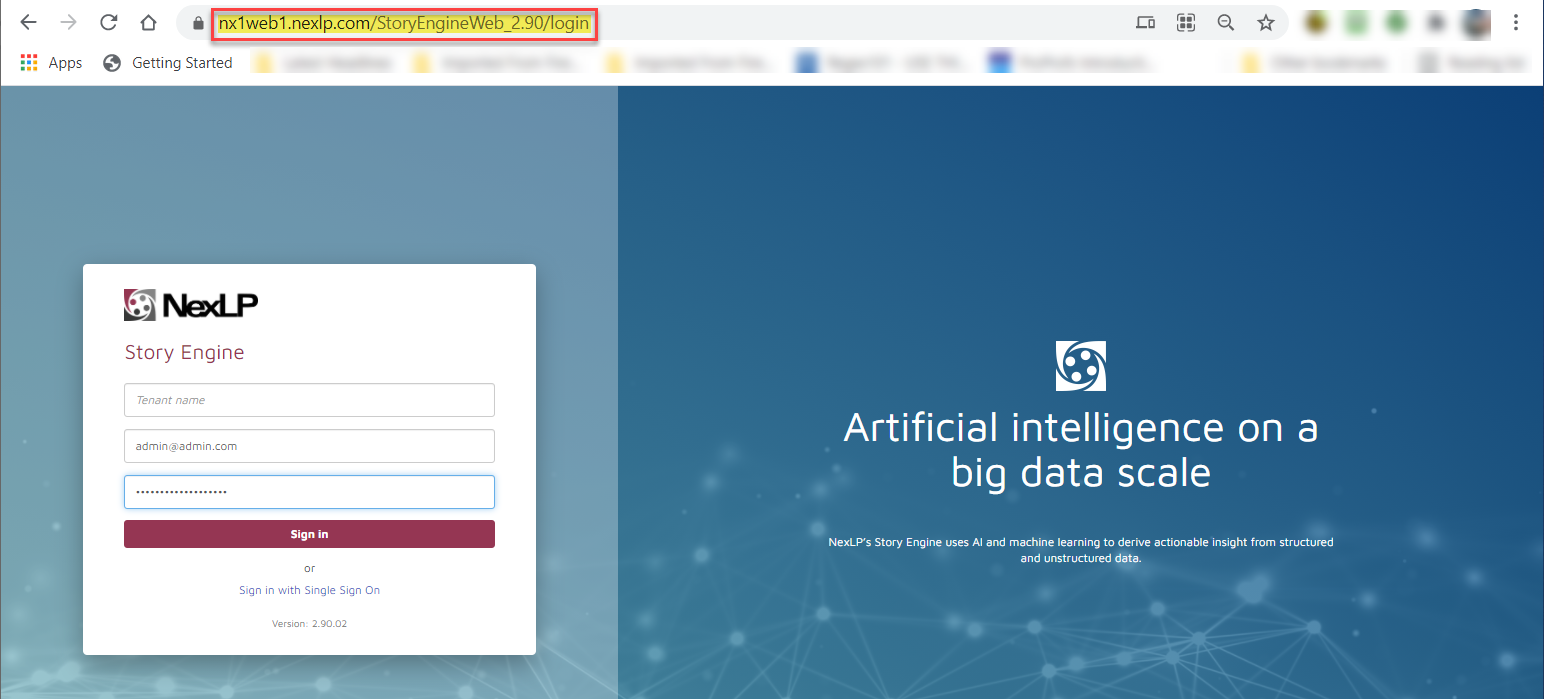
For [NexLP login URL] you copy and paste from the the URL on the Reveal AI login page:
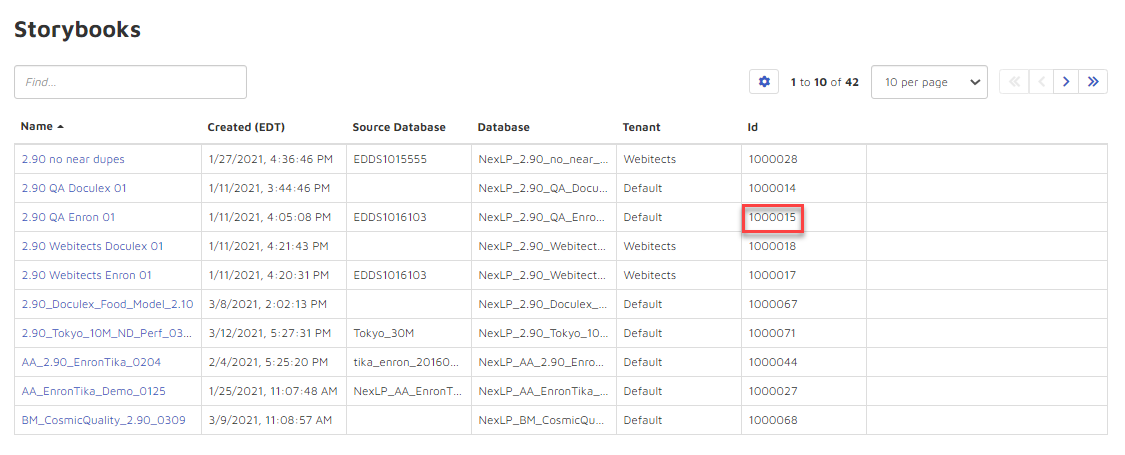
For [Storybook Id] you copy and paste from the ID column of the Storybooks list:
The resulting link might read something like this:
https://nx1web1.nexlp.com/StoryEngineWeb_2.80/login?isRelativitySession=1&next=1000026/explore
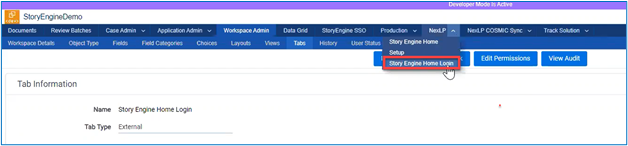
You may now choose the resulting tab.
This provides access to Reveal AI inside of Relativity® through the external link:
Note
This product may only be used by parties with valid licenses for Relativity®, a product of Relativity ODA LLC. Relativity ODA LLC does not test, evaluate, endorse or certify this product.