Install Reveal AI Web Server
Unzip StoryEngineWeb_2.90.xx.zip in the 06.WebServer folder from the Installation Packages to a local folder (C:\NexLP) on the server. Before you begin please make sure you have installed the recommended .Net Framework + ASP.Net version on your Web Server. The recommended version is .Net Framework 4.8. See the Appendix (Troubleshooting) section of this Installation Guide for details on installing .NET Framework ASP.NET.
Important
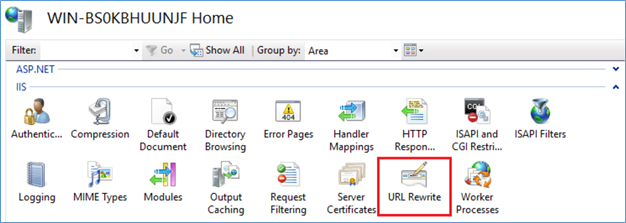
For the 2.0x Web Versions you will need to make sure that on each web server in IIS you have URL Rewrite installed.
Important
If you plan on processing data from a database that is not located on the Reveal AI SQL Server you will need to ensure that the default SQL port (1433) is open on both the Reveal AI Web Server and the server to which you are trying to connect. You can confirm this is the case by creating a UDL file from the Reveal AI Web server and using the credentials of the user running the IIS App Pool for Reveal AI to access the other server. Please see Appendix 16.6 on how to set up a .udl file.
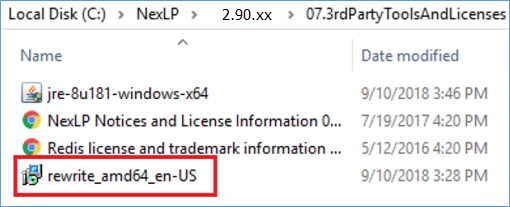
If you do not have this installed you can find a copy of the rewrite_amd64_en-US.msi in the 07.3rdPartyToolsAndLicenses folder in the Reveal AI package folder, or you can use the following URL: https://www.iis.net/downloads/microsoft/url-rewrite.
Open IIS, right click “Application Pools” and add a new application pool with the name nexlp:
Under Advanced Settings…” set .NET CLR Version to v4.0.
Change the identity to the dedicated NexLP Service Account (“Domain\NexLPServiceAccount”) that has the proper permissions:
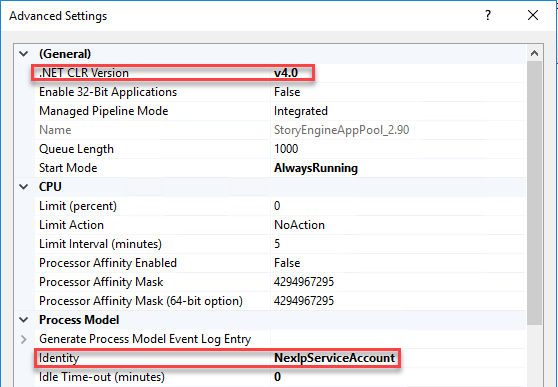
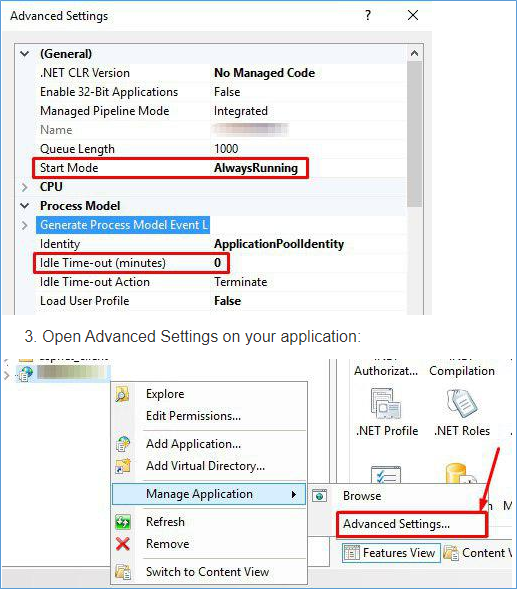
Change the “Start Mode” to Always Running.
Change “Idle Time-out (minutes)” to 0.
Reveal AI will need a total of three (3) IIS Applications to operate. If you are using multiple web servers, you will need to install all three components on each server.
Expand the Sites dropdown.
Right click Default Web Site to create a new Application.
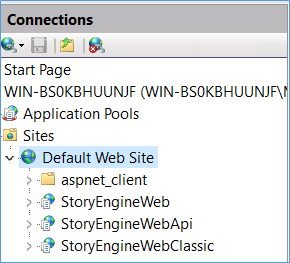
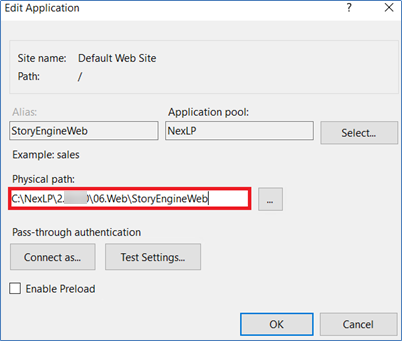
Name this “StoryEngineWeb”.
Select Nexlp from the application pool.
Point to the “StoryEngineWeb” folder for Physical Path:
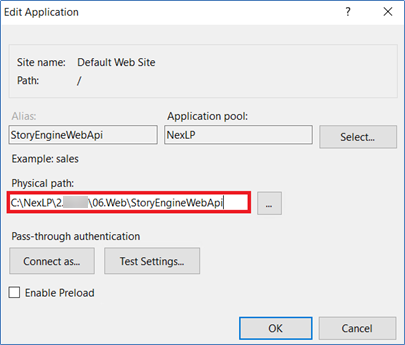
Name this “StoryEngineWebApi”.
Select Nexlp from the application pool.
Point to the “StoryEngineWebApi” folder for Physical Path:
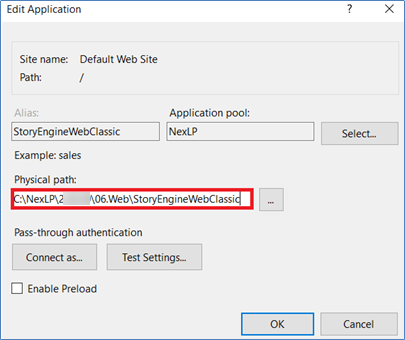
Name this “StoryEngineWebClassic”.
Select Nexlp from the application pool.
Point to the “StoryEngineWebClassic” folder for Physical Path:
Configuration update to the StoryEngineWeb file:
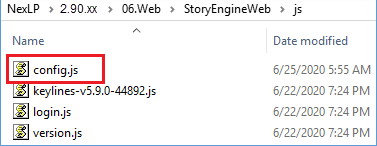
Within the StoryEngineWeb folder open the js folder.
Edit the config.js file (this will be easier to edit using Notepad++).
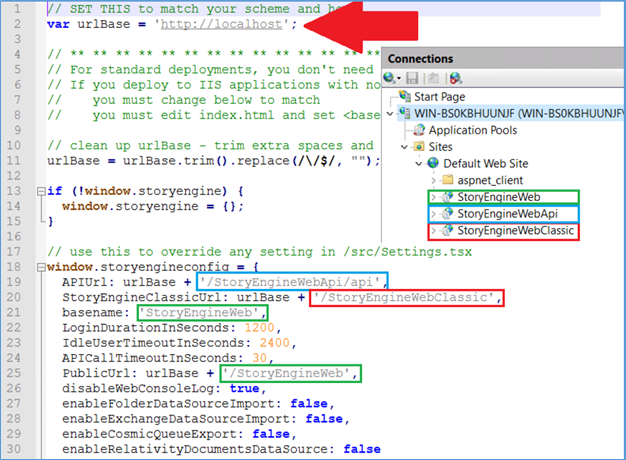
In the screenshot below there are up to 5 items that will need to be configured based on your IIS Application names/host. If you name your Reveal AI IIS Applications using the default names you will only need to configure the Url Base for this step:
urlBase (Red Arrow) – This will need to match your scheme and how you plan on hitting Reveal AI from the URL.
Important
If you are using a load balancer enter the URL of the load balancer on ALL of the web servers.
APIUrl (Blue) – Replace StoryEngineWebApi with your IIS application that is pointed to the StoryEngineWebApi folder.
StoryEngineClassicUrl (Red) – Replace StoryEngineWebClassic with your IIS application that is pointed to the StoryEngineWebClassic folder.
basename + PublicURL (Green) – Replace StoryEngineWeb with your IIS application that is pointed to the StoryEngineWeb folder.
Within the StoryEngineWeb folder Open the index.html file.
Edit the base href tag to change StoryEngineWeb to the same name used for the IIS application. If no change has been made to the StoryEngineWeb application name no configuration will be needed here.

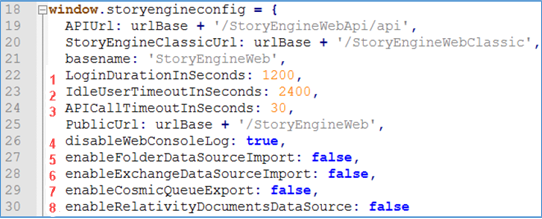
Changing the default timeout value for the NexLP Application – the below fields will override the default Reveal AI session timeout values found in the config.js file.
LoginDurationInSeconds variable to increase the time at which the front-end Reveal AI login token duration is set to expire. Clicking activity throughout the site will refresh the token.
IdleUserTimeoutInSeconds to increase the idle systems timeout value to 1200 seconds. If the user does not move the mouse pointer or make any searches for the duration value the user will be logged out.
APICallTimeoutInSeconds to increase the duration of front-end searching queries. By default this gives large front-end queries 30 seconds to run before timing out. Additional Configuration changes:
disableWebconsoleLog - (Set to “true” by default) – This setting will disable some console logging to assist debugging for particular scenarios and will not need to be changed from “true”.
EnableFolderDataSourceImport - (Set to “false” by default) -- When set to “true” this gives you the option to process data from a loose file source. The nexlp_Extraction service will also need to be installed.
EnableCosmicQueueExport - (Set to “false” by default) -- When set to “true” enables the ability to sync COSMIC tags from the AI queue when setting up the COSMIC Sync application within Relativity®.
EnableRelativityDocumentsDataSource - (Set to “true” by default) -- This option will give users the ability to extract documents from Relativity® into a Reveal AI database. The Relativity_Extraction service will need to be installed to utilize this feature.
Configuration update to the StoryEngineWebApi folder:
Once the Reveal AI Web Application is created in IIS,
go to the physical StoryEngineApi folder,
open Web.config file, and
update the connection string:
Tip
<connectionStrings>
<add name="NexLPAdmin" connectionString="Server=localhost;Database=NexLPAdmin;Integrated Security=SSPI;Connection Timeout=120" providerName="System.Data.SqlClient" />
</connectionStrings>
After the connection string please make sure to update the following value in the <StoryEngineBaseUrl/> tag to same as your urlBase that you updated in Step 3.1.
Tip
<add key="StoryEngineBaseUrl" value="https://localhost/StoryEngineWeb" />
There is a timeout value that can also be configured <add key="DefaultSqlTimeout" value="120" />. This refers to the time (in seconds) given a SQL query to run against the admin or storybook databases. We have added this value in now by default and set it to 120.

Configuration update to the StoryEngineWebClassic folder:
Once the Reveal AI Web Application is created in IIS,
go to the physical StoryEngineClassic folder,
open Web.config file, and
update the connecting string:
<connectionStrings>
<add name="NexLPAdmin" connectionString="Server=localhost;Database=NexLPAdmin;Integrated Security=SSPI;Connection Timeout=120" providerName="System.Data.SqlClient" />
</connectionStrings>
Reset Admin Password and Initial Login
We highly recommend you change the default admin password during installation. This only needs to be done once.
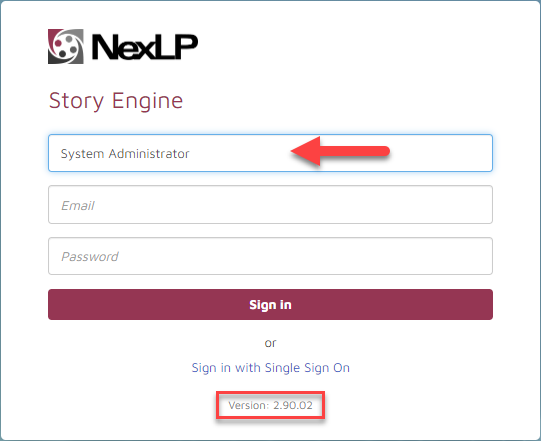
Open browser on the Web Server and browse to http://localhost/StoryEngineWeb. Use the admin username/login provided in “00.NewInstall\NexlpAdmin_default_user.txt” from the unzipped installation package to login to the front-end as an admin.
After entering the default Username + Password you will need to enter “System Administrator” for the Tenant Name. Any non-admin users that have not been assigned a Tenant group will use “Default”.
 |
For additional assistance on setting up a non-system admin tenant please refer to Section 8 (Optional) Tenant Domain Setup for Reveal AI Standalone.
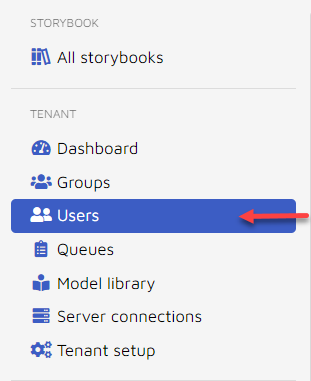
Click Admin >> System Administration to open admin mode.
On the left-hand navigation bar under Tenant Settings select Users.
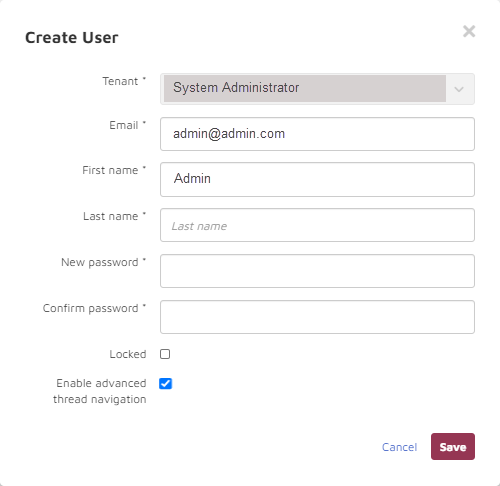
Select the pencil icon
 under “Actions” for the Admin account.
Configure the username and password for your front-end Admin account.
Relativity® Web Integration:
By default, v2.90 of Reveal AI comes installed with the ability to connect to the dll files of the supported Relativity® 10 versions listed below. You DO NOT need to manually drop any dll files.
Supported Relativity® Versions:
9.5 – Please contact Reveal AI Support for additional information on connecting to this version
9.6 – Relativity® Version 9.6
9.7 – Relativity® Version 9.7
10.1 – Relativity® Version 10.1
10.2 – Relativity® Version 10.2
10.3 – Relativity® Version 10.3
Customize front-end using Web.config (optional)
System admin can use Web.config to customize front-end. The table below listed these options:
ID | Setting | Description | Example |
|---|---|---|---|
1 | <CultureInfo> | Defines the culture info of the environment. This will need to match the default language of your SQL Server, for example:
You will need to update the StoryEngineWebClassic and StoryEngineWebApiweb.config files IMPORTANT: The language of date format on the SQL Server MUST match what is in both web.config files:
You can confirm this by running the following command in SQL Server Management Studio: DBCC USEROPTIONS | <add key="CultureInfo" value="en-UK" /> |
2 | Client Image / Disclaimer text | Image to be displayed on the login page. The file must be placed in: 2.90.xx\06.Web\StoryEngineWeb\images For logo-full, maintain this filename for your new custom image | Edit the following file: C:\NexLP\2.90.xx\06.Web\StoryEngineWeb\js\login.js IMPORTANT: after saving changes to the above file please restart IIS/NexLP Application Pool and clear the browsing cache (CTRL + F5) to the server |
3 | <FullTextSearchContentTypeDefaults> | Decides which part of email keyword search runs again, possible values include:
You will need to update the web.config file found in the StoryEngineWebApi folder | <add key="FullTextSearchContentTypeDefaults" value="Header,Body"/> |
Rebranding (Section 2 above) Examples: Below you will see a screenshot example of what can be modified with updated images / text. In the even of an upgrade you will need to reconfigure these changes per your new version of Reveal AI.
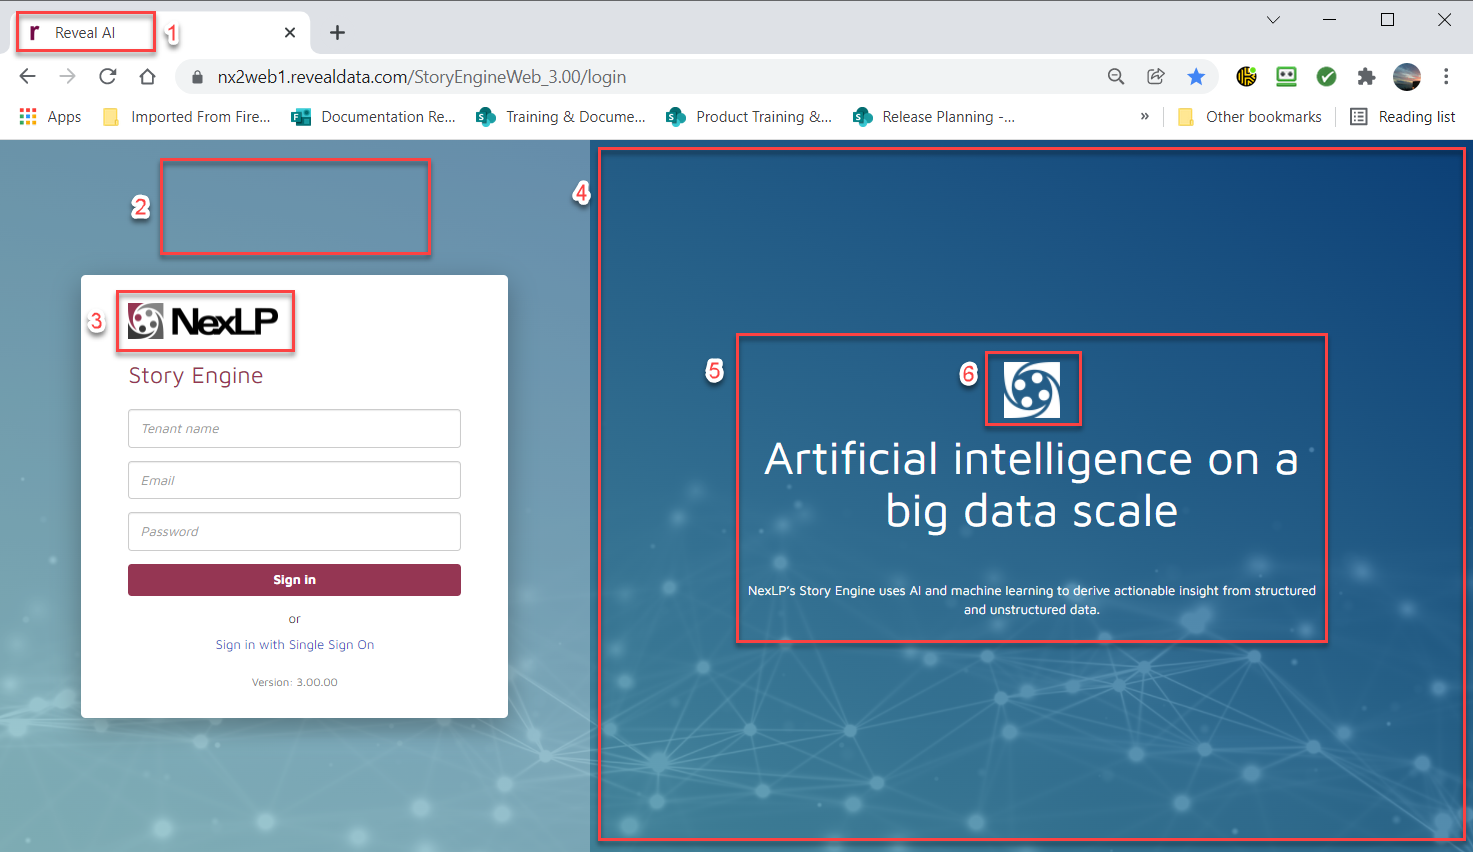
Logo in Browser Tab – Drop updated image file called favicon.ico found here: 2.90.xx\06.Web\StoryEngineWeb\images.
Inner NexLP Logo - Browse to the file C:\NexLP\2.90.xx\0Web\StoryEngineWeb\js\login.js and uncomment the 2nd and 3rd lines of the file. Update the logo.png file to your logo in the images folder.
Additional Information Dialog Box - Browse to the file C:\NexLP\2.90.xx\06.Web\StoryEngineWeb\js\login.js and uncomment the /*secondaryContent tag. This will then display a dialog box where #5 is in the screenshot above. Note you will be able to modify any of the text from the original image that begins with “Artificial Intelligence”. Your new dialog box can contain whatever information you would like.
Right Side Background image - Drop updated image file called background.jpg found here 2.90.xx\06.Web\StoryEngineWeb\images.
Login Box Logo - Drop updated image file called logo-full.png found here 2.90.xx\06.Web\StoryEngineWeb\images.
Add Additional Logo – Browse to the file C:\NexLP\2.90.xx\06.Web\StoryEngineWeb\js\login.js and uncomment the //clientLogoUrl and //clientLogoPosition lines of the file. Update the logo.png file to your logo in the images folder.